<!DOCTYPE html>
<html>
<head>
  <title>Chat Application</title>
  <style>
    .chat-container {
      width: 400px;
      margin: 0 auto;
      padding: 20px;
      border: 1px solid #ccc;
    }
    .chat-messages {
      height: 300px;
      overflow-y: scroll;
      border: 1px solid #ccc;
      padding: 10px;
      margin-bottom: 10px;
    }
    .chat-input {
      width: 100%;
    }
  </style>
</head>
<body>
  <div class="chat-container">
    <div class="chat-messages" id="chatMessages"></div>
    <input type="text" class="chat-input" id="chatInput" placeholder="Type your message">
    <button onclick="sendMessage()">Send</button>
  </div>

  <script>
    function sendMessage() {
      var messageInput = document.getElementById('chatInput');
      var message = messageInput.value;

      if (message.trim() !== '') {
        var messageElement = document.createElement('div');
        messageElement.textContent = message;
        document.getElementById('chatMessages').appendChild(messageElement);
        messageInput.value = '';
      }
    }
  </script>
</body>
</html>
Simple calculator in JavaScript
<!DOCTYPE html>
<html>
<head>
<title>Calculator</title>
<style>
.calculator {
width: 200px;
border: 1px solid #ccc;
padding: 10px;
}
.calculator input {
width: 100%;
margin-bottom: 5px;
}
.calculator .btn {
width: 48%;
margin: 1%;
}
</style>
</head>
<body>
<div class=”calculator”>
<input type=”text” id=”result” readonly>
<button class=”btn” onclick=”appendToResult(‘1’)”>1</button>
<button class=”btn” onclick=”appendToResult(‘2’)”>2</button>
<button class=”btn” onclick=”appendToResult(‘3’)”>3</button>
<button class=”btn” onclick=”appendToResult(‘+’)”>+</button>
<button class=”btn” onclick=”appendToResult(‘4’)”>4</button>
<button class=”btn” onclick=”appendToResult(‘5’)”>5</button>
<button class=”btn” onclick=”appendToResult(‘6’)”>6</button>
<button class=”btn” onclick=”appendToResult(‘-‘)”>-</button>
<button class=”btn” onclick=”appendToResult(‘7’)”>7</button>
<button class=”btn” onclick=”appendToResult(‘8’)”>8</button>
<button class=”btn” onclick=”appendToResult(‘9’)”>9</button>
<button class=”btn” onclick=”appendToResult(‘*’)”>*</button>
<button class=”btn” onclick=”appendToResult(‘0’)”>0</button>
<button class=”btn” onclick=”appendToResult(‘.’)”>.</button>
<button class=”btn” onclick=”calculate()”>=</button>
<button class=”btn” onclick=”appendToResult(‘/’)”>/</button>
<button class=”btn” onclick=”clearResult()”>C</button>
</div>
<script>
function appendToResult(value) {
var resultInput = document.getElementById(‘result’);
resultInput.value += value;
}
function calculate() {
var resultInput = document.getElementById(‘result’);
var result = eval(resultInput.value);
resultInput.value = result;
}
function clearResult() {
var resultInput = document.getElementById(‘result’);
resultInput.value = ”;
}
</script>
</body>
</html>
What is ADO.NET?
ADO stands for Microsoft ActiveX Data Objects. ADO.NET is one of Microsoft’s Data Access Technologies using which we can communicate with different data sources. It is a part of the .NET Framework which is used to establish a connection between the .NET Application (Console, WCF, WPF, Windows, MVC, Web Form, etc.) and different data sources.
What types of Applications use ADO.NET?
ADO.NET can be used to develop any kind of .NET application. The following are some of the .NET applications where you can use ADO.NET Data Access Technology to interact with a data source.
- ASP.NET Web Form Applications
- Windows Applications
- ASP.NET MVC Application
- Console Applications
- ASP.NET Web API Applications
- ASP.NET Core Applications
Components of ADO.NET
Components are designed for data manipulation and faster data access.
Connection, Command, DataReader, DataAdapter, DataSet, and DataView are the components of ADO.NET that are used to perform database operations. ADO.NET has two main components that are used for accessing and manipulating data. They are as follows:
- Data Provider and
- DataSet.
What are .NET Data Providers?
The Database can not directly execute our C# code, it only understands SQL. So, if a .NET application needs to retrieve data or to do some insert, update, and delete operations from or to a database, then the .NET application needs to
- Connect to the Database
- Prepare an SQL Command
- Execute the Command
- Retrieve the results and display them in the application
And this is possible with the help of .NET Data Providers.
ADO.NET Code to Connect with SQL Server Database
The following image shows the sample ADO.NET code which is connecting to SQL Server Database and retrieves data. If you notice in the below image, here, we are using some predefined classes such as SQLConnection, SQLCommand, and SQLDataReader. These classes are called .NET Provider classes and these classes are responsible for interacting with the database and performing the CRUD operation. If you further notice all the classes are prefixed with the word SQL, it means these classes are going to interact with only the SQL Server database.

All these classes are present in System.Data.SqlClient namespace. We can also say that the .NET data provider for the SQL Server database is System.Data.SqlClient.
ADO.NET code to connect with Oracle Database
The following code is for connecting to Oracle Database and retrieving data. If you notice, here we are using OracleConnection, OracleCommand, and OracleDataReader classes. That means all these classes have prefixed the word Oracle and these classes are used to communicate with the Oracle database only.
OracleConnection connection = new OracleConnection(“data source=.; database=TestDB; integrated security=SSPI”);
OracleCommand command = new OracleCommand(“Select * from Customers”, connection);
connection.Open();
OracleDataReader myReader = command.ExecuteReader();
while (myReader.Read())
{
Console.WriteLine(“\t{0}\t{1}”, myReader.GetInt32(0), myReader.GetString(1));
}
connection.Close();
All the above classes are present in System.Data.OracleClient namespace. So, we can say that the .NET Data Provider for Oracle Database is System.Data.OracleClient.
Note: Similarly, if you want to communicate with OLEDB data sources such as Excel, Access, etc. then you need to use OleDbConnection, OleDbCommand, and OleDbDataReader classes. So, the .NET data provider for OLEDB data sources is System.Data.OleDb.
Different .NET Data Providers

ADO.NET Data Providers
Please have a look at the following image to understand the ADO.NET Data Providers in a better manner. As you can see, here, we have divided the diagram into three sections. The first section is the .NET Applications, the second section is the .NET Data Providers and the third section is the data sources. Based on the data source, you need to use the appropriate .NET Provider in your application.

The point that you need to remember is depending on the provider, the ADO.NET objects (Connection, Command, DataReader, and DataAdapter) have a different prefix as shown below.
- Connection – SQLConnection, OracleConnection, OleDbConnection, OdbcConnection, etc.
- Command – SQLCommand, OracleCommand, OleDbCommand, OdbcCommand, etc.
- DataReader – SQLDataReader, OracleDataReader, OleDbDataReader, OdbcDataReader, etc.
- DataAdapter – SQLDataAdapter, OracleDataAdapter, OleDbDataAdapter, OdbcDataAdapter, etc.
DataSet:
The DataSet object in ADO.NET is not Provider-Specific. Once you connect to a database, execute the command, and retrieve the data into the .NET application. The data can then be stored in a DataSet and work independently of the database. So, it is used to access data independently from any data source. The DataSet contains a collection of one or more DataTable objects.
ADO.NET using SQL Server
Open SQL Server Management Studio Tool
Once you open SSMS (SQL Server Management Studio), It will prompt you the connect to the server window. Here, you need to provide the server name and authentication details (I am going with the Windows Authentication), select Database Engine as the server type, and finally, click on the Connect button as shown in the below image.

Once you click on the Connect button, it will connect to the SQL Server Database and after a successful connection, it will display the following window.

Creating Database in SQL Server
In order to create a database using GUI, you need to select the database option from object explorer and then right-click on it. It pops up an options menu and here, you need to click on the New Database option as shown in the below image.

Once you click on the New Database option, then it will open the following New Database window. Here, you just need to provide the database name and click on the OK button. Here, I created a database with the name Student. But it is up to you, you can provide any meaningful name as per your choice.

Once you click on the OK button, then it will create a Student database and you can see the Student database in the object explorer as shown in the below image.

That’s it. Our database part is over. Now let us move to the ADO.NET part.
Establish a connection to SQL Server database and create a table using ADO.NET
Once the Student Database is ready, now, let’s move and create a table (Student table) by using the ADO.NET Provider and C# code. Open visual studio 2017 (you can use any version of visual studio), then create a new .NET console application project. Once you create the project, then modify the Program.cs class file as shown below. In this article, I am not going to explain the code. Here in this article, I am just going to show you how to communicate with SQL Server database. From our next article onwards, I will explain each and everything in detail.
using System;
using System.Data.SqlClient;
namespace AdoNetConsoleApplication
{
class Program
{
static void Main(string[] args)
{
new Program().CreateTable();
Console.ReadKey();
}
public void CreateTable()
{
SqlConnection con = null;
try
{
// Creating Connection
con = new SqlConnection(“data source=.; database=student; integrated security=SSPI”);
// writing sql query
SqlCommand cm = new SqlCommand(“create table student(id int not null, name varchar(100), email varchar(50), join_date date)”, con);
// Opening Connection
con.Open();
// Executing the SQL query
cm.ExecuteNonQuery();
// Displaying a message
Console.WriteLine(“Table created Successfully”);
}
catch (Exception e)
{
Console.WriteLine(“OOPs, something went wrong.” + e);
}
// Closing the connection
finally
{
con.Close();
}
}
}
}
Now, execute the program and you should see the following message on the console.

We can see the created table in Microsoft SQL Server Management Studio also. It shows the created table as shown below.

See, we have the Student table within the Student database. As of now, the Student table is empty. Let us insert one record into the Student table using ADO.NET and C#.
Inserting Record using C# and ADO.NET:
Please modify the Program.cs class file as shown below. Here, we will insert a record into the student table.
using System;
using System.Data.SqlClient;
namespace AdoNetConsoleApplication
{
class Program
{
static void Main(string[] args)
{
new Program().InsertRecord();
Console.ReadKey();
}
public void InsertRecord()
{
SqlConnection con = null;
try
{
// Creating Connection
con = new SqlConnection(“data source=.; database=student; integrated security=SSPI”);
// writing sql query
SqlCommand cm = new SqlCommand(“insert into student (id, name, email, join_date) values (‘101’, ‘Ronald Trump’, ‘ronald@example.com’, ‘1/12/2017’)”, con);
// Opening Connection
con.Open();
// Executing the SQL query
cm.ExecuteNonQuery();
// Displaying a message
Console.WriteLine(“Record Inserted Successfully”);
}
catch (Exception e)
{
Console.WriteLine(“OOPs, something went wrong.” + e);
}
// Closing the connection
finally
{
con.Close();
}
}
}
}
Once you run the application, you will get the following output.

Retrieve Record using C# and ADO.NET
Here, we will retrieve the inserted data from the Student table of the student database. Please modify the Program.cs class file as shown below.
using System;
using System.Data.SqlClient;
namespace AdoNetConsoleApplication
{
class Program
{
static void Main(string[] args)
{
new Program().DisplayData();
Console.ReadKey();
}
public void DisplayData()
{
SqlConnection con = null;
try
{
// Creating Connection
con = new SqlConnection(“data source=.; database=student; integrated security=SSPI”);
// writing sql query
SqlCommand cm = new SqlCommand(“Select * from student”, con);
// Opening Connection
con.Open();
// Executing the SQL query
SqlDataReader sdr = cm.ExecuteReader();
// Iterating Data
while (sdr.Read())
{
// Displaying Record
Console.WriteLine(sdr[“id”] + ” ” + sdr[“name”] + ” ” + sdr[“email”]);
}
}
catch (Exception e)
{
Console.WriteLine(“OOPs, something went wrong.” + e);
}
// Closing the connection
finally
{
con.Close();
}
}
}
}
You will get the following output when you run the above program.

Deleting Record from SQL Server database using C# and ADO.NET
As of now, the student table contains one record. Let us delete that record using ADO.NET and C#. Please modify the Program.cs class file code as shown below which will delete the record from the Student table.
using System;
using System.Data.SqlClient;
namespace AdoNetConsoleApplication
{
class Program
{
static void Main(string[] args)
{
new Program().DeleteData();
Console.ReadKey();
}
public void DeleteData()
{
SqlConnection con = null;
try
{
// Creating Connection
con = new SqlConnection(“data source=.; database=student; integrated security=SSPI”);
// writing sql query
SqlCommand cm = new SqlCommand(“delete from student where id = ‘101’”, con);
// Opening Connection
con.Open();
// Executing the SQL query
cm.ExecuteNonQuery();
Console.WriteLine(“Record Deleted Successfully”);
}
catch (Exception e)
{
Console.WriteLine(“OOPs, something went wrong.” + e);
}
// Closing the connection
finally
{
con.Close();
}
}
}
}
It will display the following output once you execute the program.

Now, if you verify the student table, then you will see that the record is deleted. In this article, I didn’t explain a single line of code intentionally. I will explain each and everything in detail from our next article.
In the next article, I am going to discuss ADO.NET SqlConnection Class in detail. Here, in this, I try to explain ADO.NET using SQL Server i.e. how to connect to SQL server using ADO.NET. I hope you enjoy this article. I would like to have your feedback. Please post your feedback, question, or comments about this article.
ADO.NET SqlConnection
Back to: ADO.NET Tutorial For Beginners and Professionals
ADO.NET SqlConnection Class in C# with Examples
In this article, I am going to discuss the ADO.NET SqlConnection Class in C# with Examples. Please read our previous article where we discussed ADO.NET using SQL Server. As part of this article, we are going to discuss the following pointers in detail.
- What is the ADO.NET SqlConnection class?
- How to instantiate the SqlConnection object
- Using the SqlConnection object
- Why is it important to close a database connection
- How to properly close a connection
- What is the problem with hard-coding the connection string in the application?
- How to store and retrieve the connection string from the configuration file?
What we discussed in the Introduction Part of this article?
Let us first recap what we discussed in our introduction to ADO.NET Article. We discussed the different .NET data providers. The key to understanding ADO.NET is to understand the following objects.
In our introduction part, we discussed that Connection, Command, DataAdapter, and DataReader objects are providers specific whereas the DataSet is provider-independent. That means if you are going to work with the SQL Server database, then you need to use SQL-specific provider objects such as SQLConnection, SqlCommand, SqlDataAdapter, and SqlDataReader objects which belong to the System.Data.SqlClient namespace.
Note: If you understand how to work with one database, then you can easily work with any other database. All you have to do is, change the provider-specific string (i.e. SQL, Oracle, Oledb, Odbc) on the Connection, Command, DataReader, and DataAdapter objects depending on the data source you are working with.
Here, in this article, I am going to discuss the SqlConnection object in detail. The concepts that we discuss here will be applicable to all the .NET data providers.
What is ADO.NET SqlConnection Class in C#?
The ADO.NET SqlConnection class belongs to System.Data.SqlClient namespace, and is used to establish an open connection to the SQL Server database. The most important point that you need to remember is the connection does not close implicitly even if it goes out of scope. Therefore, it is always recommended and always a good programming practice to close the connection object explicitly by calling the Close() method of the connection object
Note: The connections should be opened as late as possible, and should be closed as early as possible as the connection is one of the most expensive resources.
ADO.NET SqlConnection class Signature in C#:
Following is the signature of SqlConnection class. As you can see, it is a sealed class, inherited from DbConnection class, and implement the ICloneable interface.

https://googleads.g.doubleclick.net/pagead/ads?client=ca-pub-5996718494925719&output=html&h=400&adk=1627668767&adf=3832474069&w=839&lmt=1680294023&rafmt=12&channel=9442797445&format=839×400&url=https%3A%2F%2Fdotnettutorials.net%2Flesson%2Fado-net-sqlconnection-class%2F&wgl=1&uach=WyJXaW5kb3dzIiwiMTUuMC4wIiwieDg2IiwiIiwiMTExLjAuNTU2My4xNDciLFtdLGZhbHNlLG51bGwsIjY0IixbWyJHb29nbGUgQ2hyb21lIiwiMTExLjAuNTU2My4xNDciXSxbIk5vdChBOkJyYW5kIiwiOC4wLjAuMCJdLFsiQ2hyb21pdW0iLCIxMTEuMC41NTYzLjE0NyJdXSxmYWxzZV0.&dt=1680311524469&bpp=2&bdt=411&idt=2&shv=r20230329&mjsv=m202303280101&ptt=9&saldr=aa&abxe=1&cookie=ID%3D2ca54fe5a990354f-22dc8f28dedc00ad%3AT%3D1680311161%3AS%3DALNI_MZTfqJT3580Gz2kIeiOZe7qGh_ldQ&gpic=UID%3D00000a3ae4d0f1da%3AT%3D1680311161%3ART%3D1680311161%3AS%3DALNI_MaH3Cu84bXJC4HJYPPDWxiPmKf43g&prev_fmts=0x0&nras=1&correlator=2037974830673&frm=20&pv=1&ga_vid=417109815.1680311161&ga_sid=1680311524&ga_hid=426242812&ga_fc=1&u_tz=330&u_his=9&u_h=864&u_w=1536&u_ah=816&u_aw=1536&u_cd=24&u_sd=1.25&dmc=8&adx=520&ady=2013&biw=1519&bih=746&scr_x=0&scr_y=0&eid=44759876%2C44759927%2C44759837%2C44773809%2C31071755%2C31073378%2C31073508%2C44786919%2C31073349%2C31067147&oid=2&pvsid=3885401420046842&tmod=1252662495&uas=0&nvt=1&ref=https%3A%2F%2Fdotnettutorials.net%2Flesson%2Fado-net-using-sql-server%2F&fc=1920&brdim=0%2C0%2C0%2C0%2C1536%2C0%2C1536%2C816%2C1536%2C746&vis=1&rsz=%7C%7CEebr%7C&abl=CS&pfx=0&cms=2&fu=256&bc=31&td=1&ifi=2&uci=a!2&btvi=1&fsb=1&xpc=EzqJslEObt&p=https%3A//dotnettutorials.net&dtd=15
SqlConnection Class Constructors:
The ADO.NET SqlConnection class has three constructors which are shown in the below image.

Let us discuss each of these constructors in detail.
- SqlConnection(): It initializes a new instance of the System.Data.SqlClient.SqlConnection class
- SqlConnection(String connectionString): This constructor is used to initialize a new instance of the System.Data.SqlClient.SqlConnection class when given a string that contains the connection string.
- SqlConnection(String connectionString, SqlCredential credential): It is used to initialize a new instance of the System.Data.SqlClient.SqlConnection class given a connection string, that does not use Integrated Security = true and a System.Data.SqlClient.SqlCredential object that contains the user ID and password.
C# SqlConnection class Methods:
Following are some of the important methods of the SqlConnection object.
- BeginTransaction(): It is used to start a database transaction and returns an object representing the new transaction.
- ChangeDatabase(string database): It is used to change the current database for an open SqlConnection. Here, the parameter database is nothing but the name of the database to use instead of the current database.
- ChangePassword(string connectionString, string newPassword): Changes the SQL Server password for the user indicated in the connection string to the supplied new password. Here, the parameter connectionString is the connection string that contains enough information to connect to the server that you want. The connection string must contain the user ID and the current password. The parameter newPassword is the new password to set. This password must comply with any password security policy set on the server, including minimum length, requirements for specific characters, and so on.
- Close(): It is used to close the connection to the database. This is the preferred method of closing any open connection.
- CreateCommand(): It Creates and returns a System.Data.SqlClient.SqlCommand object associated with the System.Data.SqlClient.SqlConnection.
- GetSchema(): It returns schema information for the data source of this System.Data.SqlClient.SqlConnection.
- Open(): This method is used to open a database connection with the property settings specified by the System.Data.SqlClient.SqlConnection.ConnectionString.
How to create a Connection Object in C#?
You can create an instance of the SqlConnection class in three ways as there are three constructors in SqlConnection class. Here, I am going to show you the two most preferred ways of creating an instance of SqlConnection class. They are as follows:
Using the constructor which takes the connection string as the parameter.
The following image shows how to create an instance of SqlConnection class using the constructor which takes ConnectionString as the only parameter.

Using the parameterless constructor of C# SqlConnection class:
The following image shows how to create an instance of SqlConnection class using the parameterless constructor. It is a two-step process. First, you need to create an instance of SqlConnection class using the parameterless constructor, and then using the ConnectionString property of the connection object you need to specify the connection string.

Note: The ConnectionString parameter is a string made up of Key/Value pairs that have the information required to create a connection object.

Here, the “data source” is the name or IP Address of the SQL Server that you want to connect to. If you are working with a local instance of SQL Server, then you can simply put a DOT(.). If the server is on a network, then you need to use either the Name or IP address of the server.
SqlConnection Example in C#
Let us see an example to understand how to connect to an SQL Server database. We have created a Student database in our previous article and we will connect to that Student database. Please have a look at the following C# code which will create the connection object and then establish an open connection when the Open method is called on the connection object.

Note: Here, we are using the using block to close the connection automatically. If you are using the using block then you don’t require to call the close() method explicitly to close the connection. It is always recommended to close the database connection using the using block in C#.
The complete code is given below.
using System;
using System.Data.SqlClient;
namespace AdoNetConsoleApplication
{
class Program
{
static void Main(string[] args)
{
new Program().Connecting();
Console.ReadKey();
}
public void Connecting()
{
string ConnectionString = “data source=.; database=student; integrated security=SSPI”;
using (SqlConnection con = new SqlConnection(ConnectionString))
{
con.Open();
Console.WriteLine(“Connection Established Successfully”);
}
}
}
}
Output:

What, if we don’t use using block?
If you don’t use the using block to create the connection object, then you have to close the connection explicitly by calling the Close method on the connection object. In the following example, we are using try-block instead of using block and calling the Close method in finally block to close the database connection.
using System;
using System.Data.SqlClient;
namespace AdoNetConsoleApplication
{
class Program
{
static void Main(string[] args)
{
new Program().Connecting();
Console.ReadKey();
}
public void Connecting()
{
SqlConnection con = null;
try
{
// Creating Connection
string ConnectionString = “data source=.; database=student; integrated security=SSPI”;
con = new SqlConnection(ConnectionString);
con.Open();
Console.WriteLine(“Connection Established Successfully”);
}
catch (Exception e)
{
Console.WriteLine(“OOPs, something went wrong.\n” + e);
}
finally
{ // Closing the connection
con.Close();
}
}
}
}
Output:

Here, we hard-coded the connection strings in the application code. Let us first understand what is the problem when we hard-coded the connection string within the application code and then we will see how to overcome this problem.
The problem of hard-coding the connection string in application code:
There are 3 problems when we hard-coded the connection strings in the application code. They are as follows:
- Let’s say, you move your database to a different server, then you need to change the database details in the application code itself. Once you change the application code, then you need to rebuild the application as well as it also required a re-deployment which is time-consuming.
- Again if you hard-coded the connection string in multiple places, then you need to change the connection in all the places which is not only a maintenance overhead but is also error-prone.
- In real-time applications, while developing you may point to your Development database. While moving to UAT, you may have a different server for UAT and in a production environment, you need to point to the production database.
How to solve the above problems?
We can solve the above problems, by storing the connection string in the application configuration file. The configuration file in windows or console application is app.config whereas for ASP.NET MVC or ASP.NET Web API application, the application configuration file is web.config.
How to store the connection string in the configuration file?
As we are working with a console application, the configuration file is app.config. So, we need to store the connection string in the app.config file as shown below. Give a meaningful name to your connection string. As we are going to communicate with the SQL Server database, so, we need to provide the provider name as System.Data.SqlClient.
<connectionStrings>
<add name=”ConnectionString”
connectionString=”data source=.; database=student; integrated security=SSPI”
providerName=”System.Data.SqlClient” />
</connectionStrings>
Note: You need to put the above connection string inside the configuration section of the configuration file.
How to read the connection string from the app.config file?
In order to read the connection string from the configuration file, you need to use the ConnectionStrings property of the ConfigurationManager class. The ConfigurationManager class is present in System.Configuration namespace. By default, this System.Configuration DLL is not included in our application, so we need to add this DLL first.
Example to Read the Connection String from the Configuration File:
Please modify the Program.cs class file as shown below read the connection string from the configuration file.
using System;
using System.Configuration;
using System.Data.SqlClient;
namespace AdoNetConsoleApplication
{
class Program
{
static void Main(string[] args)
{
try
{
string ConString = ConfigurationManager.ConnectionStrings[“ConnectionString”].ConnectionString;
using (SqlConnection connection = new SqlConnection(ConString))
{
connection.Open();
Console.WriteLine(“Connection Established Successfully”);
}
}
catch (Exception e)
{
Console.WriteLine(“OOPs, something went wrong.\n” + e);
}
Console.ReadKey();
}
}
}
Output:

Note: Storing connection strings in web.config is similar to the app.config and the same ConfigurationManager class is used to read connection strings from the web.config file.
In the next article, I am going to discuss ADO.NET SqlCommand Class in detail. Here, in this article, I try to explain the ADO.NET SqlConnection class in C# with examples. I hope this C# SqlConnection article will help you with your need. I would like to have your feedback. Please post your feedback, question, or comments about this article.
How you can use jQuery and AJAX to set session state from JavaScript
Session state in ASP.NET is maintained on the server-side and cannot be directly set from JavaScript running on the client-side. However, you can use AJAX to make an asynchronous call to the server and set session state from there.
Here’s an example of how you can use jQuery and AJAX to set session state from JavaScript:
First, create a web method in your ASP.NET code-behind file that will be called by your AJAX request. This web method should set the session variable to the value passed in as a parameter. Here’s an example:
[WebMethod(EnableSession = true)]
public static void SetSessionValue(string value)
{
    HttpContext.Current.Session["MySessionVariable"] = value;
}
Note that the [WebMethod] attribute is used to mark the method as a web service that can be called from JavaScript, and the EnableSession property is set to true to enable access to session state.
Next, in your JavaScript code, use the $.ajax() function to make an asynchronous call to the web method. Here’s an example:
javascriptCopy code$.ajax({
    type: "POST",
    url: "MyPage.aspx/SetSessionValue",
    data: '{value: "myValue"}',
    contentType: "application/json; charset=utf-8",
    dataType: "json",
    success: function() {
        // Session value has been set
    },
    error: function() {
        // An error occurred
    }
});
In this example, we’re making a POST request to the SetSessionValue web method on the MyPage.aspx page. We’re passing in the value "myValue" as a JSON object, and we’ve specified the content type and data type as JSON.
When the AJAX call succeeds, the session value will have been set on the server-side. You can then access this session value from any page in your application by using HttpContext.Current.Session["MySessionVariable"].
ASP.NET State Management
ASP.NET is a web application framework that allows developers to create dynamic web applications. One important aspect of web development is managing state, which refers to preserving data between page requests or application sessions. ASP.NET provides several ways to manage state, including:
- ViewState: ViewState is a hidden field in an ASP.NET web page that stores the state of the page between postbacks. It’s useful for storing small amounts of data that are specific to a single page. ViewState is enabled by default in ASP.NET, but it can be disabled if necessary.
- Session state: Session state allows you to store data that is specific to a user’s session. This data is stored on the server and can be accessed from any page in the application. Session state can be configured to use in-memory storage, which is fast but has limited capacity, or out-of-process storage, which is slower but can handle more data.
- Application state: Application state allows you to store data that is specific to the entire application. This data is also stored on the server and can be accessed from any page in the application. Application state is useful for storing data that is needed by all users of the application, such as application configuration settings.
- Cookies: Cookies are small text files that are stored on the client’s computer. They can be used to store user-specific data, such as login credentials or preferences. Cookies can be set to expire after a certain amount of time, or they can be deleted manually by the user.
- Query string: The query string is the part of the URL that comes after the “?” character. It can be used to pass data between pages in an application. Query string data is visible in the URL and can be bookmarked or shared, but it’s not secure and should not be used to store sensitive data.
- Cache: ASP.NET provides a caching mechanism that allows you to store frequently accessed data in memory. This can improve the performance of your application by reducing the number of database calls or expensive computations. The cache can be configured to expire after a certain amount of time, or it can be removed manually by the application.
Overall, ASP.NET provides developers with a range of options for managing state in their applications. The choice of which method to use depends on the specific requirements of the application, such as the size of the data being stored, the security needs, and the performance considerations.
SQL Server Stored Procedures
A SQL Server stored procedure is a precompiled and saved SQL code block that can be executed repeatedly by calling its name. It is similar to a function or subroutine in programming, but it is stored on the SQL Server and can be executed by anyone with the necessary permissions.
Stored procedures can contain SQL statements, control-of-flow statements, and other programming constructs. They can also accept parameters, which can be used to customize the behavior of the procedure.
Stored procedures can provide several benefits, such as improved performance, enhanced security, and simplified maintenance. They can also be used to encapsulate complex business logic or data processing tasks, making it easier to manage and maintain these operations over time.
Creating a simple stored procedure
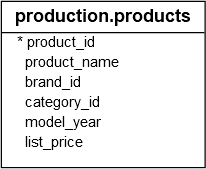
The following SELECT statement returns a list of products from the products table in the BikeStores sample database:
SELECT
product_name,
list_price
FROM
production.products
ORDER BY
product_name;
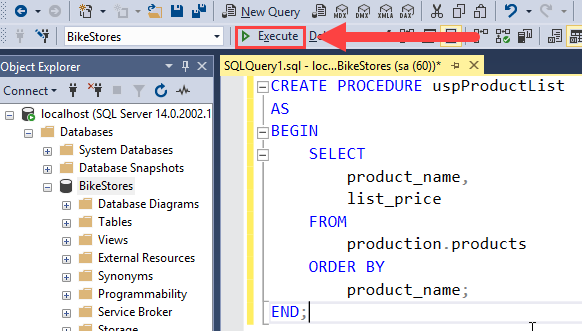
Code language: SQL (Structured Query Language) (sql)To create a stored procedure that wraps this query, you use the CREATE PROCEDURE statement as follows:
CREATE PROCEDURE uspProductList
AS
BEGIN
    SELECT
        product_name,
        list_price
    FROM
        production.products
    ORDER BY
        product_name;
END;
Code language: SQL (Structured Query Language) (sql)
In this syntax:
- The
uspProductListis the name of the stored procedure. - The
ASkeyword separates the heading and the body of the stored procedure. - If the stored procedure has one statement, the
BEGINandENDkeywords surrounding the statement are optional. However, it is a good practice to include them to make the code clear.
Note that in addition to the CREATE PROCEDURE keywords, you can use the CREATE PROC keywords to make the statement shorter.
To compile this stored procedure, you execute it as a normal SQL statement in SQL Server Management Studio as shown in the following picture:
If everything is correct, then you will see the following message:
Commands completed successfully.
Code language: SQL (Structured Query Language) (sql)
It means that the stored procedure has been successfully compiled and saved into the database catalog.
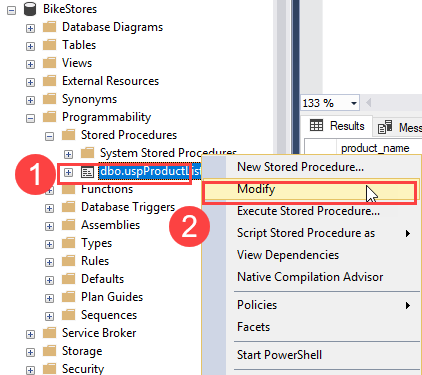
You can find the stored procedure in the Object Explorer, under Programmability > Stored Procedures as shown in the following picture:

Sometimes, you need to click the Refresh button to manually update the database objects in the Object Explorer.
Executing a stored procedure
To execute a stored procedure, you use the EXECUTE or EXEC statement followed by the name of the stored procedure:
EXECUTE sp_name;
Code language: SQL (Structured Query Language) (sql)
Or
EXEC sp_name;
Code language: SQL (Structured Query Language) (sql)
where sp_name is the name of the stored procedure that you want to execute.
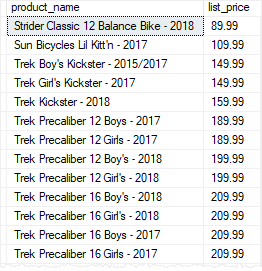
For example, to execute the uspProductList stored procedure, you use the following statement:
EXEC uspProductList;
Code language: SQL (Structured Query Language) (sql)
The stored procedure returns the following output:

Modifying a stored procedure
To modify an existing stored procedure, you use the ALTER PROCEDURE statement.
First, open the stored procedure to view its contents by right-clicking the stored procedure name and select Modify menu item:
Second, change the body of the stored procedure by sorting the products by list prices instead of product names:
 ALTER PROCEDURE uspProductList
    AS
    BEGIN
        SELECT
            product_name,
            list_price
        FROM
            production.products
        ORDER BY
            list_price
    END;
Code language: SQL (Structured Query Language) (sql)
Third, click the Execute button, SQL Server modifies the stored procedure and returns the following output:
Commands completed successfully.
Code language: SQL (Structured Query Language) (sql)
Now, if you execute the stored procedure again, you will see the changes taking effect:
EXEC uspProductList;
Code language: SQL (Structured Query Language) (sql)
The following shows the partial output:
Deleting a stored procedure
To delete a stored procedure, you use the DROP PROCEDURE or DROP PROC statement:
DROP PROCEDURE sp_name;
Code language: SQL (Structured Query Language) (sql)
or
DROP PROC sp_name;
Code language: SQL (Structured Query Language) (sql)
where sp_name is the name of the stored procedure that you want to delete.
For example, to remove the uspProductList stored procedure, you execute the following statement:
DROP PROCEDURE uspProductList;
Code language: SQL (Structured Query Language) (sql)
In this tutorial, you have learned how to manage SQL Server stored procedures including creating, executing, modifying, and deleting stored procedures.
SQL Server Stored Procedure Parameters
Creating a stored procedure with one parameter
The following query returns a product list from the products table in the sample database:
SELECT
    product_name,
    list_price
FROM
    production.products
ORDER BY
    list_price;
Code language: SQL (Structured Query Language) (sql)
You can create a stored procedure that wraps this query using the CREATE PROCEDURE statement:
CREATE PROCEDURE uspFindProducts
AS
BEGIN
    SELECT
        product_name,
        list_price
    FROM
        production.products
    ORDER BY
        list_price;
END;
Code language: SQL (Structured Query Language) (sql)
However, this time we can add a parameter to the stored procedure to find the products whose list prices are greater than an input price:
ALTER PROCEDURE uspFindProducts(@min_list_price AS DECIMAL)
AS
BEGIN
    SELECT
        product_name,
        list_price
    FROM
        production.products
    WHERE
        list_price >= @min_list_price
    ORDER BY
        list_price;
END;
Code language: SQL (Structured Query Language) (sql)
In this example:
- First, we added a parameter named
@min_list_priceto theuspFindProductsstored procedure. Every parameter must start with the@sign. TheAS DECIMALkeywords specify the data type of the@min_list_priceparameter. The parameter must be surrounded by the opening and closing brackets. - Second, we used
@min_list_priceparameter in theWHEREclause of theSELECTstatement to filter only the products whose list prices are greater than or equal to the@min_list_price.
Executing a stored procedure with one parameter
To execute the uspFindProducts stored procedure, you pass an argument to it as follows:
EXEC uspFindProducts 100;
Code language: SQL (Structured Query Language) (sql)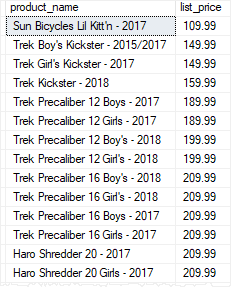
The stored procedure returns all products whose list prices are greater than or equal to 100.
If you change the argument to 200, you will get a different result set:
EXEC uspFindProducts 200;
Code language: SQL (Structured Query Language) (sql)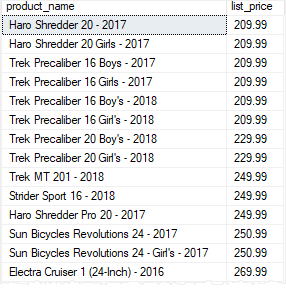
Creating a stored procedure with multiple parameters
Stored procedures can take one or more parameters. The parameters are separated by commas.
The following statement modifies the uspFindProducts stored procedure by adding one more parameter named @max_list_price to it:
ALTER PROCEDURE uspFindProducts(
@min_list_price AS DECIMAL
,@max_list_price AS DECIMAL
)
AS
BEGIN
SELECT
product_name,
list_price
FROM
production.products
WHERE
list_price >= @min_list_price AND
list_price <= @max_list_price
ORDER BY
list_price;
END;
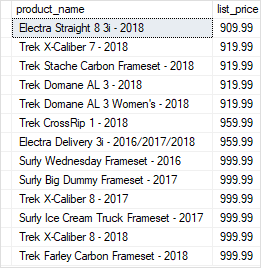
Code language: SQL (Structured Query Language) (sql)Once the stored procedure is modified successfully, you can execute it by passing two arguments, one for @min_list_price and the other for @max_list_price:
EXECUTE uspFindProducts 900, 1000;
Code language: SQL (Structured Query Language) (sql)
The following shows the output:
Using named parameters
In case stored procedures have multiple parameters, it is better and more clear to execute the stored procedures using named parameters.
For example, the following statement executes the uspFindProducts stored procedure using the named parameters @min_list_priceand @max_list_price:
EXECUTE uspFindProducts
    @min_list_price = 900,
    @max_list_price = 1000;
Code language: SQL (Structured Query Language) (sql)
The result of the stored procedure is the same however the statement is more obvious.
Creating text parameters
The following statement adds the @name parameter as a character string parameter to the stored procedure.
ALTER PROCEDURE uspFindProducts(
    @min_list_price AS DECIMAL
    ,@max_list_price AS DECIMAL
    ,@name AS VARCHAR(max)
)
AS
BEGIN
    SELECT
        product_name,
        list_price
    FROM
        production.products
    WHERE
        list_price >= @min_list_price AND
        list_price <= @max_list_price AND
        product_name LIKE '%' + @name + '%'
    ORDER BY
        list_price;
END;
Code language: SQL (Structured Query Language) (sql)
In the WHERE clause of the SELECT statement, we added the following condition:
product_name LIKE '%' + @name + '%'
Code language: SQL (Structured Query Language) (sql)
By doing this, the stored procedure returns the products whose list prices are in the range of min and max list prices and the product names also contain a piece of text that you pass in.
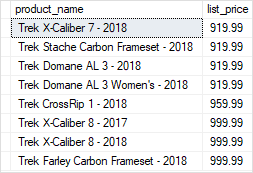
Once the stored procedure is altered successfully, you can execute it as follows:
EXECUTE uspFindProducts
@min_list_price = 900,
@max_list_price = 1000,
@name = 'Trek';
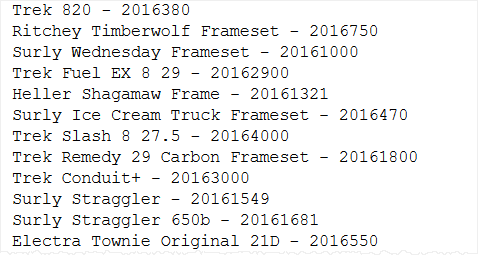
Code language: SQL (Structured Query Language) (sql)In this statement, we used the uspFindProducts stored procedure to find the product whose list prices are in the range of 900 and 1,000 and their names contain the word Trek.
The following picture shows the output:
Creating optional parameters
When you execute the uspFindProducts stored procedure, you must pass all three arguments corresponding to the three parameters.
SQL Server allows you to specify default values for parameters so that when you call stored procedures, you can skip the parameters with default values.
See the following stored procedure:
ALTER PROCEDURE uspFindProducts(
    @min_list_price AS DECIMAL = 0
    ,@max_list_price AS DECIMAL = 999999
    ,@name AS VARCHAR(max)
)
AS
BEGIN
    SELECT
        product_name,
        list_price
    FROM
        production.products
    WHERE
        list_price >= @min_list_price AND
        list_price <= @max_list_price AND
        product_name LIKE '%' + @name + '%'
    ORDER BY
        list_price;
END;
Code language: SQL (Structured Query Language) (sql)
In this stored procedure, we assigned 0 as the default value for the @min_list_price parameter and 999,999 as the default value for the @max_list_price parameter.
Once the stored procedure is compiled, you can execute it without passing the arguments to @min_list_price and @max_list_price parameters:
EXECUTE uspFindProducts
    @name = 'Trek';
Code language: SQL (Structured Query Language) (sql)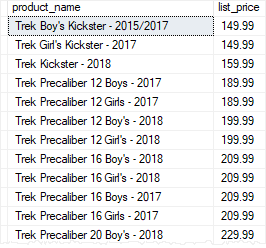
In this case, the stored procedure used 0 for @min_list_price parameter and 999,999 for the @max_list_price parameter when it executed the query.
The @min_list_price and @max_list_price parameters are called optional parameters.
Of course, you can also pass the arguments to the optional parameters. For example, the following statement returns all products whose list prices are greater or equal to 6,000 and the names contain the word Trek:
EXECUTE uspFindProducts
    @min_list_price = 6000,
    @name = 'Trek';
Code language: SQL (Structured Query Language) (sql)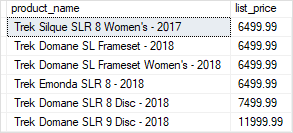
Using NULL as the default value
In the uspFindProducts stored procedure, we used 999,999 as the default maximum list price. This is not robust because in the future you may have products with the list prices that are greater than that.
A typical technique to avoid this is to use NULL as the default value for the parameters:
ALTER PROCEDURE uspFindProducts(
    @min_list_price AS DECIMAL = 0
    ,@max_list_price AS DECIMAL = NULL
    ,@name AS VARCHAR(max)
)
AS
BEGIN
    SELECT
        product_name,
        list_price
    FROM
        production.products
    WHERE
        list_price >= @min_list_price AND
        (@max_list_price IS NULL OR list_price <= @max_list_price) AND
        product_name LIKE '%' + @name + '%'
    ORDER BY
        list_price;
END;
Code language: SQL (Structured Query Language) (sql)
In the WHERE clause, we changed the condition to handle NULL value for the @max_list_price parameter:
(@max_list_price IS NULL OR list_price <= @max_list_price)
Code language: SQL (Structured Query Language) (sql)
The following statement executes the uspFindProducts stored procedure to find the product whose list prices are greater or equal to 500 and names contain the word Haro.
EXECUTE uspFindProducts
    @min_list_price = 500,
    @name = 'Haro';
Code language: SQL (Structured Query Language) (sql)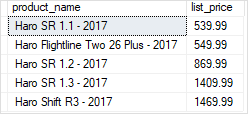
In this tutorial, you have learned how to create and execute stored procedures with one or more parameters. You also learned how to create optional parameters and use NULL as the default values for the parameters.
Variables
What is a variable
A variable is an object that holds a single value of a specific type e.g., integer, date, or varying character string.
We typically use variables in the following cases:
- As a loop counter to count the number of times a loop is performed.
- To hold a value to be tested by a control-of-flow statement such as
WHILE. - To store the value returned by a stored procedure or a function
Declaring a variable
To declare a variable, you use the DECLARE statement. For example, the following statement declares a variable named @model_year:
DECLARE @model_year SMALLINT;
Code language: SQL (Structured Query Language) (sql)
The DECLARE statement initializes a variable by assigning it a name and a data type. The variable name must start with the @ sign. In this example, the data type of the @model_year variable is SMALLINT.
By default, when a variable is declared, its value is set to NULL.
Between the variable name and data type, you can use the optional AS keyword as follows:
DECLARE @model_year AS SMALLINT;
Code language: SQL (Structured Query Language) (sql)
To declare multiple variables, you separate variables by commas:
DECLARE @model_year SMALLINT,
        @product_name VARCHAR(MAX);
Code language: SQL (Structured Query Language) (sql)
Assigning a value to a variable
To assign a value to a variable, you use the SET statement. For example, the following statement assigns 2018 to the @model_year variable:
SET @model_year = 2018;
Code language: SQL (Structured Query Language) (sql)
Using variables in a query
The following SELECT statement uses the @model_year variable in the WHERE clause to find the products of a specific model year:
SELECT
product_name,
model_year,
list_price
FROM
production.products
WHERE
model_year = @model_year
ORDER BY
product_name;
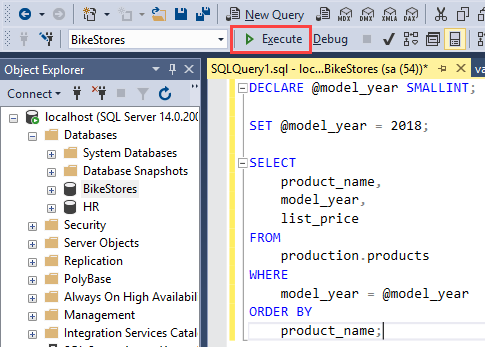
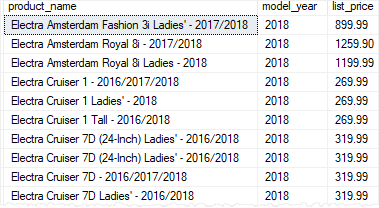
Code language: SQL (Structured Query Language) (sql)Now, you can put everything together and execute the following code block to get a list of products whose model year is 2018:
DECLARE @model_year SMALLINT;

SET @model_year = 2018;

SELECT
    product_name,
    model_year,
    list_price
FROM
    production.products
WHERE
    model_year = @model_year
ORDER BY
    product_name;
Code language: SQL (Structured Query Language) (sql)
Note that to execute the code, you click the Execute button as shown in the following picture:
The following picture shows the output:
Storing query result in a variable
The following steps describe how to store the query result in a variable:
First, declare a variable named @product_count with the integer data type:
DECLARE @product_count INT;
Code language: SQL (Structured Query Language) (sql)
Second, use the SET statement to assign the query’s result set to the variable:
SET @product_count = (
SELECT
COUNT(*)
FROM
production.products
);
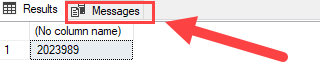
Code language: SQL (Structured Query Language) (sql)Third, output the content of the @product_count variable:
SELECT @product_count;
Code language: SQL (Structured Query Language) (sql)
Or you can use the PRINT statement to print out the content of a variable:
PRINT @product_count;
Code language: SQL (Structured Query Language) (sql)
or
PRINT 'The number of products is ' + CAST(@product_count AS VARCHAR(MAX));
Code language: SQL (Structured Query Language) (sql)
The output in the messages tab is as follows:
The number of products is 204
Code language: SQL (Structured Query Language) (sql)
To hide the number of rows affected messages, you use the following statement:
SET NOCOUNT ON;
Code language: SQL (Structured Query Language) (sql)
Selecting a record into variables
The following steps illustrate how to declare two variables, assign a record to them, and output the contents of the variables:
First, declare variables that hold the product name and list price:
DECLARE
    @product_name VARCHAR(MAX),
    @list_price DECIMAL(10,2);
Code language: SQL (Structured Query Language) (sql)
Second, assign the column names to the corresponding variables:
SELECT
    @product_name = product_name,
    @list_price = list_price
FROM
    production.products
WHERE
    product_id = 100;
Code language: SQL (Structured Query Language) (sql)
Third, output the content of the variables:
SELECT
    @product_name AS product_name,
    @list_price AS list_price;
Code language: SQL (Structured Query Language) (sql)
Accumulating values into a variable
The following stored procedure takes one parameter and returns a list of products as a string:
CREATE  PROC uspGetProductList(
    @model_year SMALLINT
) AS
BEGIN
    DECLARE @product_list VARCHAR(MAX);

    SET @product_list = '';

    SELECT
        @product_list = @product_list + product_name
                        + CHAR(10)
    FROM
        production.products
    WHERE
        model_year = @model_year
    ORDER BY
        product_name;

    PRINT @product_list;
END;
Code language: SQL (Structured Query Language) (sql)
In this stored procedure:
- First, we declared a variable named
@product_listwith varying character string type and set its value to blank. - Second, we selected the product name list from the products table based on the input
@model_year. In the select list, we accumulated the product names to the@product_listvariable. Note that theCHAR(10)returns the line feed character. - Third, we used the
PRINTstatement to print out the product list.
The following statement executes the uspGetProductList stored procedure:
EXEC uspGetProductList 2018Code language: SQL (Structured Query Language) (sql)The following picture shows the partial output:

In this tutorial, you have learned about variables including declaring variables, setting their values, and assigning value fields of a record to the variables.
Stored Procedure Output Parameters
Creating output parameters
To create an output parameter for a stored procedure, you use the following syntax:
parameter_name data_type OUTPUT
Code language: SQL (Structured Query Language) (sql)
A stored procedure can have many output parameters. In addition, the output parameters can be in any valid data type e.g., integer, date, and varying character.
For example, the following stored procedure finds products by model year and returns the number of products via the @product_count output parameter:
CREATE PROCEDURE uspFindProductByModel (
    @model_year SMALLINT,
    @product_count INT OUTPUT
) AS
BEGIN
    SELECT
        product_name,
        list_price
    FROM
        production.products
    WHERE
        model_year = @model_year;

    SELECT @product_count = @@ROWCOUNT;
END;
Code language: SQL (Structured Query Language) (sql)
In this stored procedure:
First, we created an output parameter named @product_count to store the number of products found:
@product_count INT OUTPUT
Code language: SQL (Structured Query Language) (sql)
Second, after the SELECT statement, we assigned the number of rows returned by the query(@@ROWCOUNT) to the @product_count parameter.
Note that the @@ROWCOUNT is a system variable that returns the number of rows read by the previous statement.
Once you execute the CREATE PROCEDURE statement above, the uspFindProductByModel stored procedure is compiled and saved in the database catalog.
If everything is fine, SQL Server issues the following output:
Commands completed successfully.Code language: SQL (Structured Query Language) (sql)Calling stored procedures with output parameters
To call a stored procedure with output parameters, you follow these steps:
- First, declare variables to hold the values returned by the output parameters
- Second, use these variables in the stored procedure call.
For example, the following statement executes the uspFindProductByModel stored procedure:
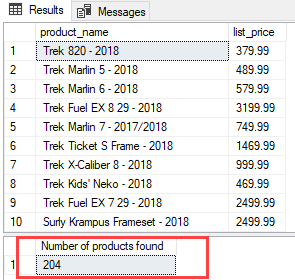
DECLARE @count INT;

EXEC uspFindProductByModel
    @model_year = 2018,
    @product_count = @count OUTPUT;

SELECT @count AS 'Number of products found';Code language: SQL (Structured Query Language) (sql)
The following picture shows the output:
In this example:
First, declare the @count variable to hold the the value of the output parameter of the stored procedure:
DECLARE @count INT;Code language: SQL (Structured Query Language) (sql)Then, execute the uspFindProductByModel stored procedure and passing the parameters:
EXEC uspFindProductByModel
     @model_year = 2018,
     @product_count = @count OUTPUT;Code language: SQL (Structured Query Language) (sql)
In this statement, the model_year is 2018 and the @count variable assigns the value of the output parameter @product_count.
You can call the uspFindProductByModel stored procedure as follows:
EXEC uspFindProductByModel 2018, @count OUTPUT;Code language: SQL (Structured Query Language) (sql)Note that if you forget the OUTPUT keyword after the @count variable, the @count variable will be NULL.
Finally, show the value of the @count variable:
SELECT @count AS 'Number of products found';SQL Server BEGIN END
Overview of the BEGIN...END statement
The BEGIN...END statement is used to define a statement block. A statement block consists of a set of SQL statements that execute together. A statement block is also known as a batch.
In other words, if statements are sentences, the BEGIN...END statement allows you to define paragraphs.
The following illustrates the syntax of the BEGIN...END statement:
BEGIN
    { sql_statement | statement_block}
END
Code language: SQL (Structured Query Language) (sql)
In this syntax, you place a set of SQL statements between the BEGIN and END keywords, for example:
BEGIN
    SELECT
        product_id,
        product_name
    FROM
        production.products
    WHERE
        list_price > 100000;

    IF @@ROWCOUNT = 0
        PRINT 'No product with price greater than 100000 found';
END
Code language: SQL (Structured Query Language) (sql)
Output:
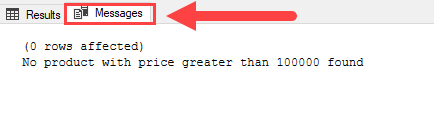
To view the messages generated by the PRINT statement, in SQL Server Management Studio, you need to click the Messages tab. By default, the Messages tab is hidden.
In this example:
- First, we have a block starting with the
BEGINkeyword and ending with theEND
keyword. - Second, inside the block, we have a
SELECTstatement that finds products whose list prices are greater than 100,000. Then, we have theIFstatement to check if the query returns any product and print out a message if no product returns.
Note that the @@ROWCOUNT is a system variable that returns the number of rows affected by the last previous statement.
The BEGIN... END statement bounds a logical block of SQL statements. We often use the BEGIN...END at the start and end of a stored procedure and function. But it is not strictly necessary.
However, the BEGIN...END is required for the IF ELSE statements, WHILE statements, etc., where you need to wrap multiple statements.
Nesting BEGIN... END
The statement block can be nested. It simply means that you can place a BEGIN...END statement within another BEGIN... END statement.
Consider the following example:
BEGIN
    DECLARE @name VARCHAR(MAX);

    SELECT TOP 1
        @name = product_name
    FROM
        production.products
    ORDER BY
        list_price DESC;

    IF @@ROWCOUNT <> 0
    BEGIN
        PRINT 'The most expensive product is ' + @name
    END
    ELSE
    BEGIN
        PRINT 'No product found';
    END;
ENDCode language: SQL (Structured Query Language) (sql)
In this example, we used the BEGIN...END statement to wrap the whole statement block. Inside this block, we also used the BEGIN...END for the IF...ELSE statement.
SQL Server IF ELSE
The IF...ELSE statement is a control-flow statement that allows you to execute or skip a statement block based on a specified condition.
The IF statement
The following illustrates the syntax of the IF statement:
IF boolean_expression
BEGIN
    { statement_block }
ENDCode language: SQL (Structured Query Language) (sql)
In this syntax, if the Boolean_expression evaluates to TRUE then the statement_block in the BEGIN...END block is executed. Otherwise, the statement_block is skipped and the control of the program is passed to the statement after the END keyword.
Note that if the Boolean expression contains a SELECT statement, you must enclose the SELECT statement in parentheses.
The following example first gets the sales amount from the sales.order_items table in the sample database and then prints out a message if the sales amount is greater than 1 million.
BEGIN
    DECLARE @sales INT;

    SELECT
        @sales = SUM(list_price * quantity)
    FROM
        sales.order_items i
        INNER JOIN sales.orders o ON o.order_id = i.order_id
    WHERE
        YEAR(order_date) = 2018;

    SELECT @sales;

    IF @sales > 1000000
    BEGIN
        PRINT 'Great! The sales amount in 2018 is greater than 1,000,000';
    END
END
Code language: SQL (Structured Query Language) (sql)
The output of the code block is:
Great! The sales amount in 2018 is greater than 1,000,000
Code language: SQL (Structured Query Language) (sql)
Note that you have to click the Messages tab to see the above output message:
The IF ELSE statement
When the condition in the IF clause evaluates to FALSE and you want to execute another statement block, you can use the ELSE clause.
The following illustrates the IF ELSE statement:
IF Boolean_expression
BEGIN
    -- Statement block executes when the Boolean expression is TRUE
END
ELSE
BEGIN
    -- Statement block executes when the Boolean expression is FALSE
END
Code language: SQL (Structured Query Language) (sql)
Each IF statement has a condition. If the condition evaluates to TRUE then the statement block in the IF clause is executed. If the condition is FALSE, then the code block in the ELSE clause is executed.
See the following example:
BEGIN
    DECLARE @sales INT;

    SELECT
        @sales = SUM(list_price * quantity)
    FROM
        sales.order_items i
        INNER JOIN sales.orders o ON o.order_id = i.order_id
    WHERE
        YEAR(order_date) = 2017;

    SELECT @sales;

    IF @sales > 10000000
    BEGIN
        PRINT 'Great! The sales amount in 2018 is greater than 10,000,000';
    END
    ELSE
    BEGIN
        PRINT 'Sales amount in 2017 did not reach 10,000,000';
    END
END
Code language: SQL (Structured Query Language) (sql)
In this example:
First, the following statement sets the total sales in 2017 to the @sales variable:
    SELECT
        @sales = SUM(list_price * quantity)
    FROM
        sales.order_items i
        INNER JOIN sales.orders o ON o.order_id = i.order_id
    WHERE
        YEAR(order_date) = 2017;Code language: SQL (Structured Query Language) (sql)
Second, this statement returns the sales to the output:
SELECT @sales;Code language: SQL (Structured Query Language) (sql)Finally, the IF clause checks if the sales amount in 2017 is greater than 10 million. Because the sales amount is less than that, the statement block in the ELSE clause executes.
    IF @sales > 10000000
    BEGIN
        PRINT 'Great! The sales amount in 2018 is greater than 10,000,000';
    END
    ELSE
    BEGIN
        PRINT 'Sales amount in 2017 did not reach 10,000,000';
    ENDCode language: SQL (Structured Query Language) (sql)
The following shows the output:
Sales amount did not reach 10,000,000
Code language: SQL (Structured Query Language) (sql)
Nested IF...ELSE
SQL Server allows you to nest an IF...ELSE statement within inside another IF...ELSE statement, see the following example:
BEGIN
    DECLARE @x INT = 10,
            @y INT = 20;

    IF (@x > 0)
    BEGIN
        IF (@x < @y)
            PRINT 'x > 0 and x < y';
        ELSE
            PRINT 'x > 0 and x >= y';
    END
END
Code language: SQL (Structured Query Language) (sql)
In this example:
First, declare two variables @x and @y and set their values to 10 and 20 respectively:
DECLARE @x INT = 10,
        @y INT = 20;Code language: SQL (Structured Query Language) (sql)
Second, the output IF statement check if @x is greater than zero. Because @x is set to 10, the condition (@x > 10) is true. Therefore, the nested IF statement executes.
Finally, the nested IF statement check if @x is less than @y ( @x < @y). Because @y is set to 20, the condition (@x < @y) evaluates to true. The PRINT 'x > 0 and x < y'; statement in the IF branch executes.
Here is the output:
x > 0 and x < yIt is a good practice to not nest an IF statement inside another statement because it makes the code difficult to read and hard to maintain.
SQL Server WHILE
Overview of WHILE statement
The WHILE statement is a control-flow statement that allows you to execute a statement block repeatedly as long as a specified condition is TRUE.
The following illustrates the syntax of the WHILE statement:
WHILE Boolean_expression
     { sql_statement | statement_block}
Code language: SQL (Structured Query Language) (sql)
In this syntax:
First, the Boolean_expression is an expression that evaluates to TRUE or FALSE.
Second, sql_statement | statement_block is any Transact-SQL statement or a set of Transact-SQL statements. A statement block is defined using the BEGIN...END statement.
If the Boolean_expression evaluates to FALSE when entering the loop, no statement inside the WHILE loop will be executed.
Inside the WHILE loop, you must change some variables to make the Boolean_expression returns FALSE at some points. Otherwise, you will have an indefinite loop.
Note that if the Boolean_expression contains a SELECT statement, it must be enclosed in parentheses.
To exit the current iteration of the loop immediately, you use the BREAK statement. To skip the current iteration of the loop and start the new one, you use the CONTINUE statement.
SQL Server WHILE example
Let’s take an example of using the SQL Server WHILE statement to understand it better.
The following example illustrates how to use the WHILE statement to print out numbers from 1 to 5:
DECLARE @counter INT = 1;

WHILE @counter <= 5
BEGIN
    PRINT @counter;
    SET @counter = @counter + 1;
END
Code language: SQL (Structured Query Language) (sql)
Output:
1
2
3
4
5
In this example:
- First, we declared the
@countervariable and set its value to one. - Then, in the condition of the
WHILEstatement, we checked if the@counteris less than or equal to five. If it was not, we printed out the@counterand increased its value by one. After five iterations, the@counteris 6 which caused the condition of theWHILEclause evaluates toFALSE, the loop stopped.
To learn how to use the WHILE loop to process row by row, check it out the cursor tutorial.
In this tutorial, you have learned how to use the SQL Server WHILE statement to repeat the execution of a statement block based on a specified condition.
SQL Server BREAK
SQL Server BREAK statement overview
In the previous tutorial, you have learned how to use the WHILE statement to create a loop. To exit the current iteration of a loop, you use the BREAK statement.
The following illustrates the typical syntax of the BREAK statement:
WHILE Boolean_expression
BEGIN
    -- statements
   IF condition
        BREAK;
    -- other statements
END
Code language: SQL (Structured Query Language) (sql)
In this syntax, the BREAK statement exit the WHILE loop immediately once the condition specified in the IF statement is met. All the statements between the BREAK and END keywords are skipped.
Suppose we have a WHILE loop nested inside another WHILE loop:
WHILE Boolean_expression1
BEGIN
    -- statement
    WHILE Boolean_expression2
    BEGIN
        IF condition
            BREAK;
    END
END
Code language: SQL (Structured Query Language) (sql)
In this case, the BREAK statement only exits the innermost loop in the WHILE statement.
Note that the BREAK statement can be used only inside the WHILE loop. The IF statement is often used with the BREAK statement but it is not required.
SQL Server BREAK statement example
The following example illustrates how to use the BREAK statement:
DECLARE @counter INT = 0;

WHILE @counter <= 5
BEGIN
    SET @counter = @counter + 1;
    IF @counter = 4
        BREAK;
    PRINT @counter;
END
Code language: SQL (Structured Query Language) (sql)
Output:
1
2
3
In this example:
First, we declared a variable named @counter and set its value to zero.
Then, we used the WHILE statement to increases the @counter by one in each iteration and print out the @counter‘s value as long as the value of the @counter is less than or equal to five.
Inside the loop, we also checked if the value of @counter equals four, then we exited the loop. In the fourth iteration, the value of the counter reached 4, then the loop is terminated. Also, the PRINT statement after the BREAK statement was skipped.
SQL Server CONTINUE
Introduction to the SQL Server CONTINUE statement
The CONTINUE statement stops the current iteration of the loop and starts the new one. The following illustrates the syntax of the CONTINUE statement:
WHILE Boolean_expression
BEGIN
    -- code to be executed
    IF condition
        CONTINUE;
    -- code will be skipped if the condition is met
END
Code language: SQL (Structured Query Language) (sql)
In this syntax, the current iteration of the loop is stopped once the condition evaluates to TRUE. The next iteration of the loop will continue until the Boolean_expression evaluates to FALSE.
Similar to the BREAK statement, the CONTINUE statement is often used in conjunction with an IF statement. Note that this is not mandatory though.
SQL Server CONTINUE example
The following example illustrates how the CONTINUE statement works.
DECLARE @counter INT = 0;

WHILE @counter < 5
BEGIN
    SET @counter = @counter + 1;
    IF @counter = 3
        CONTINUE;
    PRINT @counter;
END
Code language: SQL (Structured Query Language) (sql)
Here is the output:
1
2
4
5
Code language: SQL (Structured Query Language) (sql)
In this example:
- First, we declared a variable named
@counterand set its value to zero. - Then, the
WHILEloop started. Inside theWHILEloop, we increased the counter by one in each iteration. If the@counterwas three, we skipped printing out the value using theCONTINUEstatement. That’s why in the output, you do not see the number three is showing up.
In this tutorial, you have learned how to use the SQL Server CONTINUE statement to skip the current loop iteration and continue the next.
SQL Server CURSOR
SQL works based on set e.g., SELECT statement returns a set of rows which is called a result set. However, sometimes, you may want to process a data set on a row by row basis. This is where cursors come into play.
What is a database cursor
A database cursor is an object that enables traversal over the rows of a result set. It allows you to process individual row returned by a query.
SQL Server cursor life cycle
These are steps for using a cursor:

First, declare a cursor.
DECLARE cursor_name CURSOR
    FOR select_statement;
Code language: SQL (Structured Query Language) (sql)
To declare a cursor, you specify its name after the DECLARE keyword with the CURSOR data type and provide a SELECT statement that defines the result set for the cursor.
Next, open and populate the cursor by executing the SELECT statement:
OPEN cursor_name;
Code language: SQL (Structured Query Language) (sql)
Then, fetch a row from the cursor into one or more variables:
FETCH NEXT FROM cursor INTO variable_list;
Code language: SQL (Structured Query Language) (sql)
SQL Server provides the @@FETCHSTATUS function that returns the status of the last cursor FETCH statement executed against the cursor; If @@FETCHSTATUS returns 0, meaning the FETCH statement was successful. You can use the WHILE statement to fetch all rows from the cursor as shown in the following code:
WHILE @@FETCH_STATUS = 0
    BEGIN
        FETCH NEXT FROM cursor_name;
    END;
Code language: SQL (Structured Query Language) (sql)
After that, close the cursor:
CLOSE cursor_name;
Code language: SQL (Structured Query Language) (sql)
Finally, deallocate the cursor:
DEALLOCATE cursor_name;
Code language: SQL (Structured Query Language) (sql)
SQL Server cursor example
We’ll use the prodution.products table from the sample database to show you how to use a cursor:
First, declare two variables to hold product name and list price, and a cursor to hold the result of a query that retrieves product name and list price from the production.products table:
DECLARE
    @product_name VARCHAR(MAX),
    @list_price   DECIMAL;

DECLARE cursor_product CURSOR
FOR SELECT
        product_name,
        list_price
    FROM
        production.products;
Code language: SQL (Structured Query Language) (sql)
Next, open the cursor:
OPEN cursor_product;
Code language: SQL (Structured Query Language) (sql)
Then, fetch each row from the cursor and print out the product name and list price:
FETCH NEXT FROM cursor_product INTO
    @product_name,
    @list_price;

WHILE @@FETCH_STATUS = 0
    BEGIN
        PRINT @product_name + CAST(@list_price AS varchar);
        FETCH NEXT FROM cursor_product INTO
            @product_name,
            @list_price;
    END;
Code language: SQL (Structured Query Language) (sql)
After that, close the cursor:
CLOSE cursor_product;
Code language: SQL (Structured Query Language) (sql)
Finally, deallocate the cursor to release it.
DEALLOCATE cursor_product;
Code language: SQL (Structured Query Language) (sql)
The following code snippets put everything together:
DECLARE
    @product_name VARCHAR(MAX),
    @list_price   DECIMAL;

DECLARE cursor_product CURSOR
FOR SELECT
        product_name,
        list_price
    FROM
        production.products;

OPEN cursor_product;

FETCH NEXT FROM cursor_product INTO
    @product_name,
    @list_price;

WHILE @@FETCH_STATUS = 0
    BEGIN
        PRINT @product_name + CAST(@list_price AS varchar);
        FETCH NEXT FROM cursor_product INTO
            @product_name,
            @list_price;
    END;

CLOSE cursor_product;

DEALLOCATE cursor_product;
Code language: SQL (Structured Query Language) (sql)
Here is the partial output:
In practice, you will rarely use the cursor to process a result set in a row-by-row manner.
SQL Server TRY CATCH
SQL Server TRY CATCH overview
The TRY CATCH construct allows you to gracefully handle exceptions in SQL Server. To use the TRY CATCH construct, you first place a group of Transact-SQL statements that could cause an exception in a BEGIN TRY...END TRY block as follows:
BEGIN TRY
   -- statements that may cause exceptions
END TRY
Code language: SQL (Structured Query Language) (sql)
Then you use a BEGIN CATCH...END CATCH block immediately after the TRY block:
BEGIN CATCH
   -- statements that handle exception
END CATCH
Code language: SQL (Structured Query Language) (sql)
The following illustrates a complete TRY CATCH construct:
BEGIN TRY
   -- statements that may cause exceptions
END TRY
BEGIN CATCH
   -- statements that handle exception
END CATCH
Code language: SQL (Structured Query Language) (sql)
If the statements between the TRY block complete without an error, the statements between the CATCH block will not execute. However, if any statement inside the TRY block causes an exception, the control transfers to the statements in the CATCH block.
The CATCH block functions
Inside the CATCH block, you can use the following functions to get the detailed information on the error that occurred:
ERROR_LINE()returns the line number on which the exception occurred.ERROR_MESSAGE()returns the complete text of the generated error message.ERROR_PROCEDURE()returns the name of the stored procedure or trigger where the error occurred.ERROR_NUMBER()returns the number of the error that occurred.ERROR_SEVERITY()returns the severity level of the error that occurred.ERROR_STATE()returns the state number of the error that occurred.
Note that you only use these functions in the CATCH block. If you use them outside of the CATCH block, all of these functions will return NULL.
Nested TRY CATCH constructs
You can nest TRY CATCH construct inside another TRY CATCH construct. However, either a TRY block or a CATCH block can contain a nested TRY CATCH, for example:
BEGIN TRY
    --- statements that may cause exceptions
END TRY
BEGIN CATCH
    -- statements to handle exception
    BEGIN TRY
        --- nested TRY block
    END TRY
    BEGIN CATCH
        --- nested CATCH block
    END CATCH
END CATCH
Code language: SQL (Structured Query Language) (sql)
SQL Server TRY CATCH examples
First, create a stored procedure named usp_divide that divides two numbers:
CREATE PROC usp_divide(
    @a decimal,
    @b decimal,
    @c decimal output
) AS
BEGIN
    BEGIN TRY
        SET @c = @a / @b;
    END TRY
    BEGIN CATCH
        SELECT
            ERROR_NUMBER() AS ErrorNumber
            ,ERROR_SEVERITY() AS ErrorSeverity
            ,ERROR_STATE() AS ErrorState
            ,ERROR_PROCEDURE() AS ErrorProcedure
            ,ERROR_LINE() AS ErrorLine
            ,ERROR_MESSAGE() AS ErrorMessage;
    END CATCH
END;
GO
Code language: SQL (Structured Query Language) (sql)
In this stored procedure, we placed the formula inside the TRY block and called the CATCH block functions ERROR_* inside the CATCH block.
Second, call the usp_divide stored procedure to divide 10 by 2:
DECLARE @r decimal;
EXEC usp_divide 10, 2, @r output;
PRINT @r;
Code language: SQL (Structured Query Language) (sql)
Here is the output
5
Code language: SQL (Structured Query Language) (sql)
Because no exception occurred in the TRY block, the stored procedure completed at the TRY block.
Third, attempt to divide 20 by zero by calling the usp_divide stored procedure:
DECLARE @r2 decimal;
EXEC usp_divide 10, 0, @r2 output;
PRINT @r2;
Code language: SQL (Structured Query Language) (sql)
The following picture shows the output:

Because of division by zero error which was caused by the formula, the control was passed to the statement inside the CATCH block which returned the error’s detailed information.
SQL Serer TRY CATCH with transactions
Inside a CATCH block, you can test the state of transactions by using the XACT_STATE() function.
- If the
XACT_STATE()function returns -1, it means that an uncommittable transaction is pending, you should issue aROLLBACK TRANSACTIONstatement. - In case the
XACT_STATE()function returns 1, it means that a committable transaction is pending. You can issue aCOMMIT TRANSACTIONstatement in this case. - If the
XACT_STATE()function return 0, it means no transaction is pending, therefore, you don’t need to take any action.
It is a good practice to test your transaction state before issuing a COMMIT TRANSACTION or ROLLBACK TRANSACTION statement in a CATCH block to ensure consistency.
Using TRY CATCH with transactions example
First, set up two new tables sales.persons and sales.deals for demonstration:
CREATE TABLE sales.persons
(
    person_id  INT
    PRIMARY KEY IDENTITY,
    first_name NVARCHAR(100) NOT NULL,
    last_name  NVARCHAR(100) NOT NULL
);

CREATE TABLE sales.deals
(
    deal_id   INT
    PRIMARY KEY IDENTITY,
    person_id INT NOT NULL,
    deal_note NVARCHAR(100),
    FOREIGN KEY(person_id) REFERENCES sales.persons(
    person_id)
);

insert into
    sales.persons(first_name, last_name)
values
    ('John','Doe'),
    ('Jane','Doe');

insert into
    sales.deals(person_id, deal_note)
values
    (1,'Deal for John Doe');
Code language: SQL (Structured Query Language) (sql)
Next, create a new stored procedure named usp_report_error that will be used in a CATCH block to report the detailed information of an error:
CREATE PROC usp_report_error
AS
    SELECT
        ERROR_NUMBER() AS ErrorNumber
        ,ERROR_SEVERITY() AS ErrorSeverity
        ,ERROR_STATE() AS ErrorState
        ,ERROR_LINE () AS ErrorLine
        ,ERROR_PROCEDURE() AS ErrorProcedure
        ,ERROR_MESSAGE() AS ErrorMessage;
GO
Code language: SQL (Structured Query Language) (sql)
Then, develop a new stored procedure that deletes a row from the sales.persons table:
CREATE PROC usp_delete_person(
    @person_id INT
) AS
BEGIN
    BEGIN TRY
        BEGIN TRANSACTION;
        -- delete the person
        DELETE FROM sales.persons
        WHERE person_id = @person_id;
        -- if DELETE succeeds, commit the transaction
        COMMIT TRANSACTION;
    END TRY
    BEGIN CATCH
        -- report exception
        EXEC usp_report_error;

        -- Test if the transaction is uncommittable.
        IF (XACT_STATE()) = -1
        BEGIN
            PRINT  N'The transaction is in an uncommittable state.' +
                    'Rolling back transaction.'
            ROLLBACK TRANSACTION;
        END;

        -- Test if the transaction is committable.
        IF (XACT_STATE()) = 1
        BEGIN
            PRINT N'The transaction is committable.' +
                'Committing transaction.'
            COMMIT TRANSACTION;
        END;
    END CATCH
END;
GO
Code language: SQL (Structured Query Language) (sql)
In this stored procedure, we used the XACT_STATE() function to check the state of the transaction before performing COMMIT TRANSACTION or ROLLBACK TRANSACTION inside the CATCH block.
After that, call the usp_delete_person stored procedure to delete the person id 2:
EXEC usp_delete_person 2;
Code language: SQL (Structured Query Language) (sql)
There was no exception occurred.
Finally, call the stored procedure usp_delete_person to delete person id 1:
EXEC usp_delete_person 1;
Code language: SQL (Structured Query Language) (sql)
The following error occurred:

In this tutorial, you have learned how to use the SQL Server TRY CATCH construct to handle exceptions in stored procedures.
SQL Server RAISERROR
Summary: in this tutorial, you will learn how to use the SQL Server RAISERROR statement to generate user-defined error messages.
If you develop a new application, you should use the THROW statement instead.
SQL Server RAISEERROR statement overview
The RAISERROR statement allows you to generate your own error messages and return these messages back to the application using the same format as a system error or warning message generated by SQL Server Database Engine. In addition, the RAISERROR statement allows you to set a specific message id, level of severity, and state for the error messages.
The following illustrates the syntax of the RAISERROR statement:
RAISERROR ( { message_id | message_text | @local_variable }
    { ,severity ,state }
    [ ,argument [ ,...n ] ] )
    [ WITH option [ ,...n ] ];
Code language: SQL (Structured Query Language) (sql)
Let’s examine the syntax of the RAISERROR for better understanding.
message_id
The message_id is a user-defined error message number stored in the sys.messages catalog view.
To add a new user-defined error message number, you use the stored procedure sp_addmessage. A user-defined error message number should be greater than 50,000. By default, the RAISERROR statement uses the message_id 50,000 for raising an error.
The following statement adds a custom error message to the sys.messages view:
EXEC sp_addmessage
    @msgnum = 50005,
    @severity = 1,
    @msgtext = 'A custom error message';
Code language: SQL (Structured Query Language) (sql)
To verify the insert, you use the following query:
SELECT
    *
FROM
    sys.messages
WHERE
    message_id = 50005;
Code language: SQL (Structured Query Language) (sql)
To use this message_id, you execute the RAISEERROR statement as follows:
RAISERROR ( 50005,1,1)
Code language: SQL (Structured Query Language) (sql)
Here is the output:
A custom error message
Msg 50005, Level 1, State 1
Code language: SQL (Structured Query Language) (sql)
To remove a message from the sys.messages, you use the stored procedure sp_dropmessage. For example, the following statement deletes the message id 50005:
EXEC sp_dropmessage
    @msgnum = 50005;
Code language: SQL (Structured Query Language) (sql)
message_text
The message_text is a user-defined message with formatting like the printf function in C standard library. The message_text can be up to 2,047 characters, 3 last characters are reserved for ellipsis (…). If the message_text contains 2048 or more, it will be truncated and is padded with an ellipsis.
When you specify the message_text, the RAISERROR statement uses message_id 50000 to raise the error message.
The following example uses the RAISERROR statement to raise an error with a message text:
RAISERROR ( 'Whoops, an error occurred.',1,1)
Code language: SQL (Structured Query Language) (sql)
The output will look like this:
Whoops, an error occurred.
Msg 50000, Level 1, State 1
Code language: SQL (Structured Query Language) (sql)
severity
The severity level is an integer between 0 and 25, with each level representing the seriousness of the error.
0–10 Informational messages
11–18 Errors
19–25 Fatal errors
Code language: SQL (Structured Query Language) (sql)
state
The state is an integer from 0 through 255. If you raise the same user-defined error at multiple locations, you can use a unique state number for each location to make it easier to find which section of the code is causing the errors. For most implementations, you can use 1.
WITH option
The option can be LOG, NOWAIT, or SETERROR:
WITH LOGlogs the error in the error log and application log for the instance of the SQL Server Database Engine.WITH NOWAITsends the error message to the client immediately.WITH SETERRORsets theERROR_NUMBERand@@ERRORvalues to message_id or 50000, regardless of the severity level.
SQL Server RAISERROR examples
Let’s take some examples of using the RAISERROR statement to get a better understanding.
A) Using SQL Server RAISERROR with TRY CATCH block example
In this example, we use the RAISERROR inside a TRY block to cause execution to jump to the associated CATCH block. Inside the CATCH block, we use the RAISERROR to return the error information that invoked the CATCH block.
DECLARE
    @ErrorMessage  NVARCHAR(4000),
    @ErrorSeverity INT,
    @ErrorState    INT;

BEGIN TRY
    RAISERROR('Error occurred in the TRY block.', 17, 1);
END TRY
BEGIN CATCH
    SELECT
        @ErrorMessage = ERROR_MESSAGE(),
        @ErrorSeverity = ERROR_SEVERITY(),
        @ErrorState = ERROR_STATE();

    -- return the error inside the CATCH block
    RAISERROR(@ErrorMessage, @ErrorSeverity, @ErrorState);
END CATCH;
Code language: SQL (Structured Query Language) (sql)
Here is the output:
Msg 50000, Level 17, State 1, Line 16
Error occurred in the TRY block.
Code language: SQL (Structured Query Language) (sql)
B) Using SQL Server RAISERROR statement with a dynamic message text example
The following example shows how to use a local variable to provide the message text for a RAISERROR statement:
DECLARE @MessageText NVARCHAR(100);
SET @MessageText = N'Cannot delete the sales order %s';

RAISERROR(
    @MessageText, -- Message text
    16, -- severity
    1, -- state
    N'2001' -- first argument to the message text
);
Code language: SQL (Structured Query Language) (sql)
The output is as follows:
Msg 50000, Level 16, State 1, Line 5
Cannot delete the sales order 2001
Code language: SQL (Structured Query Language) (sql)
When to use RAISERROR statement
You use the RAISERROR statement in the following scenarios:
- Troubleshoot Transact-SQL code.
- Return messages that contain variable text.
- Examine the values of data.
- Cause the execution to jump from a
TRYblock to the associatedCATCHblock. - Return error information from the
CATCHblock to the callers, either calling batch or application.
In this tutorial, you will learn how to use the SQL Server RAISERROR statement to generate user-defined error messages.
SQL Server THROW
SQL Server THROW statement overview
The THROW statement raises an exception and transfers execution to a CATCH block of a TRY CATCH construct.
The following illustrates the syntax of the THROW statement:
THROW [ error_number ,
        message ,
        state ];
Code language: SQL (Structured Query Language) (sql)
In this syntax:
error_number
The error_number is an integer that represents the exception. The error_number must be greater than 50,000 and less than or equal to 2,147,483,647.
message
The message is a string of type NVARCHAR(2048) that describes the exception.
state
The state is a TINYINT with the value between 0 and 255. The state indicates the state associated with the message.
If you don’t specify any parameter for the THROW statement, you must place the THROW statement inside a CATCH block:
BEGIN TRY
    -- statements that may cause errors
END TRY
BEGIN CATCH
    -- statement to handle errors
    THROW;
END CATCH
Code language: SQL (Structured Query Language) (sql)
In this case, the THROW statement raises the error that was caught by the CATCH block.
Note that the statement before the THROW statement must be terminated by a semicolon (;)
THROW vs. RAISERROR
The following table illustrates the difference between the THROW statement and RAISERROR statement:
| RAISERROR | THROW |
|---|---|
The message_id that you pass to RAISERROR must be defined in sys.messages view. | The error_number parameter does not have to be defined in the sys.messages view. |
The message parameter can contain printf formatting styles such as %s and %d. | The message parameter does not accept printf style formatting. Use FORMATMESSAGE() function to substitute parameters. |
| The severity parameter indicates the severity of the exception. | The severity of the exception is always set to 16. |
SQL Server THROW statement examples
Let’s take some examples of using the THROW statement to get a better understanding.
A) Using THROW statement to raise an exception
The following example uses the THROW statement to raise an exception:
THROW 50005, N'An error occurred', 1;
Code language: SQL (Structured Query Language) (sql)
Here is the output:
Msg 50005, Level 16, State 1, Line 1
An error occurred
Code language: SQL (Structured Query Language) (sql)
B) Using THROW statement to rethrow an exception
First, create a new table t1 for the demonstration:
CREATE TABLE t1(
    id int primary key
);
GO
Code language: SQL (Structured Query Language) (sql)
Then, use the THROW statement without arguments in the CATCH block to rethrow the caught error:
BEGIN TRY
    INSERT INTO t1(id) VALUES(1);
    --  cause error
    INSERT INTO t1(id) VALUES(1);
END TRY
BEGIN CATCH
    PRINT('Raise the caught error again');
    THROW;
END CATCH
Code language: SQL (Structured Query Language) (sql)
Here is the output:
(1 row affected)

(0 rows affected)
Raise the caught error again
Msg 2627, Level 14, State 1, Line 10
Violation of PRIMARY KEY constraint 'PK__t1__3213E83F906A55AA'. Cannot insert duplicate key in object 'dbo.t1'. The duplicate key value is (1).Code language: JavaScript (javascript)
In this example, the first INSERT statement succeeded. However, the second one failed due to the primary key constraint. Therefore, the error was caught by the CATCH block was raised again by the THROW statement.
C) Using THROW statement to rethrow an exception
Unlike the RAISERROR statement, the THROW statement does not allow you to substitute parameters in the message text. Therefore, to mimic this function, you use the FORMATMESSAGE() function.
The following statement adds a custom message to the sys.messages catalog view:
EXEC sys.sp_addmessage
    @msgnum = 50010,
    @severity = 16,
    @msgtext =
    N'The order number %s cannot be deleted because it does not exist.',
    @lang = 'us_english';
GO
Code language: SQL (Structured Query Language) (sql)
This statement uses the message_id 50010 and replaces the %s placeholder by an order id ‘1001’:
DECLARE @MessageText NVARCHAR(2048);
SET @MessageText =  FORMATMESSAGE(50010, N'1001');

THROW 50010, @MessageText, 1;
Code language: SQL (Structured Query Language) (sql)
Here is the output:
Msg 50010, Level 16, State 1, Line 8
The order number 1001 cannot be deleted because it does not exist.
Code language: SQL (Structured Query Language) (sql)
In this tutorial, you have learned how to use the SQL Server THROW statement to raise an exception.
SQL Server Dynamic SQL
Introduction to Dynamic SQL
Dynamic SQL is a programming technique that allows you to construct SQL statements dynamically at runtime. It allows you to create more general purpose and flexible SQL statement because the full text of the SQL statements may be unknown at compilation. For example, you can use the dynamic SQL to create a stored procedure that queries data against a table whose name is not known until runtime.
Creating a dynamic SQL is simple, you just need to make it a string as follows:
'SELECT * FROM production.products';
Code language: SQL (Structured Query Language) (sql)
To execute a dynamic SQL statement, you call the stored procedure sp_executesql as shown in the following statement:
EXEC sp_executesql N'SELECT * FROM production.products';Code language: SQL (Structured Query Language) (sql)Because the sp_executesql accepts the dynamic SQL as a Unicode string, you need to prefix it with an N.
Though this dynamic SQL is not very useful, it illustrates a dynamic SQL very well.
Using dynamic SQL to query from any table example
First, declare two variables, @table for holding the name of the table from which you want to query and @sql for holding the dynamic SQL.
DECLARE
    @table NVARCHAR(128),
    @sql NVARCHAR(MAX);
Code language: SQL (Structured Query Language) (sql)
Second, set the value of the @table variable to production.products.
SET @table = N'production.products';
Code language: SQL (Structured Query Language) (sql)
Third, construct the dynamic SQL by concatenating the SELECT statement with the table name parameter:
SET @sql = N'SELECT * FROM ' + @table;
Code language: SQL (Structured Query Language) (sql)
Fourth, call the sp_executesql stored procedure by passing the @sql parameter.
EXEC sp_executesql @sql;
Code language: SQL (Structured Query Language) (sql)
Putting it all together:
DECLARE
    @table NVARCHAR(128),
    @sql NVARCHAR(MAX);

SET @table = N'production.products';

SET @sql = N'SELECT * FROM ' + @table;

EXEC sp_executesql @sql;
Code language: SQL (Structured Query Language) (sql)
The code block above produces the exact result set as the following statement:
SELECT * FROM production.products;
Code language: SQL (Structured Query Language) (sql)
To query data from another table, you change the value of the @table variable. However, it’s more practical if we wrap the above T-SQL block in a stored procedure.
SQL Server dynamic SQL and stored procedures
This stored procedure accepts any table and returns the result set from a specified table by using the dynamic SQL:
CREATE PROC usp_query (
    @table NVARCHAR(128)
)
AS
BEGIN

    DECLARE @sql NVARCHAR(MAX);
    -- construct SQL
    SET @sql = N'SELECT * FROM ' + @table;
    -- execute the SQL
    EXEC sp_executesql @sql;

END;
Code language: SQL (Structured Query Language) (sql)
The following statement calls the usp_query stored procedure to return all rows from the production.brands table:
EXEC usp_query 'production.brands';
Code language: SQL (Structured Query Language) (sql)
This stored procedure returns the top 10 rows from a table by the values of a specified column:
CREATE OR ALTER PROC usp_query_topn(
    @table NVARCHAR(128),
    @topN INT,
    @byColumn NVARCHAR(128)
)
AS
BEGIN
    DECLARE
        @sql NVARCHAR(MAX),
        @topNStr NVARCHAR(MAX);

    SET @topNStr  = CAST(@topN as nvarchar(max));

    -- construct SQL
    SET @sql = N'SELECT TOP ' +  @topNStr  +
                ' * FROM ' + @table +
                    ' ORDER BY ' + @byColumn + ' DESC';
    -- execute the SQL
    EXEC sp_executesql @sql;

END;
Code language: SQL (Structured Query Language) (sql)
For example, you can get the top 10 most expensive products from the production.products table:
EXEC usp_query_topn
        'production.products',
        10,
        'list_price';
Code language: SQL (Structured Query Language) (sql)
This statement returns the top 10 products with the highest quantity in stock:
EXEC usp_query_topn
        'production.tocks',
        10,
        'quantity';
Code language: SQL (Structured Query Language) (sql)
SQL Server Dynamic SQL and SQL Injection
Let’s create a new table named sales.tests for the demonstration:
CREATE TABLE sales.tests(id INT);
Code language: SQL (Structured Query Language) (sql)
This statement returns all rows from the production.brands table:
EXEC usp_query 'production.brands';
Code language: SQL (Structured Query Language) (sql)
But it does not prevent users from passing the table name as follows:
EXEC usp_query 'production.brands;DROP TABLE sales.tests';
Code language: SQL (Structured Query Language) (sql)
This technique is called SQL injection. Once the statement is executed, the sales.tests table is dropped, because the stored procedure usp_query executes both statements:
SELECT * FROM production.brands;DROP TABLE sales.tests
Code language: SQL (Structured Query Language) (sql)
To prevent this SQL injection, you can use the QUOTENAME() function as shown in the following query:
CREATE OR ALTER PROC usp_query
(
    @schema NVARCHAR(128),
    @table  NVARCHAR(128)
)
AS
    BEGIN
        DECLARE
            @sql NVARCHAR(MAX);
        -- construct SQL
        SET @sql = N'SELECT * FROM '
            + QUOTENAME(@schema)
            + '.'
            + QUOTENAME(@table);
        -- execute the SQL
        EXEC sp_executesql @sql;
    END;
Code language: SQL (Structured Query Language) (sql)
Now, if you pass the schema and table name to the stored procedure, it will work:
EXEC usp_query 'production','brands';
Code language: SQL (Structured Query Language) (sql)
However, if you try to inject another statement such as:
EXEC usp_query
        'production',
        'brands;DROP TABLE sales.tests';
Code language: SQL (Structured Query Language) (sql)
It will issue the following error:
Invalid object name 'production.brands;DROP TABLE sales.tests'.
Code language: SQL (Structured Query Language) (sql)
More on sp_executesql stored procedure
The sp_executesql has the following syntax:
EXEC sp_executesql
    sql_statement
    parameter_definition
    @param1 = value1,
    @param2 = value2,
    ...
Code language: SQL (Structured Query Language) (sql)
In this syntax:
sql_statementis a Unicode string that contains a T-SQL statement. Thesql_statementcan contain parameters such asSELECT * FROM table_name WHERE id=@idparameter_definitionis a string that contains the definition of all parameters embedded in thesql_statement. Each parameter definition consists of a parameter name and its data type e.g.,@id INT. The parameter definitions are separated by a comma (,).@param1 = value1,@param2 = value2,… specify a value for every parameter defined in theparameter_definitionstring.
This example uses the sp_executesql stored procedure to find products which have list price greater than 100 and category 1:
EXEC sp_executesql
N'SELECT *
    FROM
        production.products
    WHERE
        list_price> @listPrice AND
        category_id = @categoryId
    ORDER BY
        list_price DESC',
N'@listPrice DECIMAL(10,2),
@categoryId INT'
,@listPrice = 100
,@categoryId = 1;
Code language: SQL (Structured Query Language) (sql)
In this tutorial, you have learned how to use the SQL Server dynamic SQL to construct general purpose and flexible SQL statements.
Note that you need to execute the whole batch or you will get an error:
DECLARE @product_table TABLE (
    product_name VARCHAR(MAX) NOT NULL,
    brand_id INT NOT NULL,
    list_price DEC(11,2) NOT NULL
);

INSERT INTO @product_table
SELECT
    product_name,
    brand_id,
    list_price
FROM
    production.products
WHERE
    category_id = 1;

SELECT
    *
FROM
    @product_table;
GOCode language: SQL (Structured Query Language) (sql)
The following picture shows the partial output:
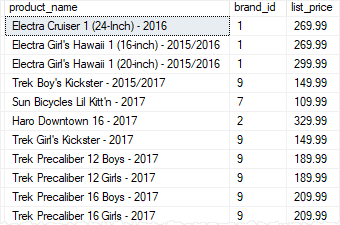
caching in .NET
In .NET, caching is the process of storing frequently accessed data in memory for faster access and improved performance. The caching mechanism allows the application to retrieve data quickly without having to read from the original source, such as a database or file system, every time it is requested.
There are several ways to implement caching in .NET:
- MemoryCache Class: The MemoryCache class is provided by the .NET Framework and allows caching of data in memory. It provides methods to add, retrieve, and remove items from the cache.
- Distributed Cache: Distributed caching is used when multiple instances of an application are running across multiple servers, and caching needs to be synchronized across all instances. .NET provides several distributed caching options such as Redis, NCache, and AppFabric Cache.
- Output Caching: Output caching is used to cache the output of a web page, including HTML, images, and other resources. This can improve the performance of the web application by reducing the load on the server.
- ASP.NET Caching: ASP.NET provides several caching mechanisms such as page caching, fragment caching, and data caching. These caching mechanisms are designed to improve the performance of web applications by reducing the number of requests made to the server.
By implementing caching, you can reduce the load on your application’s resources and provide faster access to frequently accessed data, resulting in improved performance and user experience.
Distributed caching is a great option for improving the performance of .NET webforms applications. It allows you to store frequently accessed data in a distributed cache across multiple servers, making it easily accessible and reducing the load on the database and application servers.
To implement distributed caching in a .NET webforms application, you can use one of the following distributed caching solutions:
- Redis Cache: Redis is a popular distributed caching solution that supports a variety of data structures, including strings, hashes, lists, sets, and more. It can be easily integrated into a .NET webforms application using the StackExchange.Redis library.
- NCache: NCache is another distributed caching solution for .NET applications that provides high-performance, scalable caching capabilities. It can be easily integrated into a .NET webforms application using the NCache SDK.
- AppFabric Cache: AppFabric Cache is a distributed caching solution provided by Microsoft that supports both in-memory and disk-based caching. It can be easily integrated into a .NET webforms application using the Microsoft.ApplicationServer.Caching.Client library.
Once you have chosen a distributed caching solution, you can use it to store frequently accessed data such as user sessions, application configuration settings, and frequently queried data from the database. By using distributed caching, you can reduce the load on the database and application servers, leading to improved performance and scalability for your webforms application.
Here’s an example of how to use NCache in a .NET WebForms application:
- First, you need to download and install NCache on your server(s). You can download the installation files from the NCache website and follow the installation wizard to install NCache.
- Once NCache is installed, you can create a new cache in your WebForms application using the following code:
csharpCopy codeusing Alachisoft.NCache.Web.Caching;

// Create a new instance of the cache
var cache = NCache.InitializeCache("myCache");

// Add an item to the cache
cache.Insert("myKey", "myValue");
In this code, we first import the Alachisoft.NCache.Web.Caching namespace, which contains the NCache API. We then create a new instance of the cache using the NCache.InitializeCache method, passing in the name of the cache as a parameter. Finally, we insert an item into the cache using the Insert method, specifying a key and a value.
- You can retrieve an item from the cache using the following code:
csharpCopy code// Retrieve an item from the cache
var value = cache.Get("myKey");
In this code, we use the Get method to retrieve the value of an item in the cache, passing in the key as a parameter.
- You can remove an item from the cache using the following code:
csharpCopy code// Remove an item from the cache
cache.Remove("myKey");
In this code, we use the Remove method to remove an item from the cache, passing in the key as a parameter.
- You can also set expiration policies for items in the cache using the following code:
csharpCopy code// Add an item to the cache with a sliding expiration of 10 minutes
var policy = new CacheItemPolicy { SlidingExpiration = TimeSpan.FromMinutes(10) };
cache.Insert("myKey", "myValue", policy);
In this code, we create a new CacheItemPolicy object, which allows us to set expiration policies for items in the cache. We then insert an item into the cache using the Insert method, passing in the key, value, and policy as parameters.
These are just a few examples of how to use NCache in a .NET WebForms application. NCache provides many more features and APIs for advanced caching scenarios, such as distributed caching, data partitioning, and cache synchronization.
SQL Query Optimization: How to Tune Performance of SQL Queries

In the article, we are going to examine how to optimize SQL queries and improve query performance by using SQL query optimization tips and techniques, such as execution plans, indexes, wildcards, and many others.

When businesses and companies face SQL Server performance challenges, they focus usually on applying performance tuning tools and optimization techniques. This will help not only analyze and make queries run faster but also eliminate performance issues, troubleshoot poor performance, and avoid any chaos or minimize the impact on SQL Server databases.
Contents
- SQL query optimization basics
- 12 Query optimization tips for better performance
- Tip 1: Add missing indexes
- Tip 2: Check for unused indexes
- Tip 3: Avoid using multiple OR in the FILTER predicate
- Tip 4: Use wildcards at the end of a phrase only
- Tip 5: Avoid too many JOINs
- Tip 6: Avoid using SELECT DISTINCT
- Tip 7: Use SELECT fields instead of SELECT *
- Tip 8: Use TOP to sample query results
- Tip 9: Run the query during off-peak hours
- Tip 10: Minimize the usage of any query hint
- Tip 11: Minimize large write operations
- Tip 12: Create joins with INNER JOIN (not WHERE)
- SQL query optimization best practices
SQL query optimization basics
Query optimization is a process of defining the most efficient and optimal way and techniques that can be used to improve query performance based on rational use of system resources and performance metrics. The purpose of query tuning is to find a way to decrease the response time of the query, prevent the excessive consumption of resources, and identify poor query performance.
In the context of query optimization, query processing identifies how to faster retrieve data from SQL Server by analyzing execution steps of the query, optimization techniques, and other information about the query.
12 Query optimization tips for better performance
Monitoring metrics can be used to evaluate query runtime, detect performance pitfalls, and show how they can be improved. For example, they include:
- Execution plan: A SQL Server query optimizer executes the query step by step, scans indexes to retrieve data, and provides a detailed overview of metrics during query execution.
- Input/Output statistics: Used to identify the number of logical and physical reading operations during the query execution that helps users detect cache/memory capacity issues.
- Buffer cache: Used to reduce memory usage on the server.
- Latency: Used to analyze the duration of queries or operations.
- Indexes: Used to accelerate reading operations on the SQL Server.
- Memory-optimized tables: Used to store table data in memory to make reading and writing operations run faster.
Now, we’ll discuss the best SQL Server performance tuning practices and tips you may apply when writing SQL queries.
Tip 1: Add missing indexes
Table indexes in databases help retrieve information faster and more efficiently.
In SQL Server, when you execute a query, the optimizer generates an execution plan. If it detects the missing index that may be created to optimize performance, the execution plan suggests this in the warning section. With this suggestion, it informs you which columns the current SQL should be indexed, and how performance can be improved upon completion.
Let’s run the Query Profiler available in dbForge Studio for SQL Server to see how it works.
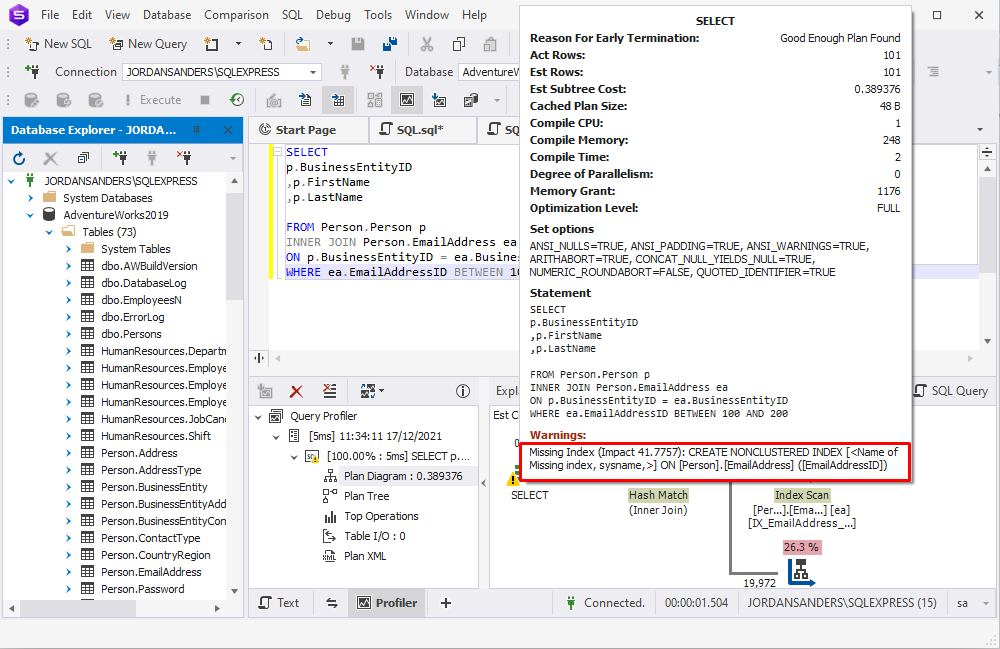
You can also understand which tables need indexes by analyzing graphical query plans. The thicker the arrow between operators on the query execution plan is, the more data is passed. Seeing thick arrows you need to think about adding indexes to the tables being processed to reduce the amount of data passed through the arrow.
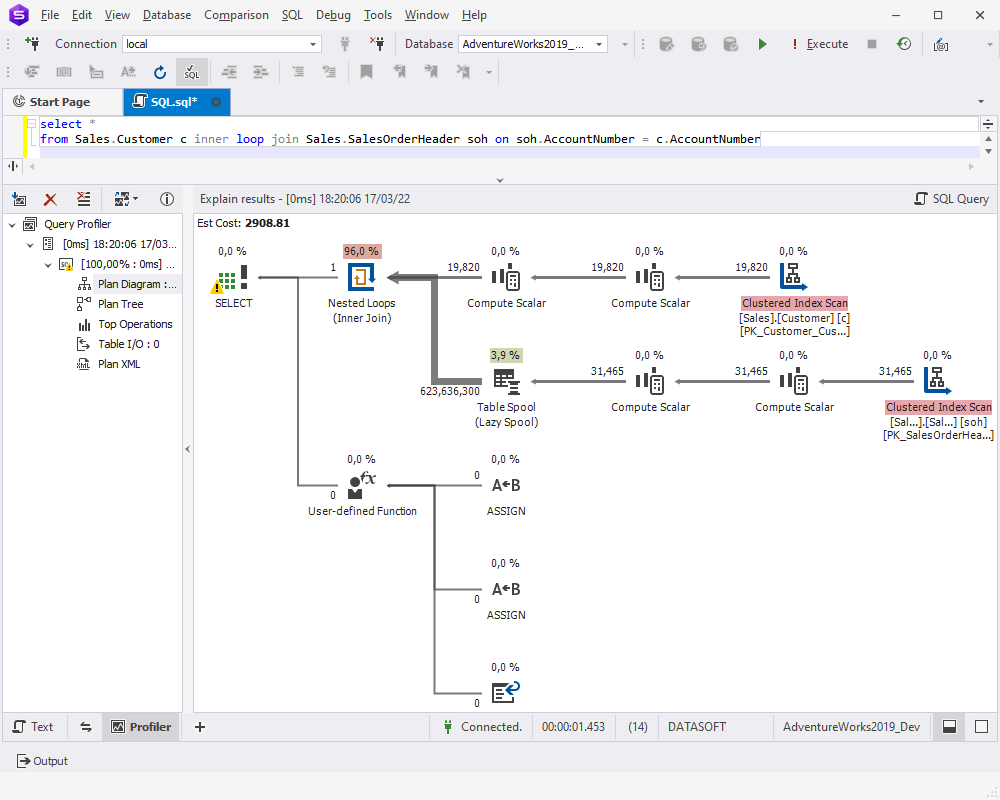
On the execution plan, you might encounter Table Spool (Lazy Spool in our case) that builds a temporary table in the tempdb and fills it in a lazy manner. Simply put, the table is filled by reading and storing the data only when individual rows are required by the parent operator. The Index Spool operator works in a somehow similar manner—all input rows are scanned and a copy of each row is placed in a hidden spool file that is stored in the tempdb database and exists only for the lifetime of the query. After that, an index on the rows is built. Both Table Spool and Index Spool might require optimization and adding indexes on the corresponding tables.
Nested Loops might also need your attention. Nested Loops must be indexed, as they take the first value from the first table and search for a match in the second table. Without indexes, SQL Server will have to scan and process the whole table, which can be time-consuming and resource-intensive.
Keep in mind that the missing index does not 100% guarantee better performance. In SQL Server, you can use the following dynamic management views to get a deep insight in using indexes based on query execution history:
- sys.dm_db_missing_index_details: Provides information about the suggested missing index, except for spatial indexes.
- sys.dm_db_missing_index_columns: Returns information about the table columns that do not contain indexes.
- sys.dm_db_missing_index_group_stats: Returns summary information about the missing index group, such as query cost, avg_user_impact (informs you how much performance can be improved by increasing the missing index), and some other metrics to measure effectiveness.
- sys.dm_db_missing_index_groups: Provides information about missing indexes included in a specific index group.
Tip 2: Check for unused indexes
You may encounter a situation where indexes exist but are not being used. One of the reasons for that might be implicit data type conversion. Let’s consider the following query:
SELECT
  *
FROM TestTable
WHERE IntColumn = '1';
When executing this query, SQL Server will perform implicit data type conversion, i.e. convert int data to varchar and run the comparison only after that. In this case, indexes won’t be used. How can you avoid this? We recommend using the CAST() function that converts a value of any type into a specified datatype. Look at the query below.
SELECT
  *
FROM TestTable
WHERE IntColumn = CAST(@char AS INT);
Let’s study one more example.
SELECT
  *
FROM TestTable
WHERE DATEPART(YEAR, SomeMyDate) = '2021';
In this case, implicit data type conversion will take place too, and the indexes won’t be used. To avoid this, we can optimize the query in the following way:
SELECT
  *
FROM TestTable
WHERE SomeDate >= '20210101'
AND SomeDate < '20220101'
Filtered indexes can affect performance too. Suppose, we have an index on the Customer table.
CREATE UNIQUE NONCLUSTERED INDEX IX ON Customer (MembershipCode)
WHERE MembershipCode IS NOT NULL;
The index won’t work for the following query:
SELECT
  *
FROM Customer
WHERE MembershipCode = '258410';
To get use of the index, you’ll need to optimize the query in the following way:
SELECT
  *
FROM Customer
WHERE MembershipCode = '258410'
AND MembershipCode IS NOT NULL;
Tip 3: Avoid using multiple OR in the FILTER predicate
When you need to combine two or more conditions, it is recommended to eliminate the usage of the OR operator or split the query into parts separating search expressions. SQL Server can not process OR within one operation. Instead, it evaluates each component of the OR which, in turn, may lead to poor performance.
Let’s consider the following query.
SELECT
  *
FROM USER
WHERE Name = @P
OR login = @P;
If we split this query into two SELECT queries and combine them by using the UNION operator, SQL Server will be able to make use of the indexes, and the query will be optimized.
SELECT * FROM USER
WHERE Name = @P
UNION
SELECT * FROM USER
WHERE login = @P;
Tip 4: Use wildcards at the end of a phrase only
Wildcards serve as a placeholder for words and phrases and can be added at the beginning/end of them. To make data retrieval faster and more efficient, you can use wildcards in the SELECT statement at the end of a phrase. For example:
SELECT
  p.BusinessEntityID
 ,p.FirstName
 ,p.LastName
 ,p.Title
FROM Person.Person p
WHERE p.FirstName LIKE 'And%';
As a result, the query will retrieve a list of customers whose First Name matches the specified condition, i.e. their First Name starts with ‘And’.
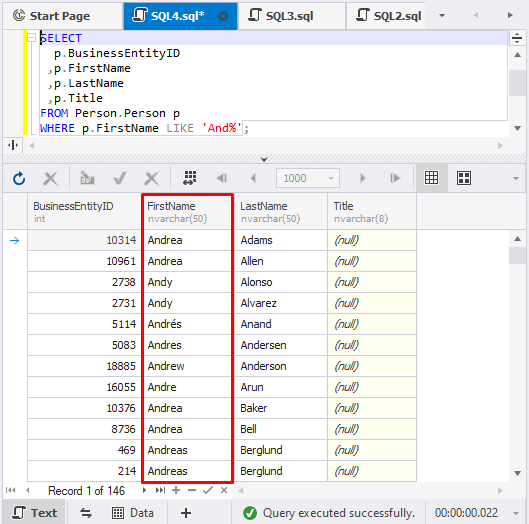
However, you might encounter situations where you regularly need to search by the last symbols of a word, number, or phrase—for example, by the last digits of a telephone number. In this case, we recommend creating a persisted computed column and running the REVERSE() function on it for easier back-searching.
CREATE TABLE dbo.Customer (
  id INT IDENTITY PRIMARY KEY
 ,CardNo VARCHAR(128)
 ,ReversedCardNo AS REVERSE(CardNo) PERSISTED
)
GO

CREATE INDEX ByReversedCardNo ON dbo.Customer (ReversedCardNo)
GO
CREATE INDEX ByCardNo ON dbo.Customer (CardNo)
GO

INSERT INTO dbo.Customer (CardNo)
  SELECT
    NEWID()
  FROM master.dbo.spt_values sv

SELECT TOP 100
  *
FROM Customer c

--searching for CardNo that end in 510c
SELECT
  *
FROM dbo.Customer
WHERE CardNo LIKE '%510c'

SELECT
  *
FROM dbo.Customer
WHERE ReversedCardNo LIKE REVERSE('%510c')
Tip 5: Avoid too many JOINs
When you add multiple tables to a query and join them, you may overload it. In addition, a large number of tables to retrieve data from may result in an inefficient execution plan. When generating a plan, the SQL query optimizer needs to identify how the tables are joined, in which order, how and when to apply filters and aggregation.
JOIN elimination is one of the many techniques to achieve efficient query plans. You can split a single query into several separate queries which can later be joined, and thus remove unnecessary joins, subqueries, tables, etc.
Tip 6: Avoid using SELECT DISTINCT
The SQL DISTINCT operator is used to select only unique values of the column and thus eliminate duplicated values. It has the following syntax:
SELECT DISTINCT column_name FROM table_name;However, this may require the tool to process large volumes of data and as a result, make the query run slowly. Generally, it is recommended to avoid using SELECT DISTINCT and simply execute the SELECT statement but specify columns.
Another issue is that quite often people build JOINs unnecessarily, and when the data doubles, they add DISTINCT. This happens mainly in a leader-follower relation when people do SELECT DISTINCT … FROM LEADER JOIN FOLLOWER… instead of doing the correct SELECT … FROM LEADER WHERE EXISTS (SELECT… FROM FOLLOWER).
Tip 7: Use SELECT fields instead of SELECT *
The SELECT statement is used to retrieve data from the database. In the case of large databases, it is not recommended to retrieve all data because this will take more resources on querying a huge volume of data.
If we execute the following query, we will retrieve all data from the Users table, including, for example, users’ avatar pictures. The result table will contain lots of data and will take too much memory and CPU usage.
SELECT
  *
FROM Users;
Instead, you can specify the exact columns you need to get data from, thus, saving database resources. In this case, SQL Server will retreive only the required data, and the query will have lower cost.
For example:
SELECT
    FirstName
   ,LastName
   ,Email
   ,Login
FROM Users;
If you need to retreive this data regularly, for example, for authenthification purposes, we recommend using covering indexes, the biggest advantage of which is that they contain all the fields required by query and can significantly improve query performance and guarantee better results.
CREATE NONCLUSTERED INDEX IDX_Users_Covering ON Users
INCLUDE (FirstName, LastName, Email, Login)
Tip 8: Use TOP to sample query results
The SELECT TOP command is used to set a limit on the number of records to be returned from the database. To make sure that your query will output the required result, you can use this command to fetch several rows as a sample.
For example, take the query from the previous section and define the limit of 5 records in the result set.
SELECT TOP 5
  p.BusinessEntityID
 ,p.FirstName
 ,p.LastName
 ,p.Title
FROM Person.Person p
WHERE p.FirstName LIKE 'And%';
This query will retrieve only 5 records matching the condition:
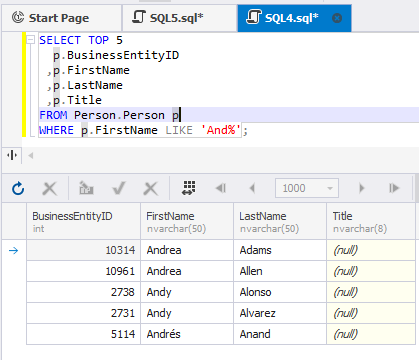
Tip 9: Run the query during off-peak hours
Another SQL tuning technique is to schedule the query execution at off-peak hours, especially if you need to run multiple SELECT queries from large tables, or execute complex queries with nested subqueries, looping queries, etc. If you are running a heavy query against a database, SQL Server locks tables you are working with to prevent concurrent use of resources by different transactions. That means that other users are not able to work with those tables. Thus, executing heavy queries at peak times leads not only to server overload but also to restricting other users’ access to certain amounts of data. One of the popular mechanisms to avoid this is to use the WITH (NOLOCK) hint. It allows the user to retrieve the data without being affected by the locks. The biggest drawback of using WITH (NOLOCK) is that it may result in working with dirty data. We recommend that users should give preference to snapshot isolation which helps avoid data locking by using row versioning and guarantees that each transaction sees a consistent snapshot of the database.
Tip 10: Minimize the usage of any query hint
When you face performance issues, you may use query hints to optimize queries. They are specified in T-SQL statements and make the optimizer select the execution plan based on this hint. Usually, query hints include NOLOCK, Optimize For and Recompile. However, you should carefully consider their usage because sometimes they may cause more unexpected side effects, undesirable impacts, or even break business logic when trying to solve the issue. For example, you write additional code for the hints that can be inapplicable or obsolete after a while. This means that you should always monitor, manage, check, and keep hints up to date.
Tip 11: Minimize large write operations
Writing, modifying, deleting, or importing large volumes of data may impact query performance and even block the table when it requires updating and manipulating data, adding indexes or check constraints to queries, processing triggers, etc. In addition, writing a lot of data will increase the size of log files. Thus, large write operations may not be a huge performance issue, but you should be aware of their consequences and be prepared in case of unexpected behavior.
One of the bet practices in optimizing SQL Server performance lies in using filegroups that allow you to spread your data across multiple physical disks. Thereby multiple write operations can be processed simultaneously and thus much faster.
Compression and data partitioning can also optimize performance and help minimize the cost of large write operations.
Tip 12: Create JOINs with INNER JOIN (not WHERE)
The INNER JOIN statement returns all matching rows from joined tables, while the WHERE clause filters the resulting rows based on the specified condition. Retrieving data from multiple tables based on the WHERE keyword condition is called NON-ANSI JOINs while INNER JOIN belongs to ANSI JOINs.
There is no difference for SQL Server how you write the query – using ANSI or NON-ANSI joins – it’s just much easier to understand and analyze queries written using ANSI joins. You can clearly see where the JOIN conditions and the WHERE filters are, whether you missed any JOIN or filter predicates, whether you joined the required tables, etc.
Let’s see how to optimize a SQL query with INNER JOIN on a particular example. We are going to retrieve data from the tables HumanResources.Department and HumanResources.EmployeeDepartmentHistory where DepartmentIDs are the same. First, execute the SELECT statement with the INNER JOIN type:
SELECT
  d.DepartmentID
 ,d.Name
 ,d.GroupName
FROM HumanResources.Department d
INNER JOIN HumanResources.EmployeeDepartmentHistory edh
  ON d.DepartmentID = edh.DepartmentID
Then, use the WHERE clause instead of INNER JOIN to join the tables in the SELECT statement:
SELECT
  d.Name
 ,d.GroupName
 ,d.DepartmentID
FROM HumanResources.Department d
    ,HumanResources.EmployeeDepartmentHistory edh
WHERE d.DepartmentID = edh.DepartmentID
Both queries will output the following result:
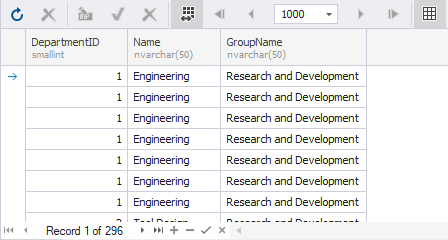
SQL query optimization best practices
SQL Server performance tuning and SQL query optimization are some of the main aspects for database developers and administrators. They need to carefully consider the usage of specific operators, the number of tables on a query, the size of a query, its execution plan, statistics, resource allocation, and other performance metrics – all that may improve and tune query performance or make it worse.
For better query performance, we recommend using tips and techniques presented in the article, such as running queries at off-peak hours, creating indexes, retrieving data only for the specific columns, applying the correct filter, joins, and operators, as well as trying not to overload queries.
Conclusion
In the article, we have covered a lot of fine-tuning techniques and tips to improve performance. We hope that they will work for you and help you avoid any performance issues that may arise.
Also, we suggest that you should try a free fully-functional 30-day trial version of dbForge Studio for SQL Server to work with SQL queries effectively.
Watch the video to get to know the powerful capabilities of our all-in-one SQL Server GUI Tool.

Asp.net Core Blazor
Some programming languages like C#, PHP, Java, VB,net etc., have been used for server-side development, while for client-side development, we have been utilizing JavaScript frameworks like VueJS, Angular, ReactJS, etc.

In order to stay market competitive, as developers, we need to learn both server-side languages as well as client-side frameworks.
But we may need to consider why we need to learn different programming languages and frameworks.
Can we use C# for both – server-side and client-side development?
Yes, we can; Developers don’t need to learn JavaScript along with C#. The C# code runs on server and client browsers, allowing developers to work with their existing skills rather than learning new ones altogether.
ASP.net Core Blazor
All of this is possible with Blazor.

What is Blazor?
If you have kept up with the latest expansions in the .NET world over the past few years, you must have probably heard the word Blazor mentioned once or twice. Blazor is basically a toolset created by Microsoft’s ASP.NET Team that lets developers create web applications. With the help of Blazor, developers can now develop interactive UI using C# instead of JavaScript.
Blazor has already begun to show its potential as a positively productive and efficient programming model above its original design—as a direct competition to JavaScript single page application (SPA) frameworks.
Microsoft already has multiple experiments ongoing with Blazor, trialing it with desktop applications usingElectronandWebWindow(a lightweight testing alternative to Electron). But recently, for native mobile app development and web application development, The Blazor programming model has been combined with native Xamarinforms controls.
How can a browser execute C# code?
Generally, browsers only execute JavaScript code. Now, C# can be performed both on the server as well as in the browser. Yet, developers will have a query, how browse will understand programming languages like C#. The answer isWebAssembly. Blazor can run the C# directly on the browser using WebAssembly.
Since ASP.net core Blazor is established on open web standards, it is native to all current browsers, including mobile browsers. There is no need to install extra plug-ins as we did for Silverlight and Flash-based applications.

ASP.Net Core Blazor hosting models
Blazor furnishes developers with two separate hosting models. These are Blazor WebAssembly on the client side and Blazor Server, which works on the server side.

Blazor WebAssembly
This is known as the client-side hosting model. In this model, the application runs directly on the browser in WebAssembly. Therefore, everything that an application need is downloaded directly to the browser (the compiled application code, dependencies, and the .NET runtime).
Advantages
- An active server connection is not required.
- Client-side resources are used.
- A fully developed .NET Core web server is not needed.
- This can be hosted on our own CDN, server, or azure.
Blazor Server
This is known as the server-side hosting model. In this model, the application is run on the server. SignalR connection will be utilized to communicate between server and client.
Whenever any event transpires on the client system, its information is sent over the connection and is managed by the server, which computes a difference for the rendered HTML.
Then, instead of transmitting the entire HTML over the connection, the server only sends the difference across to reduce the response time. The browser then updates this.
Blazor uses the single-page application architecture, which dynamically rewrites the exact page in reply to user actions, like in the case of React.

Advantages
- The application load much faster.
- Take full advantage of server capabilities.
- More secure as the app code is not sent to the client.
- Your client will only require a browser to use the web application.
Where can Blazor be used?
ASP.net core Blazor WebAssembly can be utilized in any modern browser, and the only requirement is that the client device should support web applications with the resource essentials. The list of supported browsers by Blazor is:
- Firefox
- Chrome
- Microsoft Edge
- Safari
- IOS Safari
- Opera Mini
- Android Browser
- Blackberry Browser
- Opera Mobile
- Internet Explorer
- Chrome for Android
- Firefox for Android
- IE Mobile
- UC Browser for Android
- Samsung Internet
Workstation Setup
To configure the workstation, please follow the below steps
- Install .NET Core 3.1 or later. Download the same from the link
- Visual Studio 2019/2022, Visual Studio Code, or .NET CLI
Simple Blazor application
We will use VS 2019 to demonstrate a simple blazor application. Let us use the Blazor Server App Template here.
Please follow the steps.
- Create a new project
- Select Blazor App
- Configure your new project (enter the project name, select the location, provide the solution name, and then click on “Create.”
- Choose Blazor Server App
- Click on “Create”
- New project has been created.
Now run the application, and you will fetch the below screen.
Final Thoughts
With one hosting model in production and another on the way soon, let’s see what the future holds. Where do we see Blazor going? Returning to what we saw earlier about ASP.net Core Blazor becoming a single UI framework for any .NET application, it’s where Blazor is heading. If all of the existing hosting models for Blazor roll into production, and right now, it doesn’t seem as why they wouldn’t. Developers will have the opportunity to learn a single programming model they can use to create UIs anywhere. This is a big deal.
At a time when there are many dialogues around the barrier for entry to .NET, with so many options new developers to the platform have to face, Blazor could offer clarity regarding UI, a single programming model learned once and applied anywhere. For me, that’s the hype with Blazor.
FAQs
1: What is Blazor?
Blazor is a single-page web app framework on .NET that runs in the browser via WebAssembly.
2: Why would I use .NET for web application development?
Using .NET in the browser has several advantages that can aid in making web application development productive and easier:
- Stable with consistency: .NET offers typical tools, APIs, and build infrastructure across all .NET platforms that are easy to use, feature-rich, and sound.
- Modern creative languages: .NET languages like C# and F# make programming a joy and keep getting better with new language features.
- Industry-leading tools: The Visual Studio product family provides a great .NET development experience on Windows, Linux, and macOS.
- Fast and scalable: .NET has a long history of performance, reliability, and security on the server. Using .NET as a full-stack solution makes it easier to scale your applications.
3: How to run .NET in a web browser?
Running .NET in the browser is possible by a relatively new standardized web technology called WebAssembly. WebAssembly is a “portable, size- and load-time-efficient format suitable for compilation to the web.” Code compiled to WebAssembly runs in any browser at native speeds. To run .NET binaries in a web browser, a .NET runtime (specifically Mono) is used that has been compiled to WebAssembly.
4: Does Blazor collect the whole .NET based app to WebAssembly?
No. Blazor apps consist of regular compiled .NET assemblies downloaded and ran in a web browser utilizing a WebAssembly-based .NET runtime. Only the .NET runtime itself gets compiled to WebAssembly. That said, support for full static ahead of time (AoT) compilation of the app to WebAssembly is planned to be added.
5: What features does Blazor plan to support?
All features of a modern single-page app framework:
- Layouts
- A component model for building composable UI
- Live reloading in the browser during development
- Routing
- JavaScript interop
- Forms and validation
- Publishing and app size trimming
- Rich IntelliSense and tooling
- Server-side rendering
- Dependency injection
- Full .NET debugging in browsers and IDE
6: Does Blazor use XAML?
No, Blazor is a web framework based on CSS, HTML, and other standard web technologies.
7: Can Blazor be used without running .NET on the server?
Yes, Blazor can be deployed as a group of static files without any .NET support on the server.
8: Is Blazor a .NET port of a current JavaScript framework?
Blazor is motivated by current modern single-page app frameworks, such as Angular, Vue, and React, but is a new framework within itself.
9: Is this Silverlight?
No, Blazor is a .NET web framework based on HTML and CSS running in the browser using open web standards. It doesnt require plugins and works on older browsers and mobile devices.
10: Is it possible to use Blazor with ASP.NET Core on the server?
Yes! Blazor integrates with ASP.NET Core to provide a seamless and consistent full-stack web application development solution.
Software Architecture | Architectural patterns | Architecture vs. Design pattern
This post is part of The Software Architecture Chronicles, a series of posts about Software Architecture. In them, I write about what I’ve learned on Software Architecture, how I think of it, and how I use that knowledge. The contents of this post might make more sense if you read the previous posts in this series.
In the last post, I wrote about how programming languages have evolved and what it tells us: that they evolved always in the direction of providing for more modularity and encapsulation.
In the following posts, I will write about Architectural Styles and Architectural Patterns evolution, so today I will write about what is an Architectural Style and what is an Architectural Pattern.
As much terminology in Software Development, these terms are not clear and different people give it a different meaning. MSDN says that Architectural Styles and Architectural Patterns are the same things, but personally, I prefer to think of these in the lines of what is explained by George Fairbanks and Michael Keeling, what is said in this stack overflow answers and how Wikipedia separates the two: the key difference is the scope.
It is also important to reinforce the idea that Architectural Styles, Architectural Patterns and Design Patterns are not mutually exclusive, they are complementary and they all can teach us something, although, as usual, they should be used only when needed.
Architectural Styles
Architectural styles tell us, in very broad strokes, how to organise our code. It’s the highest level of granularity and it specifies layers, high-level modules of the application and how those modules and layers interact with each other, the relations between them. Examples of Architectural Styles:
- Component-based
- Monolithic application
- Layered
- Pipes and filters
- Event-driven
- Publish-subscribe
- Plug-ins
- Client-server
- Service-oriented
Advertisements
about:blank
REPORT THIS AD
An Architectural Style can be implemented in various ways, with a specific technical environment, specific policies, frameworks or practices.
Architectural Patterns
A pattern is a recurring solution to a recurring problem. In the case of Architectural Patterns, they solve the problems related to the Architectural Style. For example, “what classes will we have and how will they interact, in order to implement a system with a specific set of layers“, or “what high-level modules will have in our Service-Oriented Architecture and how will they communicate“, or “how many tiers will our Client-server Architecture have“.
Architectural Patterns have an extensive impact on the code base, most often impacting the whole application either horizontally (ie. how to structure the code inside a layer) or vertically (ie. how a request is processed from the outer layers into the inner layers and back). Examples of Architectural Patterns:
- Three-tier
- Microkernel
- Model-View-Controller
- Model-View-ViewModel
Design Patterns
Design Patterns differ from Architectural Patterns in their scope, they are more localised, they have less impact on the code base, they impact a specific section of the code base, for example:
- How to instantiate an object when we only know what type needs to be instantiated at run time (maybe a Factory Class?);
- How to make an object behave differently according to its state (maybe a state machine, or a Strategy Pattern?).
Conclusion
As I mentioned in the beginning of this post, it’s all about the scope:
- An Architectural Style is the application design at the highest level of abstraction;
- An Architectural Pattern is a way to implement an Architectural Style;
- A Design Pattern is a way to solve a localised problem.
Furthermore, a pattern might be able to be used both as an Architectural Pattern or a Design Pattern, again depending on the scope we use it in, in a specific project.