Blazor Interview Questions and answer.

1. What Is Blazor?

Building contemporary, scalable, and cross-platform Web applications with C# and.NET is made possible with the free, open-source, Blazor Web framework.
It was originally intended for C# and.NET developers who wanted to create web client applications using the C# language that Blazor, a project of Microsoft and the open-source community, was developed.

Modern, swift, and quickly changing best describes Blazor. Both client-side and server-side coding is supported by Blazor. .NET is used to write both the server-side and client-side app logic.

Blazor generates the user interface as HTML and CSS for wide browser compatibility, including mobile browsers, despite the fact that the code is written in.NET and C#.

2. Describe The Components In The Blazor Framework?

The Razor template engine, which is used by Blazor, creates HTML and sends it to web browsers. Together, HTML and C# syntax can be used in Razor templates, which are subsequently compiled by the Razor engine to produce HTML.

For the logic in Blazor Components, we have two options: we can split the logic and write the component functions into a separate C# class file.

For writing the C# functions alongside the HTML, we utilize the @code block. The “. razor” extension is used by Blazor to identify components.

3. Why Should I Use Blazor?

Developers with backgrounds in C# and.NET who are not at ease with JavaScript are the target audience for Blazor. Blazor has the following benefits:

  • Use C# instead of JavaScript when writing code.
  • Share app logic between the client and the server.
  • Utilize the.NET libraries that already exist in the.NET environment.
  • Gain from the performance, dependability, and security of.NET.
  • Build your application using a reliable, feature-rich, and user-friendly collection of languages, frameworks, and tools.
  • Utilize Visual Studio on Windows, Linux, and macOS to be productive.

4. What Purposes Does Blazor Serve?

For creating web-based apps, Blazor is utilized. This can apply to websites, mobile applications, and anything else you can create with JavaScript.

You can carry out a variety of typical development activities with the help of the framework, including rendering HTML and component code, obtaining data through HTTP, and client-side routing.

It has complete access to the JavaScript APIs of the browser when used on one. Therefore, Blazor programs can utilize both.NET methods from JavaScript functions and.NET methods from JavaScript functions.

Developers utilize JavaScript interop when the framework lacks a certain API or component or when they wish to work with the JavaScript ecosystem.

5. What Do You Mean By Blazor WebAssembly?

Microsoft has developed a new UI technology called Blazor WebAssembly. Utilizing a component-based design, Blazor enables developers to construct single-page applications (SPAs) using C# and.NET.

A.NET runtime is included in the client-side, in-browser implementation of Blazor called Blazor WebAssembly. With the introduction of Blazor WebAssembly, C# can now be used to develop client-side SPAs.

Previously, Blazor Server and ASP.NET Core MVC, both of which are server-side solutions, could be used to build websites.

Blazor WebAssembly is for you if you want to broaden your skill set, use new Microsoft technologies, or are just interested in WebAssembly in general.

6. What Benefits And Drawbacks Does Blazor WebAssembly Offer?

Benefits:

  • Network with less lag
  • offline assistance.
  • Understanding JavaScript is not required for client-side interactions.

Drawbacks:

  • Large page download size.
  • Limited.Net Assemblies support.
  • Client-side debugging is not very effective.
  • Not very safe; the browser will download DLLs.
  • Dependency on the browser; Internet Explorer is not supported.

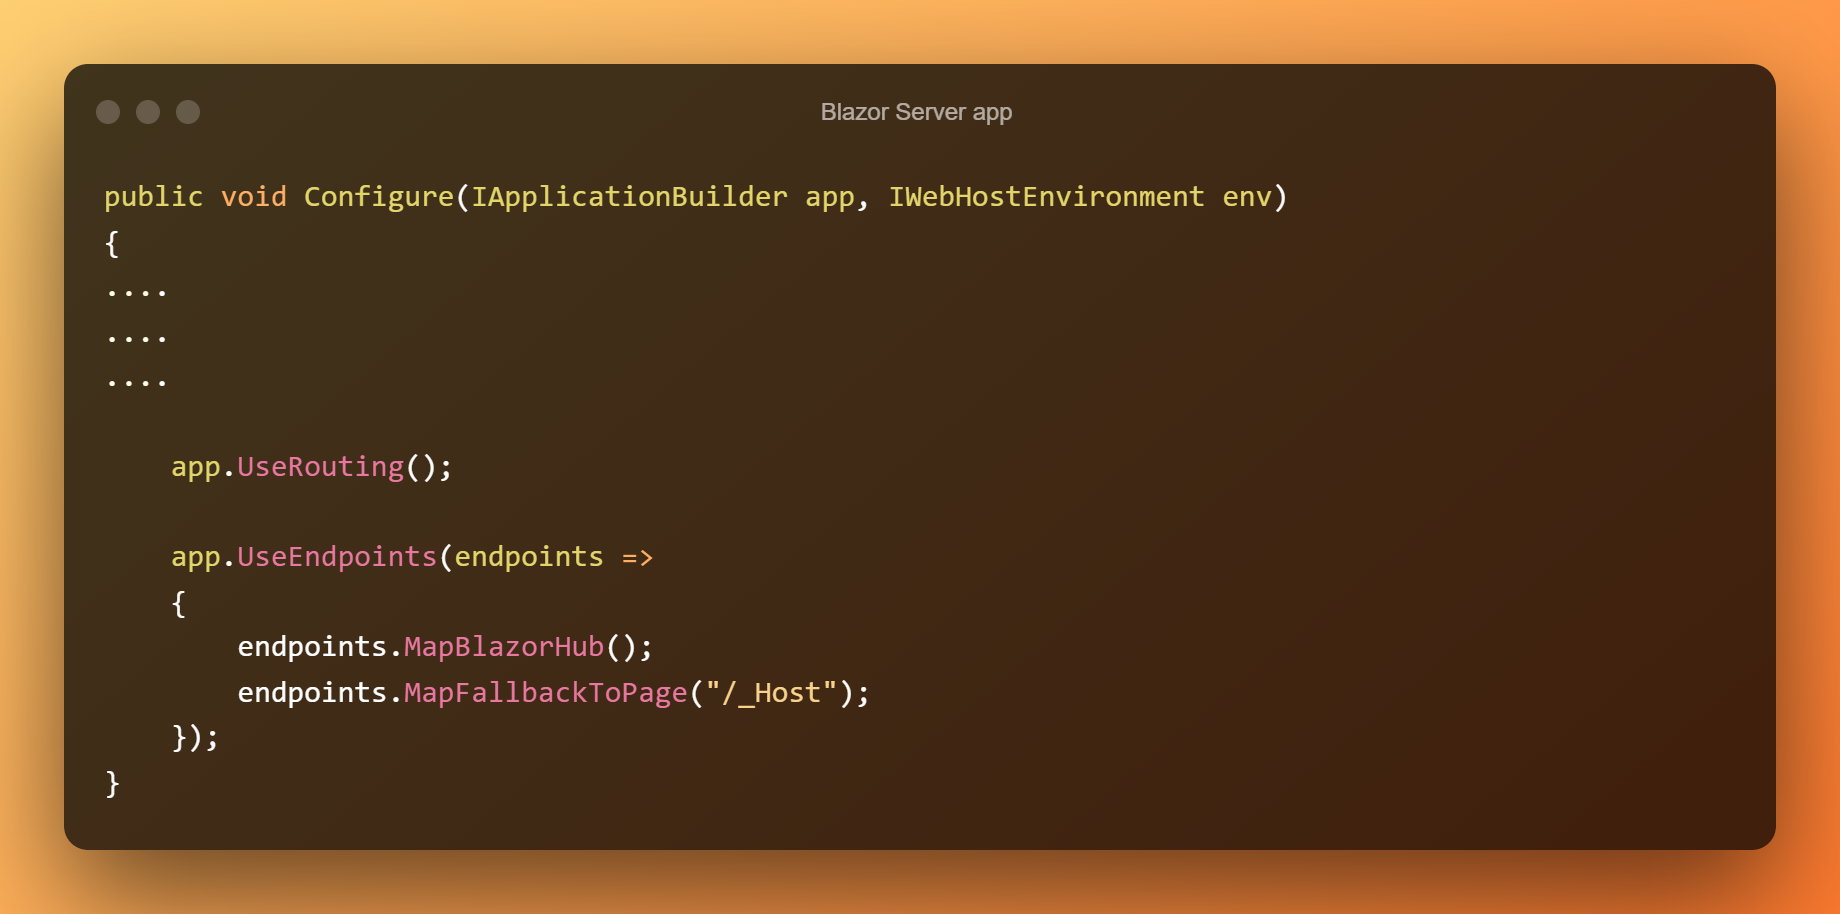
7. What Is The Role Of Directing In Blazor?

Routes are URL models, and routing is model planning that includes an action to filter purchases and determine how to handle each sale. ASP.net Core Endpoint Routing is used by the Blazor specialized application.

The shifting toward the relationship for the Blazor part is beginning to be recognized by ASP.net Core using the MapBlazorHub extension technique for endpoint guidance.

The client-side routing is provided by the Blazor client application. The switch is set up in the App. cshtml record of the Blazor client application.

The fallback course is determined by the Blazor Server application license. It is effective in directing planning with little demand.

The fallback strategy can be used when different strategies are not supported. The _Host—cshtml portion mostly describes the fallback mechanism.

8. Which Existence Cycle Approaches Are Used By Blazor Components?

In the present example of Blazor pieces as constructed, as well as nonconcurrent tactics, the Blazor application grants diverse skills to direct tasks are:

  • Instated
  • OnInitializedAsync
  • OnParametersSet
  • OnParameters
  • SetAsync
  • OnAfterRender
  • OnAfterRenderAsync

9. By “Blazor Server,” What Do You Mean?

In order to express the logic for the client browser, Microsoft Blazor Server decouples the application levels using Blazor Components (in the form of Razor components).

The ASP.Net Core framework served as the foundation for Blazor. It offers assistance with hosting Razor components in an ASP.NET Core application on the server.

For connecting to the DOM at the client-side in the ASP.Net server, Blazor employs the SignalR.

10. What Benefits And Drawbacks Does The Blazor Server Offer?

Benefits:

  • Use with any software.
  • An incredible little page download space is used.
  • JavaScript has no prerequisites.
  • Code will be, in a sense, on the server, which is far more secure.
  • Full support of online social activities while you are employing spot internet concentration from a professional.

Drawbacks:

  • Monitoring SignalR events requires more resources.
  • High network of sluggishness for coordinated worker activities
  • Each scenario requires a working professional; there should be no disconnected aid.

11. What Circumstances Would Make It Wise For Me To Use Blazor Server?

For our.NET apps, Blazor enables us to create rich, user-friendly interfaces. Numerous justifications exist for using Blazor Server.

  • When you must transfer work from the client to the employee.
  • The current application justification should not be altered for any persuasive reason.
  • Applications that require the use of low-controlled devices can benefit greatly from it.
  • The association set up for Blazor Server apps just needs a little download.

12. Which Stages Does Blazor Uphold?

Applications from Blazor can be shown and used on platforms including Windows, Linux, macOS, the cloud, and the web. Applications on the client and worker sides are both maintained by Blazor.

Applications for Blazor’s laborer side are created with ASP.NET Core. WebAssembly is used to run the customer-side Blazor apps in web programs.

Blazor is used to build online apps, cloud-neighborhood applications, local flexible applications, and Windows client applications.

13. What Distinguishes Blazor WebAssembly From Blazor Server?

Blazor provides Blazor server and Blazor WebAssembly as its two application development methods. Blazor Server applications manage UI interactions through a live SignalR connection while hosting Blazor components on the server.

ASP.NET Core renders Razor components, compiles C# code on the server, and then uses SignalR to send the produced UI elements back to the browser.

The Blazor WebAssembly apps use a WebAssembly runtime that is exclusive to.NET, unlike Blazor Server, which hosts components client-side in the browser.

.NET must be transformed into browser components by the runtime. The client-side browser manages every component and its rendering process.

14. When Should I Use Blazer WebAssembly Instead Of Blazer Server?

For C# and.NET developers who wish to create client-side web applications that run in the browser without a server, Blazor WebAssembly provides an alternative.

A Blazor WebAssembly program does not need a server, in contrast to Blazor Server, and all code is performed in the browser. Here are several scenarios when Blazor WebAssembly could be preferable over Blazor Server.

  • You want to create static web pages quickly.
  • You lack server-side and ASP.NET programming knowledge.
  • On the server, managing and distributing code is not something you want to do.
  • You want to make use of CPU, memory, and storage as well as client browsers.
  • You want to create web applications that can operate entirely offline.
  • Real-time replies and a continuously updating UI are what you want to design.
  • To add live alerts, local browser storage, messages, and server workers, you want to make use of contemporary technologies, such as progressive web applications (PWA).

15. What Does Routing Mean In Blazor?

A route is a pattern of a URL, and routing is a process of pattern matching that keeps track of the requests and decides what to do with each one. ASP.net Core Endpoint Routing is used by the Blazor server application.

Incoming connections for the Blazor component are now being accepted by ASP.net Core using the MapBlazorHub extension method of endpoint routing.

Client-side routing is offered by the Blazor client application. The Blazor client app’s App.cshtml file contains the router configuration information.

Blazor Client App

Blazor Client App

Blazor Server App

Blazor Server App

16. How Does Blazor Server Handle Authorization?

The process of authorization verifies that the user has permission to access the resource of the program.

In other words, it enables you to limit user access to a resource in accordance with roles, claims, and rules. By leveraging attributes, built-in components, and the definition of authorization rules, Blazor’s ASP.NET Core authorization system can be implemented.

Blazor’s built-in AuthorizeView component can display page content dependent on the user’s authentication status. Along with role-based authorization, this component also provides policy-based authorization.

This component comes in very handy when you want to display page content according to a user’s role, policy, or authentication status.

The authentication state of the user is known thanks to AuthentizationStateProvider.

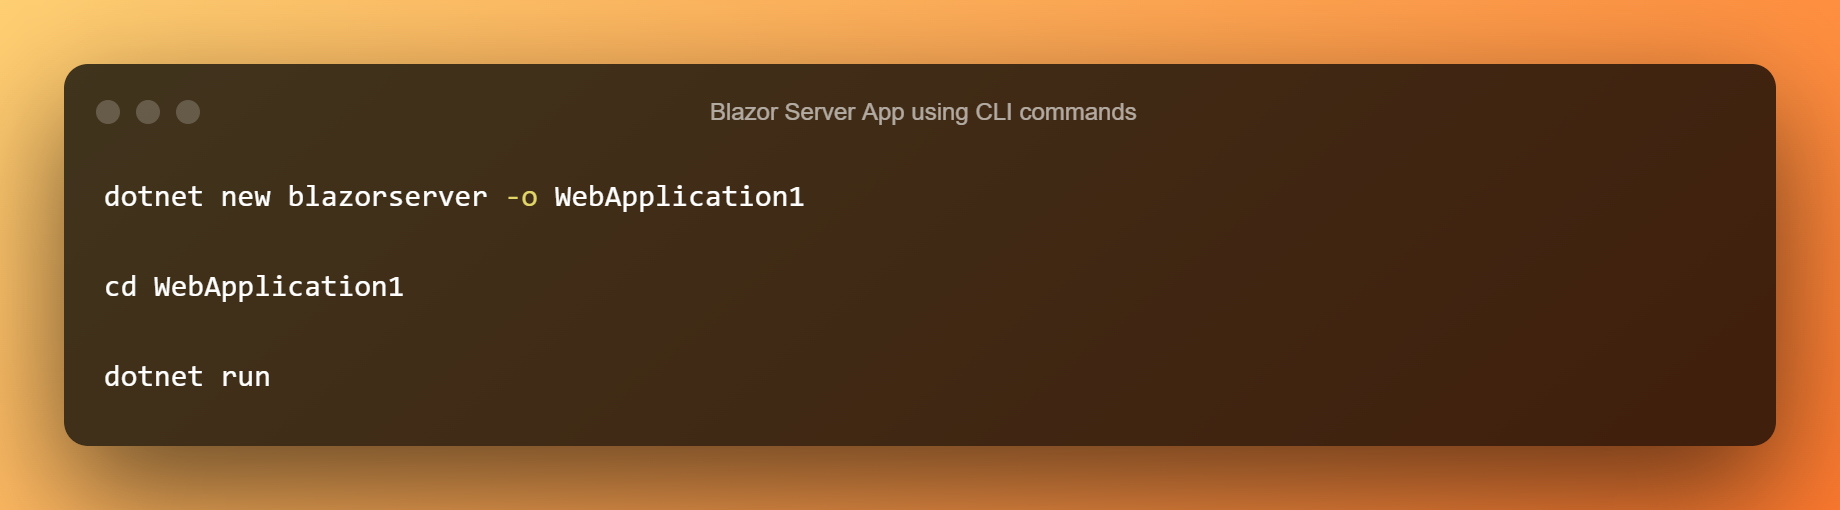
17. How Can The Blazor Server App Be Created And Operated Using CLI Commands?

To create a Blazor server app using the asp.net core CLI, open a command line and enter the following command:

Blazor Server App Using CLI Commands

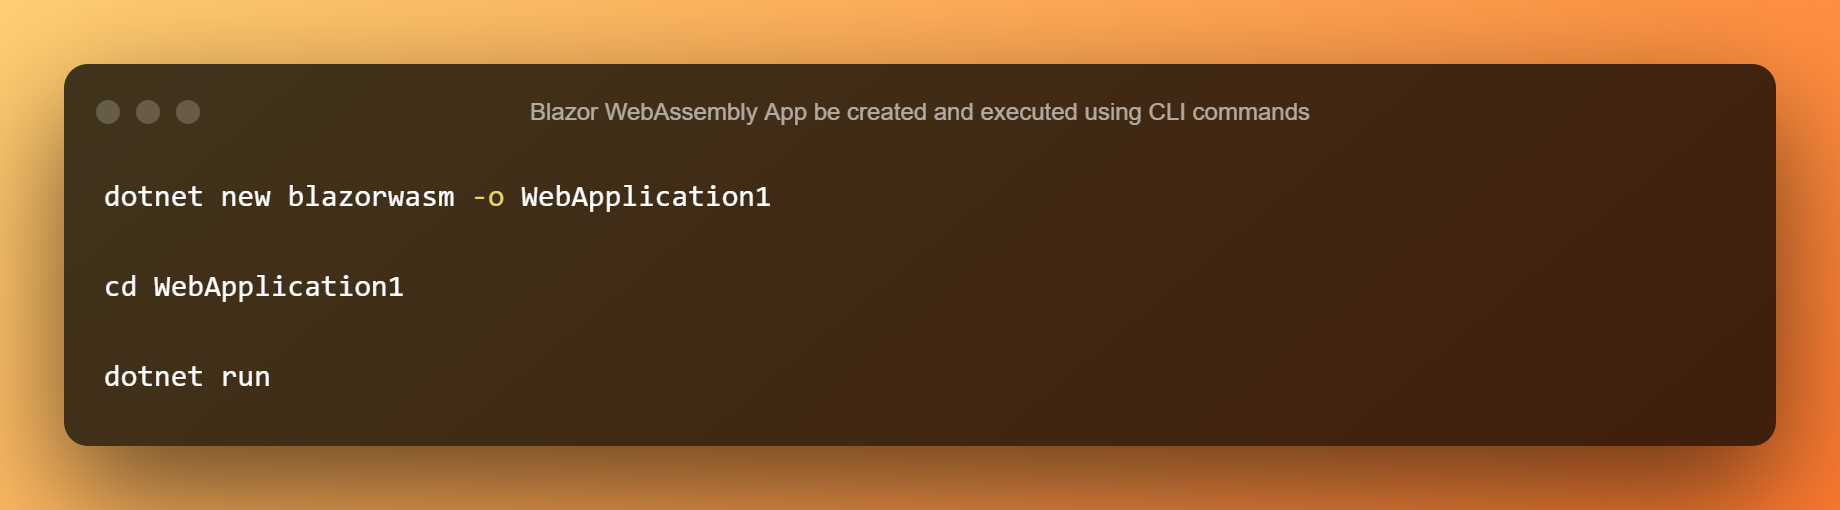
18. How Can The Blazor WebAssembly App Be Created And Executed Using CLI Commands?

By utilizing the asp.net core CLI, we can construct a Blazor WebAssembly program by opening the command line and entering the following command:

Blazor WebAssembly App Be Created And Executed Using CLI Commands

19. What Does Blazor’s Data Binding Mean?

In this battle to be the greatest web development framework, Blazor is giving other contemporary web development frameworks a tough fight.

Bindings are the key to interacting with data or control objects like Textboxes, Selects, or Forms components.

With One-way, Two-way Data Binding and robust event binding behavior, Blazor offers the finest approach to using bindings.

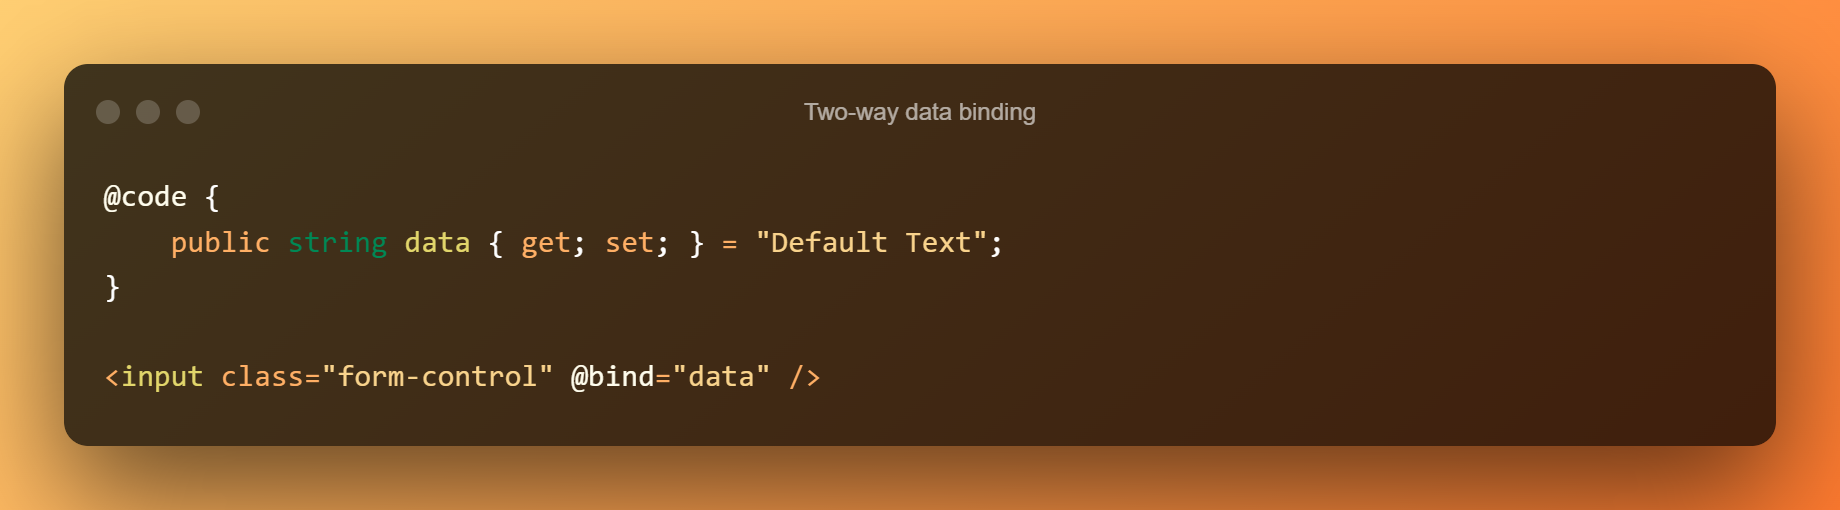
20. How Is Two-Way Data Binding Carried Out In Blazor?

In this case, information flows simultaneously from the source to the destination and from the destination to the source.

For example, let’s say we use the data variables of my component class(es) as a source and need to access the value of this variable on the HTML UI in order to display or edit some messages.

We have @bind from the razor in Blazor to read the value of any data variable in a Blazor component.

When the user edits the data and shifts the attention to another element, @bind keeps the value it received from the ref and updates the original source element.

Two Way Data Binding

21. Can Blazor WebAssembly Communicate With SQL Server Or Other Databases?

Blazor is.NET code that runs on the client. The IL code will be downloaded to the client-side, making reverse engineering easy. And because of that, you ought to avoid including any secrets—like passwords—in your Blazor WASM code.

Your Blazor application would need to connect with a remote database using a username-password combination, which could only be saved in the app. Don’t do that — it’s a massive security risk.

You should only use a service, which has a restricted access layer, to access distant data. Create a service API around your database that exposes the operations you wish to provide, such as REST, for example.

You can then use security tokens on that API to make sure that only authorized users can access the API and, therefore, your data.

What is Program.cs in ASP.NET Core 7?

Program.cs

The Program class is the entry point for the ASP.NET Core application. It contains the application startup code.

It Configure and register the services required by the appRegister middleware components and configure the app’s request handling pipeline.

What is a host?

On startup, ASP.NET Core apps configure and launch a host. It is responsible for the startup and lifetime management of the application. The host contains the application configuration and the Kestrel server (an HTTP server) that listens for requests and sends responses.

It also sets up the logging, dependency injection, configuration, request processing pipeline, etc.

There are three different hosts capable of running an ASP.NET Core app.

  • WebApplication (or Minimal Host)
  • Generic Host
  • WebHost

WebHost was used in the initial versions of ASP.NET Core. Generic Host replaced it in ASP.NET Core 3.0. WebApplication was introduced in ASP.NET Core 6.0.

What is WebApplication (Minimal Host)

The WebApplication is the core of your ASP.NET Core application. It contains the application configuration and the HTTP server (Kestrel) that listens for requests and sends responses.

WebApplication behaves similarly to the Generic Host, exposing many of the same interfaces but requiring fewer configure callbacks.

We need to configure the WebApplication before we run it. There are two essential tasks that we need to perform before running the app.

  1. Configure and add the services for dependency injection.
  2. Configure the request pipeline, which handles all requests made to the application.

We do all these things in the program.cs

Understanding program.cs

Create a new ASP.NET core application using the ASP.NET Core Empty template. Open the program.cs and you will see the following lines.

var builder = WebApplication.CreateBuilder(args);var app = builder.Build();
app.MapGet("/", () => "Hello World!");
app.Run();

These four lines contain all the initialization code you need to create a web server and start listening for requests.

The first thing you notice in this file is that no main method exists. The main method is the entry point of every C# program. But C#9 introduced the top-level statements feature, where you do not have to specify a main method. This feature allows us to create one top-level file containing only statements. It will not have to declare the main method or namespace. That top-level file will become the entry point of our program.

The program file creates the web application in three stages. CreateBuild, and Run

The earlier versions of ASP.NET Core created two files. One is program.cs and the other is startup.cs (known as startup class).

The program.cs is where we configured the host, and the startup class is where we used to configure the application. Since ASP.NET core 6, both processes and simplified and merged into a program.cs.

Create

The first line of the code creates an instance of the WebApplication builder.
var builder = WebApplication.CreateBuilder(args);

The CreateBuilder is a static method of WebApplication class.
It sets up a few basic features of the ASP.NET platform by default, including

  1. Sets up HTTP server (Kestrel)
  2. Logging
  3. Configuration
  4. Dependency injection container
  5. Adds the following framework-provided services

This method returns a new instance of the WebApplicationBuilder class.

We use the WebApplicationBuilder object to configure & register additional services.

WebApplicationBuilder exposes the ConfigurationManager type, which exposes all the current configuration values. We can also add new configuration sources.

It also exposes an IServiceCollection directly for adding services to the DI container.

We then call the build method.

Build

The build method of the WebApplicationBuilder class creates a new instance of the WebApplication class.

We use the instance of the WebApplication to setup the middleware’s and endpoints.

The template has set up one middleware component using the MapGet extension method.

app.MapGet(“/”, () => “Hello World!”);

Run

The run method of the WebApplication instance starts the application and listens to http requests.

Program.cs in Various Project Templates

.NET SDK Provides several project templates for creating a new ASP.NET core application. The most commonly used templates are

  • ASP.NET Core Empty
  • ASP.NET Core Web App (Razor pages)
  • ASP.NET Core Web App (Model-View-Controller)
  • ASP.NET Core Web API

ASP.NET Core Web App (Model View Controller)
The following program class is from the template ASP.NET Core Web App (Model View Controller).

var builder = WebApplication.CreateBuilder(args);

// Add services to the container.
builder.Services.AddControllersWithViews();

var app = builder.Build();

// Configure the HTTP request pipeline.
if (!app.Environment.IsDevelopment())
{
app.UseExceptionHandler(“/Home/Error”);
// The default HSTS value is 30 days. You may want to change this for production scenarios, see https://aka.ms/aspnetcore-hsts.
app.UseHsts();
}

app.UseHttpsRedirection();
app.UseStaticFiles();

app.UseRouting();

app.UseAuthorization();

app.MapControllerRoute(
name: “default”,
pattern: “{controller=Home}/{action=Index}/{id?}”);

app.Run();

ASP.NET Core Web API

var builder = WebApplication.CreateBuilder(args); //Create

// Add services to the container.

builder.Services.AddControllers();

// Learn more about configuring Swagger/OpenAPI at https://aka.ms/aspnetcore/swashbuckle
builder.Services.AddEndpointsApiExplorer();
builder.Services.AddSwaggerGen();

var app = builder.Build(); //Build

// Configure the HTTP request pipeline.
if (app.Environment.IsDevelopment())
{
app.UseSwagger();
app.UseSwaggerUI();
}

app.UseHttpsRedirection();

app.UseAuthorization();

app.MapControllers();

app.Run(); //Run

Create a web API using .NET Core 7 with the Unit of Work pattern and a generic repository.

Here’s an example of how you can create a web API using .NET Core 7 with the Unit of Work pattern and a generic repository.

First, let’s define the generic repository and the unit of work:

// Generic Repository Interface
public interface IRepository<TEntity> where TEntity : class
{
    TEntity GetById(int id);
    IEnumerable<TEntity> GetAll();
    void Add(TEntity entity);
    void Update(TEntity entity);
    void Delete(TEntity entity);
}

// Unit of Work Interface
public interface IUnitOfWork : IDisposable
{
    IRepository<TEntity> GetRepository<TEntity>() where TEntity : class;
    void SaveChanges();
}

Next, we’ll implement the generic repository and the unit of work:

// Generic Repository Implementation
public class Repository<TEntity> : IRepository<TEntity> where TEntity : class
{
    private DbContext _context;
    private DbSet<TEntity> _dbSet;

    public Repository(DbContext context)
    {
        _context = context;
        _dbSet = context.Set<TEntity>();
    }

    public TEntity GetById(int id)
    {
        return _dbSet.Find(id);
    }

    public IEnumerable<TEntity> GetAll()
    {
        return _dbSet.ToList();
    }

    public void Add(TEntity entity)
    {
        _dbSet.Add(entity);
    }

    public void Update(TEntity entity)
    {
        _dbSet.Update(entity);
    }

    public void Delete(TEntity entity)
    {
        _dbSet.Remove(entity);
    }
}

// Unit of Work Implementation
public class UnitOfWork : IUnitOfWork
{
    private DbContext _context;
    private Dictionary<Type, object> _repositories;

    public UnitOfWork(DbContext context)
    {
        _context = context;
        _repositories = new Dictionary<Type, object>();
    }

    public IRepository<TEntity> GetRepository<TEntity>() where TEntity : class
    {
        if (!_repositories.ContainsKey(typeof(TEntity)))
        {
            var repository = new Repository<TEntity>(_context);
            _repositories.Add(typeof(TEntity), repository);
        }

        return (IRepository<TEntity>)_repositories[typeof(TEntity)];
    }

    public void SaveChanges()
    {
        _context.SaveChanges();
    }

    public void Dispose()
    {
        _context.Dispose();
    }
}

Now, let’s create a sample entity and a web API controller that uses the unit of work and repository:

// Sample Entity
public class Product
{
    public int Id { get; set; }
    public string Name { get; set; }
    // other properties
}

// Web API Controller
[ApiController]
[Route("api/products")]
public class ProductsController : ControllerBase
{
    private IUnitOfWork _unitOfWork;
    private IRepository<Product> _productRepository;

    public ProductsController(IUnitOfWork unitOfWork)
    {
        _unitOfWork = unitOfWork;
        _productRepository = _unitOfWork.GetRepository<Product>();
    }

    // GET api/products
    [HttpGet]
    public IActionResult Get()
    {
        var products = _productRepository.GetAll();
        return Ok(products);
    }

    // GET api/products/{id}
    [HttpGet("{id}")]
    public IActionResult Get(int id)
    {
        var product = _productRepository.GetById(id);
        if (product == null)
        {
            return NotFound();
        }
        return Ok(product);
    }

    // POST api/products
    [HttpPost]
    public IActionResult Post([FromBody] Product product)
    {
        if (product == null)
        {
            return BadRequest();
        }

        _productRepository.Add(product);
        _unitOfWork.SaveChanges();

        return CreatedAtAction(nameof(Get), new { id = product.Id }, product);
    }

    // PUT api/products/{id}
    [HttpPut("{id}")]
    public IActionResult Put(int id

, [FromBody] Product product)
    {
        if (product == null || id != product.Id)
        {
            return BadRequest();
        }

        var existingProduct = _productRepository.GetById(id);
        if (existingProduct == null)
        {
            return NotFound();
        }

        existingProduct.Name = product.Name;
        // update other properties

        _productRepository.Update(existingProduct);
        _unitOfWork.SaveChanges();

        return NoContent();
    }

    // DELETE api/products/{id}
    [HttpDelete("{id}")]
    public IActionResult Delete(int id)
    {
        var product = _productRepository.GetById(id);
        if (product == null)
        {
            return NotFound();
        }

        _productRepository.Delete(product);
        _unitOfWork.SaveChanges();

        return NoContent();
    }
}

In this example, we have a Product entity, and we create a web API controller named ProductsController. The controller receives an instance of IUnitOfWork in its constructor, which provides access to the unit of work and the generic repository.

Within the controller actions, we use the repository methods to perform CRUD operations on the Product entity. The unit of work manages the transaction and ensures that changes are saved atomically.

What is Unit of Work?

The Unit of Work is a design pattern that is commonly used in software development to manage transactions and coordinate multiple database operations within a single logical unit. It ensures that all database operations related to a specific business transaction are treated as a single cohesive unit, allowing for better control, consistency, and integrity of the data.

The primary purpose of the Unit of Work pattern is to provide a way to encapsulate multiple data operations (such as inserts, updates, and deletes) into a single transaction. It allows you to define a set of operations that should be treated atomically, meaning that they either all succeed or all fail.

The Unit of Work pattern typically consists of two main components:

  1. Unit of Work: This component is responsible for tracking and coordinating multiple data operations within a transaction. It keeps a record of all changes made to the entities during the transaction and ensures that these changes are committed or rolled back as a single unit.
  2. Repositories: The repositories provide an interface for accessing and manipulating the individual entities within the Unit of Work. They encapsulate the logic for querying, updating, and persisting the entities.

Here are some key benefits of using the Unit of Work pattern:

  1. Transactional integrity: The Unit of Work pattern helps ensure that multiple database operations are performed as an atomic unit. If any operation within the unit fails, the entire unit can be rolled back, ensuring data consistency and integrity.
  2. Improved performance: By batching multiple operations into a single transaction, you can often achieve better performance compared to executing individual operations separately. This is especially true when working with a database where the cost of transaction management can be significant.
  3. Simplified code: The Unit of Work pattern provides a higher-level abstraction that encapsulates complex data operations within a transaction. It simplifies the code by handling the details of managing the transaction, allowing the business logic to focus on the specific task at hand.
  4. Cross-cutting concerns: The Unit of Work pattern enables you to incorporate cross-cutting concerns such as logging, auditing, and validation into the transactional boundary. These concerns can be applied uniformly to all operations within the unit, ensuring consistency in their application.

It’s important to note that the implementation of the Unit of Work pattern may vary depending on the specific technology or framework being used. For example, in the context of an ORM (Object-Relational Mapping) framework like Entity Framework, the Unit of Work pattern is often implemented as part of the framework itself, with the DbContext acting as the Unit of Work and individual DbSet instances serving as repositories.

Generic Repository implementation in C#

Example of a generic repository implementation in C#:

using System;
using System.Collections.Generic;
using System.Linq;

public interface IRepository<T>
{
    T GetById(int id);
    IEnumerable<T> GetAll();
    void Add(T entity);
    void Update(T entity);
    void Delete(T entity);
}

public class Repository<T> : IRepository<T>
{
    private List<T> _entities;

    public Repository()
    {
        _entities = new List<T>();
    }

    public T GetById(int id)
    {
        return _entities.FirstOrDefault(e => GetId(e) == id);
    }

    public IEnumerable<T> GetAll()
    {
        return _entities;
    }

    public void Add(T entity)
    {
        _entities.Add(entity);
        Console.WriteLine("Added: " + entity.ToString());
    }

    public void Update(T entity)
    {
        Console.WriteLine("Updated: " + entity.ToString());
    }

    public void Delete(T entity)
    {
        _entities.Remove(entity);
        Console.WriteLine("Deleted: " + entity.ToString());
    }

    // Helper method to retrieve the ID of an entity
    private int GetId(T entity)
    {
        // Replace this with the appropriate logic to extract the ID from your entity
        // For demonstration purposes, assuming an 'Id' property exists
        var idProperty = typeof(T).GetProperty("Id");
        return (int)idProperty.GetValue(entity);
    }
}

public class Product
{
    public int Id { get; set; }
    public string Name { get; set; }

    public override string ToString()
    {
        return $"Product: Id={Id}, Name={Name}";
    }
}

public class Customer
{
    public int Id { get; set; }
    public string Name { get; set; }

    public override string ToString()
    {
        return $"Customer: Id={Id}, Name={Name}";
    }
}

public class Program
{
    public static void Main(string[] args)
    {
        IRepository<Product> productRepository = new Repository<Product>();
        IRepository<Customer> customerRepository = new Repository<Customer>();

        // Add products
        Product newProduct = new Product { Id = 1, Name = "Keyboard" };
        productRepository.Add(newProduct);

        // Add customers
        Customer newCustomer = new Customer { Id = 1, Name = "John Doe" };
        customerRepository.Add(newCustomer);

        // Update a product
        Product existingProduct = productRepository.GetById(1);
        if (existingProduct != null)
        {
            existingProduct.Name = "Wireless Keyboard";
            productRepository.Update(existingProduct);
        }

        // Delete a customer
        Customer customerToDelete = customerRepository.GetById(1);
        if (customerToDelete != null)
        {
            customerRepository.Delete(customerToDelete);
        }
    }
}

In this example, we have a generic repository defined by the IRepository<T> interface, which provides common methods for data access: GetById, GetAll, Add, Update, and Delete.

The Repository<T> class is the implementation of the generic repository, which uses a List<T> to store the entities. The implementation showcases basic CRUD operations for the entities. It also includes a helper method GetId to extract the ID from an entity, assuming there is an Id property.

The Product and Customer classes are sample entities used in the example.

In the Main method, we create instances of Repository<Product> and Repository<Customer>, representing repositories for the Product and Customer entities, respectively. We then demonstrate adding products and customers, updating a product, and deleting a customer using the repository methods.

What is Generic Repository?

A generic repository is a design pattern that provides a generic implementation for data access operations in a software application. It allows you to create a single repository class that can handle CRUD (Create, Read, Update, Delete) operations for multiple entity types in a type-safe and reusable manner.

The generic repository typically uses generics, a feature in programming languages like C#, to work with different types of entities without the need to create separate repository implementations for each entity. By using generics, you can define a common set of methods that can operate on any entity type, reducing code duplication and improving maintainability.

The key benefits of using a generic repository include:

  1. Reusability: With a generic repository, you can create a single implementation that can be reused across multiple entities in your application. This saves development time and reduces code duplication.
  2. Type Safety: The use of generics ensures that the repository methods operate on the correct entity types. This helps catch compile-time errors and provides a safer and more reliable approach to data access.
  3. Simplified Codebase: By abstracting data access operations into a generic repository, you can simplify your codebase and make it more modular. This separation of concerns improves code organization and maintainability.
  4. Flexibility: The generic repository allows you to add, update, delete, and retrieve entities without writing repetitive code for each entity type. It provides a consistent interface and reduces the effort required to perform basic data access operations.

Here’s a simplified example of a generic repository interface and implementation in C#:

public interface IRepository<TEntity> where TEntity : class
{
    TEntity GetById(int id);
    void Add(TEntity entity);
    void Update(TEntity entity);
    void Delete(TEntity entity);
}

public class Repository<TEntity> : IRepository<TEntity> where TEntity : class
{
    private DbContext _context;
    private DbSet<TEntity> _dbSet;

    public Repository(DbContext context)
    {
        _context = context;
        _dbSet = context.Set<TEntity>();
    }

    public TEntity GetById(int id)
    {
        return _dbSet.Find(id);
    }

    public void Add(TEntity entity)
    {
        _dbSet.Add(entity);
        _context.SaveChanges();
    }

    public void Update(TEntity entity)
    {
        _dbSet.Attach(entity);
        _context.Entry(entity).State = EntityState.Modified;
        _context.SaveChanges();
    }

    public void Delete(TEntity entity)
    {
        _dbSet.Remove(entity);
        _context.SaveChanges();
    }
}

In this example, the IRepository<TEntity> interface defines the common set of methods that the generic repository should implement. The Repository<TEntity> class is the concrete implementation of the generic repository. It uses a DbContext to interact with the underlying data source, and a DbSet<TEntity> to access the entities in the context.

By using this generic repository, you can create specific repository instances for different entity types by providing the appropriate entity class as the generic type parameter. This enables you to work with different entities using a consistent set of data access methods.

What is Repository Pattern?

The Repository Pattern is a design pattern that is commonly used in software development to separate the logic that retrieves and stores data from the rest of the application. It provides a layer of abstraction between the data access code and the business logic code.

The main purpose of the Repository Pattern is to provide a consistent interface for accessing data from different sources, such as databases, APIs, or in-memory data structures. It encapsulates the data access logic and provides methods to perform common CRUD (Create, Read, Update, Delete) operations on the data.

Here are the key components of the Repository Pattern:

  1. Repository: It defines the contract and the interface for data access operations. It typically includes methods like Create, Read, Update, Delete, and may also include additional methods specific to the application’s data access needs.
  2. Concrete Repository: It is the implementation of the repository interface and contains the actual data access logic. It interacts with the underlying data source, such as a database or web service, to perform the required operations.
  3. Data Model: It represents the data entities or objects that are being stored or retrieved by the repository. These entities are typically mapped to the underlying data schema.
  4. Business Logic: It is the higher-level application logic that uses the repository to access and manipulate the data. The business logic interacts with the repository using the methods provided by the repository interface.

The benefits of using the Repository Pattern include:

  • Separation of concerns: It separates the data access code from the business logic code, making the application more modular and maintainable.
  • Testability: By abstracting the data access logic behind an interface, it becomes easier to write unit tests for the business logic without the need for a real database or external dependencies.
  • Code reusability: The repository interface can be implemented by different concrete repositories, allowing the application to switch between different data sources or storage technologies without affecting the business logic.
  • Centralized data access logic: The repository acts as a single point of entry for data access operations, making it easier to enforce data access policies, implement caching mechanisms, or apply data validation rules consistently.

Overall, the Repository Pattern helps in achieving a clean separation between data access and business logic, improving code organization, maintainability, and testability of the application.

Here’s an example of how the Repository Pattern can be implemented in C#:

// Define the repository interface
public interface IProductRepository
{
    Product GetById(int id);
    void Add(Product product);
    void Update(Product product);
    void Delete(Product product);
}

// Define the product entity
public class Product
{
    public int Id { get; set; }
    public string Name { get; set; }
    public decimal Price { get; set; }
}

// Implement the concrete repository
public class ProductRepository : IProductRepository
{
    // Simulate an in-memory collection of products
    private List<Product> _products;

    public ProductRepository()
    {
        _products = new List<Product>();
    }

    public Product GetById(int id)
    {
        return _products.FirstOrDefault(p => p.Id == id);
    }

    public void Add(Product product)
    {
        _products.Add(product);
        Console.WriteLine("Product added: " + product.Name);
    }

    public void Update(Product product)
    {
        var existingProduct = _products.FirstOrDefault(p => p.Id == product.Id);
        if (existingProduct != null)
        {
            existingProduct.Name = product.Name;
            existingProduct.Price = product.Price;
            Console.WriteLine("Product updated: " + product.Name);
        }
    }

    public void Delete(Product product)
    {
        _products.Remove(product);
        Console.WriteLine("Product deleted: " + product.Name);
    }
}

// Example usage
public class Program
{
    public static void Main(string[] args)
    {
        // Create a product repository instance
        IProductRepository productRepository = new ProductRepository();

        // Add a product
        Product newProduct = new Product { Id = 1, Name = "Keyboard", Price = 49.99m };
        productRepository.Add(newProduct);

        // Update a product
        Product existingProduct = productRepository.GetById(1);
        if (existingProduct != null)
        {
            existingProduct.Name = "Wireless Keyboard";
            existingProduct.Price = 59.99m;
            productRepository.Update(existingProduct);
        }

        // Delete a product
        Product productToDelete = productRepository.GetById(1);
        if (productToDelete != null)
        {
            productRepository.Delete(productToDelete);
        }
    }
}

In this example, we have an IProductRepository interface that defines the contract for data access operations related to products. The ProductRepository class implements this interface and provides the concrete implementation for the data access logic using an in-memory collection of products.

The Product class represents the product entity with properties like Id, Name, and Price.

In the Program class, we create an instance of the ProductRepository and demonstrate how to add, update, and delete products using the repository methods.

Note that this is a simplified example to illustrate the basic structure of the Repository Pattern in C#. In a real-world scenario, you would typically have more complex data access operations, dependency injection, and possibly use a database or external data source.

Design patterns in programming

Design patterns are reusable solutions to common problems that occur in software design and development.
They provide guidelines and best practices to solve these problems efficiently and effectively.
While the number of design patterns can vary depending on the source and categorization.

Here are some of the most commonly recognized types of design patterns:

1.Creational Patterns:

  • Singleton
  • Factory Method
  • Abstract Factory
  • Builder
  • Prototype

2.Structural Patterns:

  • Adapter
  • Bridge
  • Composite
  • Decorator
  • Facade
  • Flyweight
  • Proxy

3.Behavioral Patterns:

  • Observer
  • Strategy
  • Command
  • Iterator
  • Mediator
  • Memento
  • State
  • Template Method
  • Visitor
  • Chain of Responsibility

4. Architectural Patterns:

  • Model-View-Controller (MVC)
  • Model-View-ViewModel (MVVM)
  • Layered Architecture
  • Repository Pattern
  • Dependency Injection
  • Event-Driven Architecture (EDA)

These are just a few examples of the types of design patterns commonly used in programming. Each pattern addresses a specific problem and provides a recommended solution. It’s important to note that design patterns are not limited to these categories, and new patterns can emerge as software development practices evolve over time.

.NET 7 with Entity Framework Database First approach

In .NET 7, the preferred approach for working with Entity Framework (EF) is using the Code First approach rather than the Database First approach. However, you can still use the Database First approach in .NET 7 if you prefer.

To use the Database First approach in .NET 7 with Entity Framework, follow these steps:

  1. Install the necessary packages: Make sure you have the required EF packages installed in your project. You will need the Microsoft.EntityFrameworkCore package and the database provider package for your specific database (e.g., Microsoft.EntityFrameworkCore.SqlServer for SQL Server). You can install these packages using NuGet.
  2. Add a reference to your database: In your project, add a reference to your existing database. This can be done by adding a connection string to the appsettings.json file or through the DbContextOptionsBuilder in your code.
  3. Scaffold the models: Use the EF command-line tools (or the Package Manager Console) to scaffold the models based on your existing database. Open the terminal and navigate to the project’s root directory, then run the following command:
dotnet ef dbcontext scaffold "YourConnectionString" Microsoft.EntityFrameworkCore.SqlServer -o Models

Replace "YourConnectionString" with the actual connection string to your database. This command will generate the entity classes based on your database schema and place them in the “Models” folder.

  1. Use the generated models: You can now use the generated entity classes in your code to query and manipulate the database. Make sure to configure your DbContext class to use the correct connection string and database provider.

Keep in mind that the Code First approach is generally recommended because it provides better control and flexibility over the database schema. However, if you have an existing database and prefer the Database First approach, the steps above should help you get started with Entity Framework in .NET 7.

Integrate a Bootstrap 5 template into a .NET 7 layout

To integrate a Bootstrap 5 template into a .NET 7 layout, you’ll need to follow these general steps:

  1. Create a new .NET 7 project: Start by creating a new .NET 7 project in your preferred development environment, such as Visual Studio.
  2. Add Bootstrap 5 files: Download the Bootstrap 5 files from the official website (https://getbootstrap.com/) or a trusted source. Extract the contents of the downloaded ZIP file.
  3. Add Bootstrap CSS and JavaScript references: In your .NET project, navigate to the appropriate location to add static files, such as the wwwroot folder. Copy the Bootstrap CSS (bootstrap.min.css) and JavaScript (bootstrap.min.js) files into the corresponding folders within your project, such as wwwroot/css and wwwroot/js.
  4. Include Bootstrap references in the layout: Open the layout file (usually named _Layout.cshtml or similar) in your project. Add the following lines within the <head> section to reference the Bootstrap CSS file:
<link rel="stylesheet" href="~/css/bootstrap.min.css" />

And add the following line before the closing </body> tag to reference the Bootstrap JavaScript file:

<script src="~/js/bootstrap.min.js"></script>
  1. Customize layout markup: Modify the layout markup to match the structure and elements of the Bootstrap 5 template you want to integrate. Replace or modify the existing HTML elements to include the necessary Bootstrap classes, components, and structure.
  2. Link CSS and JavaScript files: Ensure that any custom CSS or JavaScript files required by the Bootstrap template are properly linked within the layout file. Add them within the <head> section or at the end of the <body> section, depending on the template’s requirements.
  3. Use Bootstrap components: Utilize Bootstrap’s CSS classes and components throughout your application’s views and pages. Update your existing views or create new ones, taking advantage of Bootstrap’s responsive grid system, typography, forms, buttons, navigation, and other components.
  4. Test and refine: Run your .NET project and test the integration of the Bootstrap 5 template. Make any necessary adjustments to ensure proper rendering and functionality.

These steps provide a general guideline for integrating a Bootstrap 5 template into a .NET 7 layout. The specific implementation may vary depending on your project structure and requirements.