Automate Microsoft Entra Identity Governance tasks via Azure Automation and Microsoft Graph


Azure Automation is an Azure cloud service that allows you to automate common or repetitive systems management and processes. Microsoft Graph is the Microsoft unified API endpoint for Azure AD features that manage users, groups, access packages, access reviews, and other resources in the directory. You can manage Azure AD at scale from the PowerShell command line, using the Microsoft Graph PowerShell SDK. You can also include the Microsoft Graph PowerShell cmdlets from a PowerShell-based runbook in Azure Automation, so that you can automate Azure AD tasks from a simple script.

Azure Automation and the PowerShell Graph SDK supports certificate-based authentication and application permissions, so you can have Azure Automation runbooks authenticate to Azure AD without needing a user context.

This article shows you how to get started using Azure Automation for Microsoft Entra Identity Governance, by creating a simple runbook that queries entitlement management via Microsoft Graph PowerShell.

Create an Azure Automation account
Important

Steps in this article may vary slightly based on the portal you start from. Content will be updated to reflect the Microsoft Entra admin center over the next few months.

Azure Automation provides a cloud-hosted environment for runbook execution. Those runbooks can start automatically based on a schedule, or be triggered by webhooks or by Logic Apps.

Using Azure Automation requires you to have an Azure subscription.

Prerequisite role: Azure subscription or resource group owner

Sign in to the Azure portal. Make sure you have access to the subscription or resource group where the Azure Automation account will be located.

Select the subscription or resource group, and select Create. Type Automation, select the Automation Azure service from Microsoft, then select Create.

After the Azure Automation account has been created, select Access control (IAM). Then select View in View access to this resource. These users and service principals will subsequently be able to interact with the Microsoft service through the scripts to be created in that Azure Automation account.

Review the users and service principals who are listed there and ensure they’re authorized. Remove any users who are unauthorized.

Create a self-signed key pair and certificate on your computer
So that it can operate without needing your personal credentials, the Azure Automation account you created will need to authenticate itself to Azure AD with a certificate.

If you already have a key pair for authenticating your service to Azure AD, and a certificate that you received from a certificate authority, skip to the next section.

To generate a self-signed certificate,

Follow the instructions in how to create a self-signed certificate, option 2, to create and export a certificate with its private key.

Display the thumbprint of the certificate.

PowerShell

Copy
$cert | ft Thumbprint
After you have exported the files, you can remove the certificate and key pair from your local user certificate store. In subsequent steps you’ll remove the .pfx and .crt files as well, once the certificate and private key have been uploaded to the Azure Automation and Azure AD services.

Upload the key pair to Azure Automation
Your runbook in Azure Automation retrieves the private key from the .pfx file, and use it for authenticating to Microsoft Graph.

In the Azure portal for the Azure Automation account, select Certificates and Add a certificate.

Upload the .pfx file created earlier, and type the password you provided when you created the file.

After the private key is uploaded, record the certificate expiration date.

You can now delete the .pfx file from your local computer. However, don’t delete the .crt file yet, as you’ll need this file in a subsequent step.

Add modules for Microsoft Graph to your Azure Automation account
By default, Azure Automation doesn’t have any PowerShell modules preloaded for Microsoft Graph. You’ll need to add Microsoft.Graph.Authentication, and then additional modules, from the gallery to your Automation account. Note that you’ll need to choose whether to use the beta or v1.0 APIs through those modules, as you can’t mix both in a single runbook.

In the Azure portal for the Azure Automation account, select Modules and then Browse gallery.

In the Search bar, type Microsoft.Graph.Authentication. Select the module, select Import, and select OK to have Azure AD begin importing the module. After selecting OK, importing a module may take several minutes. Don’t attempt to add more Microsoft Graph modules until the Microsoft.Graph.Authentication module import has completed, since those other modules have Microsoft.Graph.Authentication as a prerequisite.

Return to the Modules list and select Refresh. Once the Status of the Microsoft.Graph.Authentication module has changed to Available, you can import the next module.

If you’re using the cmdlets for Azure AD identity governance features, such as entitlement management, then repeat the import process for the module Microsoft.Graph.Identity.Governance.

Import other modules that your script may require, such as Microsoft.Graph.Users. For example, if you’re using Identity Protection, then you may wish to import the Microsoft.Graph.Identity.SignIns module.

Create an app registration and assign permissions
Next, you’ll create an app registration in Azure AD, so that Azure AD recognizes your Azure Automation runbook’s certificate for authentication.

Prerequisite role: Global Administrator or other administrator who can consent applications to application permissions

In the Azure portal, browse to Azure Active Directory > App registrations.

Select New registration.

Type a name for the application and select Register.

Once the application registration is created, take note of the Application (client) ID and Directory (tenant) ID as you’ll need these items later.

Select Certificates and Secrets and Upload certificate.

Upload the .crt file created earlier.

Select API permissions and Add a permission.

Select Microsoft Graph and Application permissions.

Select each of the permissions that your Azure Automation account requires, then select Add permissions.

If your runbook is only performing queries or updates within a single catalog, then you don’t need to assign it tenant-wide application permissions; instead you can assign the service principal to the catalog’s Catalog owner or Catalog reader role.
If your runbook is only performing queries for entitlement management, then it can use the EntitlementManagement.Read.All permission.
If your runbook is making changes to entitlement management, for example to create assignments across multiple catalogs, then use the EntitlementManagement.ReadWrite.All permission.
For other APIs, ensure that the necessary permission is added. For example, for identity protection, the IdentityRiskyUser.Read.All permission should be added.
Select Grant admin permissions to give your app those permissions.

Create Azure Automation variables
In this step, you’ll create in the Azure Automation account three variables that the runbook uses to determine how to authenticate to Azure AD.

In the Azure portal, return to the Azure Automation account.

Select Variables, and Add variable.

Create a variable named Thumbprint. Type, as the value of the variable, the certificate thumbprint that was generated earlier.

Create a variable named ClientId. Type, as the value of the variable, the client ID for the application registered in Azure AD.

Create a variable named TenantId. Type, as the value of the variable, the tenant ID of the directory where the application was registered.

Create an Azure Automation PowerShell runbook that can use Graph
In this step, you’ll create an initial runbook. You can trigger this runbook to verify the authentication using the certificate created earlier is successful.

Select Runbooks and Create a runbook.

Type the name of the runbook, select PowerShell as the type of runbook to create, and select Create.

Once the runbook is created, a text editing pane appears for you to type in the PowerShell source code of the runbook.

Type the following PowerShell into the text editor.

PowerShell

Copy
Import-Module Microsoft.Graph.Authentication
$ClientId = Get-AutomationVariable -Name ‘ClientId’
$TenantId = Get-AutomationVariable -Name ‘TenantId’
$Thumbprint = Get-AutomationVariable -Name ‘Thumbprint’
Connect-MgGraph -clientId $ClientId -tenantId $TenantId -certificatethumbprint $Thumbprint
Select Test pane, and select Start. Wait a few seconds for the Azure Automation processing of your runbook script to complete.

If the run of your runbook is successful, then the message Welcome to Microsoft Graph! will appear.

Now that you have verified that your runbook can authenticate to Microsoft Graph, extend your runbook by adding cmdlets for interacting with Azure AD features.

Extend the runbook to use Entitlement Management
If the app registration for your runbook has the EntitlementManagement.Read.All or EntitlementManagement.ReadWrite.All permissions, then it can use the entitlement management APIs.

For example, to get a list of Azure AD entitlement management access packages, you can update the above-created runbook, and replace the text with the following PowerShell.
PowerShell

Copy
Import-Module Microsoft.Graph.Authentication
$ClientId = Get-AutomationVariable -Name ‘ClientId’
$TenantId = Get-AutomationVariable -Name ‘TenantId’
$Thumbprint = Get-AutomationVariable -Name ‘Thumbprint’
$auth = Connect-MgGraph -clientId $ClientId -tenantid $TenantId -certificatethumbprint $Thumbprint
Select-MgProfile -Name beta
Import-Module Microsoft.Graph.Identity.Governance
$ap = Get-MgEntitlementManagementAccessPackage -All -ErrorAction Stop
$ap | Select-Object -Property Id,DisplayName | ConvertTo-Json
Select Test pane, and select Start. Wait a few seconds for the Azure Automation processing of your runbook script to complete.

If the run was successful, the output instead of the welcome message will be a JSON array. The JSON array includes the ID and display name of each access package returned from the query.

Provide parameters to the runbook (optional)
You can also add input parameters to your runbook, by adding a Param section at the top of the PowerShell script. For instance,

PowerShell

Copy
Param
(
[String] $AccessPackageAssignmentId
)
The format of the allowed parameters depends upon the calling service. If your runbook does take parameters from the caller, then you’ll need to add validation logic to your runbook to ensure that the parameter values supplied are appropriate for how the runbook could be started. For example, if your runbook is started by a webhook, Azure Automation doesn’t perform any authentication on a webhook request as long as it’s made to the correct URL, so you’ll need an alternate means of validating the request.

Once you configure runbook input parameters, then when you test your runbook you can provide values through the Test page. Later, when the runbook is published, you can provide parameters when starting the runbook from PowerShell, the REST API, or a Logic App.

Parse the output of an Azure Automation account in Logic Apps (optional)
Once your runbook is published, your can create a schedule in Azure Automation, and link your runbook to that schedule to run automatically. Scheduling runbooks from Azure Automation is suitable for runbooks that don’t need to interact with other Azure or Office 365 services that don’t have PowerShell interfaces.

If you wish to send the output of your runbook to another service, then you may wish to consider using Azure Logic Apps to start your Azure Automation runbook, as Logic Apps can also parse the results.

In Azure Logic Apps, create a Logic App in the Logic Apps Designer starting with Recurrence.

Add the operation Create job from Azure Automation. Authenticate to Azure AD, and select the Subscription, Resource Group, Automation Account created earlier. Select Wait for Job.

Add the parameter Runbook name and type the name of the runbook to be started. If the runbook has input parameters, then you can provide the values to them.

Select New step and add the operation Get job output. Select the same Subscription, Resource Group, Automation Account as the previous step, and select the Dynamic value of the Job ID from the previous step.

You can then add more operations to the Logic App, such as the Parse JSON action that uses the Content returned when the runbook completes. (If you’re auto-generating the Parse JSON schema from a sample payload, be sure to account for PowerShell script potentially returning null; you might need to change some of the “type”: “string” to “type”: [“string”, “null”] in the schema.)

Note that in Azure Automation, a PowerShell runbook can fail to complete if it tries to write a large amount of data to the output stream at once. You can typically work around this issue by having the runbook output just the information needed by the Logic App, such as by using the Select-Object -Property cmdlet to exclude unneeded properties.

Plan to keep the certificate up to date
If you created a self-signed certificate following the steps above for authentication, keep in mind that the certificate has a limited lifetime before it expires. You’ll need to regenerate the certificate and upload the new certificate before its expiration date.

There are two places where you can see the expiration date in the Azure portal.

In Azure Automation, the Certificates screen displays the expiration date of the certificate.
In Azure AD, on the app registration, the Certificates & secrets screen displays the expiration date of the certificate used for the Azure Automation account.
Get started with Azure PowerShell

Azure PowerShell is designed for managing and administering Azure resources from the command line. Use Azure PowerShell when you want to build automated tools that use the Azure Resource Manager model. Try it out in your browser with Azure Cloud Shell, or install on your local machine.

This article helps you get started with Azure PowerShell and teaches the core concepts behind it.

Install or run in Azure Cloud Shell

The easiest way to get started with Azure PowerShell is by trying it out in an Azure Cloud Shell environment. To get up and running with Cloud Shell, see Quickstart for PowerShell in Azure Cloud Shell. Cloud Shell runs PowerShell on a Linux container, so Windows-specific functionality isn’t available.

When you’re ready to install Azure PowerShell on your local machine, follow the instructions in Install the Azure PowerShell module.

Sign in to Azure

Sign in interactively with the Connect-AzAccount cmdlet. Skip this step if you use Cloud Shell. Your Azure Cloud Shell session is already authenticated for the environment, subscription, and tenant that launched the Cloud Shell session.

Azure PowerShellCopy

Connect-AzAccount

Azure cloud services offer environments compliant with regional data-handling laws. For accounts in a regional cloud, use the Environment parameter to sign in. Get the name of the environment for your region using the Get-AzEnvironment cmdlet. For example, to sign in to Azure China 21Vianet:

Azure PowerShellCopyOpen Cloudshell

Connect-AzAccount -Environment AzureChinaCloud

Beginning with Az PowerShell module version 5.0.0, Connect-AzAccount presents an interactive browser based login prompt by default. You can specify the UseDeviceAuthentication parameter to receive a token string which was previously the default for PowerShell version 6 and higher.

After signing in, you’ll see information indicating which of your Azure subscriptions is active. If you have multiple Azure subscriptions in your account and want to select a different one, get your available subscriptions with Get-AzSubscription and use the Set-AzContext cmdlet with your subscription ID. For more information about managing your Azure subscriptions in Azure PowerShell, see Use multiple Azure subscriptions.

Once signed in, use the Azure PowerShell cmdlets to access and manage resources in your subscription. To learn more about the sign-in process and authentication methods, see Sign in with Azure PowerShell.

Find commands

Azure PowerShell cmdlets follow a standard naming convention for PowerShell, Verb-Noun. The verb describes the action (examples include NewGetSetRemove) and the noun describes the resource type (examples include AzVMAzKeyVaultCertificateAzFirewallAzVirtualNetworkGateway). Nouns in Azure PowerShell always start with the prefix Az. For the full list of standard verbs, see Approved verbs for PowerShell Commands.

Knowing the nouns, verbs, and the Azure PowerShell modules available helps you find commands with the Get-Command cmdlet. For example, to find all VM-related commands that use the Get verb:

PowerShellCopyOpen Cloudshell

Get-Command -Verb Get -Noun AzVM* -Module Az.Compute

To help you find common commands, this table lists the resource type, corresponding Azure PowerShell module, and noun prefix to use with Get-Command:

Resource typeAzure PowerShell moduleNoun prefix
Resource groupAz.ResourcesAzResourceGroup
Virtual machinesAz.ComputeAzVM
Storage accountsAz.StorageAzStorageAccount
Key VaultAz.KeyVaultAzKeyVault
Web applicationsAz.WebsitesAzWebApp
SQL databasesAz.SqlAzSqlDatabase

For a full list of the modules in Azure PowerShell, see the Azure PowerShell modules list hosted on GitHub.

Data Collection

Azure PowerShell collects telemetry data by default. Microsoft aggregates collected data to identify patterns of usage to identify common issues and to improve the experience of Azure PowerShell. Microsoft Azure PowerShell does not collect any private or personal data. For example, the usage data helps identify issues such as cmdlets with low success and helps prioritize our work.

While we appreciate the insights this data provides, we also understand that not everyone wants to send usage data. You can disable data collection with the Disable-AzDataCollection cmdlet. You can also read our privacy statement to learn more.

Learn Azure PowerShell basics with quickstarts and tutorials

To get started with Azure PowerShell, try an in-depth tutorial for setting up virtual machines and learning how to query them.

Create virtual machines with Azure PowerShell

There are also Azure PowerShell quickstarts for other popular Azure services:

Introduction to Identity on ASP.NET Core


Is an API that supports user interface (UI) login functionality.

Manages users, passwords, profile data, roles, claims, tokens, email confirmation, and more.

Users can create an account with the login information stored in Identity or they can use an external login provider. Supported external login providers include Facebook, Google, Microsoft Account, and Twitter.

For information on how to globally require all users to be authenticated, see Require authenticated users.

The Identity source code is available on GitHub. Scaffold Identity and view the generated files to review the template interaction with Identity.

Identity is typically configured using a SQL Server database to store user names, passwords, and profile data. Alternatively, another persistent store can be used, for example, Azure Table Storage.

In this topic, you learn how to use Identity to register, log in, and log out a user. Note: the templates treat username and email as the same for users. For more detailed instructions about creating apps that use Identity, see Next Steps.

ASP.NET Core Identity isn’t related to the Microsoft identity platform. Microsoft identity platform is:

  • An evolution of the Azure Active Directory (Azure AD) developer platform.
  • An alternative identity solution for authentication and authorization in ASP.NET Core apps.

ASP.NET Core Identity adds user interface (UI) login functionality to ASP.NET Core web apps. To secure web APIs and SPAs, use one of the following:

Duende Identity Server is an OpenID Connect and OAuth 2.0 framework for ASP.NET Core. Duende Identity Server enables the following security features:

  • Authentication as a Service (AaaS)
  • Single sign-on/off (SSO) over multiple application types
  • Access control for APIs
  • Federation Gateway

 Important

Duende Software might require you to pay a license fee for production use of Duende Identity Server. For more information, see Migrate from ASP.NET Core 5.0 to 6.0.

For more information, see the Duende Identity Server documentation (Duende Software website).

View or download the sample code (how to download).

Create a Web app with authentication

Create an ASP.NET Core Web Application project with Individual User Accounts.

  • Select the ASP.NET Core Web App template. Name the project WebApp1 to have the same namespace as the project download. Click OK.
  • In the Authentication type input, select Individual User Accounts.

The generated project provides ASP.NET Core Identity as a Razor Class Library. The Identity Razor Class Library exposes endpoints with the Identity area. For example:

  • /Identity/Account/Login
  • /Identity/Account/Logout
  • /Identity/Account/Manage

Apply migrations

Apply the migrations to initialize the database.

Run the following command in the Package Manager Console (PMC):

Update-Database

Test Register and Login

Run the app and register a user. Depending on your screen size, you might need to select the navigation toggle button to see the Register and Login links.

View the Identity database

  • From the View menu, select SQL Server Object Explorer (SSOX).
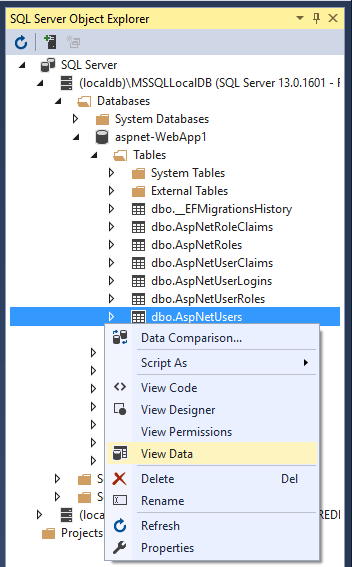
  • Navigate to (localdb)MSSQLLocalDB(SQL Server 13). Right-click on dbo.AspNetUsers > View Data:
Contextual menu on AspNetUsers table in SQL Server Object Explorer

Configure Identity services

Services are added in Program.cs. The typical pattern is to call methods in the following order:

  1. Add{Service}
  2. builder.Services.Configure{Service}

C#Copy

using Microsoft.AspNetCore.Identity;
using Microsoft.EntityFrameworkCore;
using WebApp1.Data;

var builder = WebApplication.CreateBuilder(args);

var connectionString = builder.Configuration.GetConnectionString("DefaultConnection");
builder.Services.AddDbContext<ApplicationDbContext>(options =>
    options.UseSqlServer(connectionString));
builder.Services.AddDatabaseDeveloperPageExceptionFilter();

builder.Services.AddDefaultIdentity<IdentityUser>(options => options.SignIn.RequireConfirmedAccount = true)
    .AddEntityFrameworkStores<ApplicationDbContext>();
builder.Services.AddRazorPages();

builder.Services.Configure<IdentityOptions>(options =>
{
    // Password settings.
    options.Password.RequireDigit = true;
    options.Password.RequireLowercase = true;
    options.Password.RequireNonAlphanumeric = true;
    options.Password.RequireUppercase = true;
    options.Password.RequiredLength = 6;
    options.Password.RequiredUniqueChars = 1;

    // Lockout settings.
    options.Lockout.DefaultLockoutTimeSpan = TimeSpan.FromMinutes(5);
    options.Lockout.MaxFailedAccessAttempts = 5;
    options.Lockout.AllowedForNewUsers = true;

    // User settings.
    options.User.AllowedUserNameCharacters =
    "abcdefghijklmnopqrstuvwxyzABCDEFGHIJKLMNOPQRSTUVWXYZ0123456789-._@+";
    options.User.RequireUniqueEmail = false;
});

builder.Services.ConfigureApplicationCookie(options =>
{
    // Cookie settings
    options.Cookie.HttpOnly = true;
    options.ExpireTimeSpan = TimeSpan.FromMinutes(5);

    options.LoginPath = "/Identity/Account/Login";
    options.AccessDeniedPath = "/Identity/Account/AccessDenied";
    options.SlidingExpiration = true;
});

var app = builder.Build();

if (app.Environment.IsDevelopment())
{
    app.UseMigrationsEndPoint();
}
else
{
    app.UseExceptionHandler("/Error");
    app.UseHsts();
}

app.UseHttpsRedirection();
app.UseStaticFiles();

app.UseRouting();

app.UseAuthentication();
app.UseAuthorization();

app.MapRazorPages();

app.Run();

The preceding code configures Identity with default option values. Services are made available to the app through dependency injection.

Identity is enabled by calling UseAuthenticationUseAuthentication adds authentication middleware to the request pipeline.

The template-generated app doesn’t use authorizationapp.UseAuthorization is included to ensure it’s added in the correct order should the app add authorization. UseRoutingUseAuthentication, and UseAuthorization must be called in the order shown in the preceding code.

For more information on IdentityOptions, see IdentityOptions and Application Startup.

Scaffold Register, Login, LogOut, and RegisterConfirmation

Add the RegisterLoginLogOut, and RegisterConfirmation files. Follow the Scaffold identity into a Razor project with authorization instructions to generate the code shown in this section.

Examine Register

When a user clicks the Register button on the Register page, the RegisterModel.OnPostAsync action is invoked. The user is created by CreateAsync(TUser) on the _userManager object:

C#Copy

public async Task<IActionResult> OnPostAsync(string returnUrl = null)
{
    returnUrl = returnUrl ?? Url.Content("~/");
    ExternalLogins = (await _signInManager.GetExternalAuthenticationSchemesAsync())
                                          .ToList();
    if (ModelState.IsValid)
    {
        var user = new IdentityUser { UserName = Input.Email, Email = Input.Email };
        var result = await _userManager.CreateAsync(user, Input.Password);
        if (result.Succeeded)
        {
            _logger.LogInformation("User created a new account with password.");

            var code = await _userManager.GenerateEmailConfirmationTokenAsync(user);
            code = WebEncoders.Base64UrlEncode(Encoding.UTF8.GetBytes(code));
            var callbackUrl = Url.Page(
                "/Account/ConfirmEmail",
                pageHandler: null,
                values: new { area = "Identity", userId = user.Id, code = code },
                protocol: Request.Scheme);

            await _emailSender.SendEmailAsync(Input.Email, "Confirm your email",
                $"Please confirm your account by <a href='{HtmlEncoder.Default.Encode(callbackUrl)}'>clicking here</a>.");

            if (_userManager.Options.SignIn.RequireConfirmedAccount)
            {
                return RedirectToPage("RegisterConfirmation", 
                                      new { email = Input.Email });
            }
            else
            {
                await _signInManager.SignInAsync(user, isPersistent: false);
                return LocalRedirect(returnUrl);
            }
        }
        foreach (var error in result.Errors)
        {
            ModelState.AddModelError(string.Empty, error.Description);
        }
    }

    // If we got this far, something failed, redisplay form
    return Page();
}

Disable default account verification

With the default templates, the user is redirected to the Account.RegisterConfirmation where they can select a link to have the account confirmed. The default Account.RegisterConfirmation is used only for testing, automatic account verification should be disabled in a production app.

To require a confirmed account and prevent immediate login at registration, set DisplayConfirmAccountLink = false in /Areas/Identity/Pages/Account/RegisterConfirmation.cshtml.cs:

C#Copy

[AllowAnonymous]
public class RegisterConfirmationModel : PageModel
{
    private readonly UserManager<IdentityUser> _userManager;
    private readonly IEmailSender _sender;

    public RegisterConfirmationModel(UserManager<IdentityUser> userManager, IEmailSender sender)
    {
        _userManager = userManager;
        _sender = sender;
    }

    public string Email { get; set; }

    public bool DisplayConfirmAccountLink { get; set; }

    public string EmailConfirmationUrl { get; set; }

    public async Task<IActionResult> OnGetAsync(string email, string returnUrl = null)
    {
        if (email == null)
        {
            return RedirectToPage("/Index");
        }

        var user = await _userManager.FindByEmailAsync(email);
        if (user == null)
        {
            return NotFound($"Unable to load user with email '{email}'.");
        }

        Email = email;
        // Once you add a real email sender, you should remove this code that lets you confirm the account
        DisplayConfirmAccountLink = false;
        if (DisplayConfirmAccountLink)
        {
            var userId = await _userManager.GetUserIdAsync(user);
            var code = await _userManager.GenerateEmailConfirmationTokenAsync(user);
            code = WebEncoders.Base64UrlEncode(Encoding.UTF8.GetBytes(code));
            EmailConfirmationUrl = Url.Page(
                "/Account/ConfirmEmail",
                pageHandler: null,
                values: new { area = "Identity", userId = userId, code = code, returnUrl = returnUrl },
                protocol: Request.Scheme);
        }

        return Page();
    }
}

Log in

The Login form is displayed when:

  • The Log in link is selected.
  • A user attempts to access a restricted page that they aren’t authorized to access or when they haven’t been authenticated by the system.

When the form on the Login page is submitted, the OnPostAsync action is called. PasswordSignInAsync is called on the _signInManager object.

C#Copy

public async Task<IActionResult> OnPostAsync(string returnUrl = null)
{
    returnUrl = returnUrl ?? Url.Content("~/");

    if (ModelState.IsValid)
    {
        // This doesn't count login failures towards account lockout
        // To enable password failures to trigger account lockout, 
        // set lockoutOnFailure: true
        var result = await _signInManager.PasswordSignInAsync(Input.Email,
                           Input.Password, Input.RememberMe, lockoutOnFailure: true);
        if (result.Succeeded)
        {
            _logger.LogInformation("User logged in.");
            return LocalRedirect(returnUrl);
        }
        if (result.RequiresTwoFactor)
        {
            return RedirectToPage("./LoginWith2fa", new
            {
                ReturnUrl = returnUrl,
                RememberMe = Input.RememberMe
            });
        }
        if (result.IsLockedOut)
        {
            _logger.LogWarning("User account locked out.");
            return RedirectToPage("./Lockout");
        }
        else
        {
            ModelState.AddModelError(string.Empty, "Invalid login attempt.");
            return Page();
        }
    }

    // If we got this far, something failed, redisplay form
    return Page();
}

For information on how to make authorization decisions, see Introduction to authorization in ASP.NET Core.

Log out

The Log out link invokes the LogoutModel.OnPost action.

C#Copy

using Microsoft.AspNetCore.Authorization;
using Microsoft.AspNetCore.Identity;
using Microsoft.AspNetCore.Mvc;
using Microsoft.AspNetCore.Mvc.RazorPages;
using Microsoft.Extensions.Logging;
using System.Threading.Tasks;

namespace WebApp1.Areas.Identity.Pages.Account
{
    [AllowAnonymous]
    public class LogoutModel : PageModel
    {
        private readonly SignInManager<IdentityUser> _signInManager;
        private readonly ILogger<LogoutModel> _logger;

        public LogoutModel(SignInManager<IdentityUser> signInManager, ILogger<LogoutModel> logger)
        {
            _signInManager = signInManager;
            _logger = logger;
        }

        public void OnGet()
        {
        }

        public async Task<IActionResult> OnPost(string returnUrl = null)
        {
            await _signInManager.SignOutAsync();
            _logger.LogInformation("User logged out.");
            if (returnUrl != null)
            {
                return LocalRedirect(returnUrl);
            }
            else
            {
                return RedirectToPage();
            }
        }
    }
}

In the preceding code, the code return RedirectToPage(); needs to be a redirect so that the browser performs a new request and the identity for the user gets updated.

SignOutAsync clears the user’s claims stored in a cookie.

Post is specified in the Pages/Shared/_LoginPartial.cshtml:

CSHTMLCopy

@using Microsoft.AspNetCore.Identity
@inject SignInManager<IdentityUser> SignInManager
@inject UserManager<IdentityUser> UserManager

<ul class="navbar-nav">
@if (SignInManager.IsSignedIn(User))
{
    <li class="nav-item">
        <a  class="nav-link text-dark" asp-area="Identity" asp-page="/Account/Manage/Index" 
                                              title="Manage">Hello @User.Identity.Name!</a>
    </li>
    <li class="nav-item">
        <form class="form-inline" asp-area="Identity" asp-page="/Account/Logout" 
                                  asp-route-returnUrl="@Url.Page("/", new { area = "" })" 
                                  method="post" >
            <button  type="submit" class="nav-link btn btn-link text-dark">Logout</button>
        </form>
    </li>
}
else
{
    <li class="nav-item">
        <a class="nav-link text-dark" asp-area="Identity" asp-page="/Account/Register">Register</a>
    </li>
    <li class="nav-item">
        <a class="nav-link text-dark" asp-area="Identity" asp-page="/Account/Login">Login</a>
    </li>
}
</ul>

Test Identity

The default web project templates allow anonymous access to the home pages. To test Identity, add [Authorize]:

C#Copy

using Microsoft.AspNetCore.Authorization;
using Microsoft.AspNetCore.Mvc.RazorPages;
using Microsoft.Extensions.Logging;

namespace WebApp1.Pages
{
    [Authorize]
    public class PrivacyModel : PageModel
    {
        private readonly ILogger<PrivacyModel> _logger;

        public PrivacyModel(ILogger<PrivacyModel> logger)
        {
            _logger = logger;
        }

        public void OnGet()
        {
        }
    }
}

If you are signed in, sign out. Run the app and select the Privacy link. You are redirected to the login page.

Explore Identity

To explore Identity in more detail:

Identity Components

All the Identity-dependent NuGet packages are included in the ASP.NET Core shared framework.

The primary package for Identity is Microsoft.AspNetCore.Identity. This package contains the core set of interfaces for ASP.NET Core Identity, and is included by Microsoft.AspNetCore.Identity.EntityFrameworkCore.

Migrating to ASP.NET Core Identity

For more information and guidance on migrating your existing Identity store, see Migrate Authentication and Identity.

Setting password strength

See Configuration for a sample that sets the minimum password requirements.

AddDefaultIdentity and AddIdentity

AddDefaultIdentity was introduced in ASP.NET Core 2.1. Calling AddDefaultIdentity is similar to calling the following:

See AddDefaultIdentity source for more information.

Prevent publish of static Identity assets

To prevent publishing static Identity assets (stylesheets and JavaScript files for Identity UI) to the web root, add the following ResolveStaticWebAssetsInputsDependsOn property and RemoveIdentityAssets target to the app’s project file:

XMLCopy

<PropertyGroup>
  <ResolveStaticWebAssetsInputsDependsOn>RemoveIdentityAssets</ResolveStaticWebAssetsInputsDependsOn>
</PropertyGroup>

<Target Name="RemoveIdentityAssets">
  <ItemGroup>
    <StaticWebAsset Remove="@(StaticWebAsset)" Condition="%(SourceId) == 'Microsoft.AspNetCore.Identity.UI'" />
  </ItemGroup>
</Target>

Next Steps

Manage role permissions and security in Azure Automation

Azure role-based access control (Azure RBAC) enables access management for Azure resources. Using Azure RBAC, you can segregate duties within your team and grant only the amount of access to users, groups, and applications that they need to perform their jobs. You can grant role-based access to users using the Azure portal, Azure Command-Line tools, or Azure Management APIs.

Roles in Automation accounts

In Azure Automation, access is granted by assigning the appropriate Azure role to users, groups, and applications at the Automation account scope. Following are the built-in roles supported by an Automation account:

RoleDescription
OwnerThe Owner role allows access to all resources and actions within an Automation account including providing access to other users, groups, and applications to manage the Automation account.
ContributorThe Contributor role allows you to manage everything except modifying other user’s access permissions to an Automation account.
ReaderThe Reader role allows you to view all the resources in an Automation account but can’t make any changes.
Automation ContributorThe Automation Contributor role allows you to manage all resources in the Automation account, except modifying other user’s access permissions to an Automation account.
Automation OperatorThe Automation Operator role allows you to view runbook name and properties and to create and manage jobs for all runbooks in an Automation account. This role is helpful if you want to protect your Automation account resources like credentials assets and runbooks from being viewed or modified but still allow members of your organization to execute these runbooks.
Automation Job OperatorThe Automation Job Operator role allows you to create and manage jobs for all runbooks in an Automation account.
Automation Runbook OperatorThe Automation Runbook Operator role allows you to view a runbook’s name and properties.
Log Analytics ContributorThe Log Analytics Contributor role allows you to read all monitoring data and edit monitoring settings. Editing monitoring settings includes adding the VM extension to VMs, reading storage account keys to be able to configure collection of logs from Azure storage, creating and configuring Automation accounts, adding Azure Automation features, and configuring Azure diagnostics on all Azure resources.
Log Analytics ReaderThe Log Analytics Reader role allows you to view and search all monitoring data as well as view monitoring settings. This includes viewing the configuration of Azure diagnostics on all Azure resources.
Monitoring ContributorThe Monitoring Contributor role allows you to read all monitoring data and update monitoring settings.
Monitoring ReaderThe Monitoring Reader role allows you to read all monitoring data.
User Access AdministratorThe User Access Administrator role allows you to manage user access to Azure Automation accounts.

Role permissions

The following tables describe the specific permissions given to each role. This can include Actions, which give permissions, and Not Actions, which restrict them.

Owner

An Owner can manage everything, including access. The following table shows the permissions granted for the role:

ActionsDescription
Microsoft.Automation/automationAccounts/*Create and manage resources of all types.

Contributor

A Contributor can manage everything except access. The following table shows the permissions granted and denied for the role:

ActionsDescription
Microsoft.Automation/automationAccounts/*Create and manage resources of all types
Not Actions
Microsoft.Authorization/*/DeleteDelete roles and role assignments.
Microsoft.Authorization/*/WriteCreate roles and role assignments.
Microsoft.Authorization/elevateAccess/ActionDenies the ability to create a User Access Administrator.

Reader

 Note

We have recently made a change in the built-in Reader role permission for the Automation account. Learn more

A Reader can view all the resources in an Automation account but can’t make any changes.

ActionsDescription
Microsoft.Automation/automationAccounts/readView all resources in an Automation account.

Automation Contributor

An Automation Contributor can manage all resources in the Automation account except access. The following table shows the permissions granted for the role:

ActionsDescription
Microsoft.Automation/automationAccounts/*Create and manage resources of all types.
Microsoft.Authorization/*/readRead roles and role assignments.
Microsoft.Resources/deployments/*Create and manage resource group deployments.
Microsoft.Resources/subscriptions/resourceGroups/readRead resource group deployments.
Microsoft.Support/*Create and manage support tickets.
Microsoft.Insights/ActionGroups/*Read/write/delete action groups.
Microsoft.Insights/ActivityLogAlerts/*Read/write/delete activity log alerts.
Microsoft.Insights/diagnosticSettings/*Read/write/delete diagnostic settings.
Microsoft.Insights/MetricAlerts/*Read/write/delete near real-time metric alerts.
Microsoft.Insights/ScheduledQueryRules/*Read/write/delete log alerts in Azure Monitor.
Microsoft.OperationalInsights/workspaces/sharedKeys/actionList keys for a Log Analytics workspace

 Note

The Automation Contributor role can be used to access any resource using the managed identity, if appropriate permissions are set on the target resource, or using a Run As account. An Automation Run As account are by default, configured with Contributor rights on the subscription. Follow the principal of least privilege and carefully assign permissions only required to execute your runbook. For example, if the Automation account is only required to start or stop an Azure VM, then the permissions assigned to the Run As account or managed identity needs to be only for starting or stopping the VM. Similarly, if a runbook is reading from blob storage, then assign read only permissions.

When assigning permissions, it is recommended to use Azure role based access control (RBAC) assigned to a managed identity. Review our best approach recommendations for using a system or user-assigned managed identity, including management and governance during its lifetime.

Automation Operator

An Automation Operator is able to create and manage jobs, and read runbook names and properties for all runbooks in an Automation account.

 Note

If you want to control operator access to individual runbooks then don’t set this role. Instead use the Automation Job Operator and Automation Runbook Operator roles in combination.

The following table shows the permissions granted for the role:

ActionsDescription
Microsoft.Authorization/*/readRead authorization.
Microsoft.Automation/automationAccounts/hybridRunbookWorkerGroups/readRead Hybrid Runbook Worker Resources.
Microsoft.Automation/automationAccounts/jobs/readList jobs of the runbook.
Microsoft.Automation/automationAccounts/jobs/resume/actionResume a job that is paused.
Microsoft.Automation/automationAccounts/jobs/stop/actionCancel a job in progress.
Microsoft.Automation/automationAccounts/jobs/streams/readRead the Job Streams and Output.
Microsoft.Automation/automationAccounts/jobs/output/readGet the Output of a job.
Microsoft.Automation/automationAccounts/jobs/suspend/actionPause a job in progress.
Microsoft.Automation/automationAccounts/jobs/writeCreate jobs.
Microsoft.Automation/automationAccounts/jobSchedules/readGet an Azure Automation job schedule.
Microsoft.Automation/automationAccounts/jobSchedules/writeCreate an Azure Automation job schedule.
Microsoft.Automation/automationAccounts/linkedWorkspace/readGet the workspace linked to the Automation account.
Microsoft.Automation/automationAccounts/readGet an Azure Automation account.
Microsoft.Automation/automationAccounts/runbooks/readGet an Azure Automation runbook.
Microsoft.Automation/automationAccounts/schedules/readGet an Azure Automation schedule asset.
Microsoft.Automation/automationAccounts/schedules/writeCreate or update an Azure Automation schedule asset.
Microsoft.Resources/subscriptions/resourceGroups/readRead roles and role assignments.
Microsoft.Resources/deployments/*Create and manage resource group deployments.
Microsoft.Insights/alertRules/*Create and manage alert rules.
Microsoft.Support/*Create and manage support tickets.
Microsoft.ResourceHealth/availabilityStatuses/readGets the availability statuses for all resources in the specified scope.

Automation Job Operator

An Automation Job Operator role is granted at the Automation account scope. This allows the operator permissions to create and manage jobs for all runbooks in the account. If the Job Operator role is granted read permissions on the resource group containing the Automation account, members of the role have the ability to start runbooks. However, they don’t have the ability to create, edit, or delete them.

The following table shows the permissions granted for the role:

ActionsDescription
Microsoft.Authorization/*/readRead authorization.
Microsoft.Automation/automationAccounts/jobs/readList jobs of the runbook.
Microsoft.Automation/automationAccounts/jobs/resume/actionResume a job that is paused.
Microsoft.Automation/automationAccounts/jobs/stop/actionCancel a job in progress.
Microsoft.Automation/automationAccounts/jobs/streams/readRead the Job Streams and Output.
Microsoft.Automation/automationAccounts/jobs/suspend/actionPause a job in progress.
Microsoft.Automation/automationAccounts/jobs/writeCreate jobs.
Microsoft.Resources/subscriptions/resourceGroups/readRead roles and role assignments.
Microsoft.Resources/deployments/*Create and manage resource group deployments.
Microsoft.Insights/alertRules/*Create and manage alert rules.
Microsoft.Support/*Create and manage support tickets.
Microsoft.Automation/automationAccounts/hybridRunbookWorkerGroups/readReads a Hybrid Runbook Worker Group.
Microsoft.Automation/automationAccounts/jobs/output/readGets the output of a job.

Automation Runbook Operator

An Automation Runbook Operator role is granted at the Runbook scope. An Automation Runbook Operator can view the runbook’s name and properties. This role combined with the Automation Job Operator role enables the operator to also create and manage jobs for the runbook. The following table shows the permissions granted for the role:

ActionsDescription
Microsoft.Automation/automationAccounts/runbooks/readList the runbooks.
Microsoft.Authorization/*/readRead authorization.
Microsoft.Resources/subscriptions/resourceGroups/readRead roles and role assignments.
Microsoft.Resources/deployments/*Create and manage resource group deployments.
Microsoft.Insights/alertRules/*Create and manage alert rules.
Microsoft.Support/*Create and manage support tickets.

Log Analytics Contributor

A Log Analytics Contributor can read all monitoring data and edit monitoring settings. Editing monitoring settings includes adding the VM extension to VMs; reading storage account keys to be able to configure collection of logs from Azure Storage; creating and configuring Automation accounts; adding features; and configuring Azure diagnostics on all Azure resources. The following table shows the permissions granted for the role:

ActionsDescription
*/readRead resources of all types, except secrets.
Microsoft.ClassicCompute/virtualMachines/extensions/*Create and manage virtual machine extensions.
Microsoft.ClassicStorage/storageAccounts/listKeys/actionList classic storage account keys.
Microsoft.Compute/virtualMachines/extensions/*Create and manage classic virtual machine extensions.
Microsoft.Insights/alertRules/*Read/write/delete alert rules.
Microsoft.Insights/diagnosticSettings/*Read/write/delete diagnostic settings.
Microsoft.OperationalInsights/*Manage Azure Monitor logs.
Microsoft.OperationsManagement/*Manage Azure Automation features in workspaces.
Microsoft.Resources/deployments/*Create and manage resource group deployments.
Microsoft.Resources/subscriptions/resourcegroups/deployments/*Create and manage resource group deployments.
Microsoft.Storage/storageAccounts/listKeys/actionList storage account keys.
Microsoft.Support/*Create and manage support tickets.
Microsoft.HybridCompute/machines/extensions/writeInstalls or Updates an Azure Arc extensions.

Log Analytics Reader

A Log Analytics Reader can view and search all monitoring data as well as and view monitoring settings, including viewing the configuration of Azure diagnostics on all Azure resources. The following table shows the permissions granted or denied for the role:

ActionsDescription
*/readRead resources of all types, except secrets.
Microsoft.OperationalInsights/workspaces/analytics/query/actionManage queries in Azure Monitor logs.
Microsoft.OperationalInsights/workspaces/search/actionSearch Azure Monitor log data.
Microsoft.Support/*Create and manage support tickets.
Not Actions
Microsoft.OperationalInsights/workspaces/sharedKeys/readNot able to read the shared access keys.

Monitoring Contributor

A Monitoring Contributor can read all monitoring data and update monitoring settings. The following table shows the permissions granted for the role:

ActionsDescription
*/readRead resources of all types, except secrets.
Microsoft.AlertsManagement/alerts/*Manage Alerts.
Microsoft.AlertsManagement/alertsSummary/*Manage the Alert dashboard.
Microsoft.Insights/AlertRules/*Manage alert rules.
Microsoft.Insights/components/*Manage Application Insights components.
Microsoft.Insights/DiagnosticSettings/*Manage diagnostic settings.
Microsoft.Insights/eventtypes/*List Activity Log events (management events) in a subscription. This permission is applicable to both programmatic and portal access to the Activity Log.
Microsoft.Insights/LogDefinitions/*This permission is necessary for users who need access to Activity Logs via the portal. List log categories in Activity Log.
Microsoft.Insights/MetricDefinitions/*Read metric definitions (list of available metric types for a resource).
Microsoft.Insights/Metrics/*Read metrics for a resource.
Microsoft.Insights/Register/ActionRegister the Microsoft.Insights provider.
Microsoft.Insights/webtests/*Manage Application Insights web tests.
Microsoft.OperationalInsights/workspaces/intelligencepacks/*Manage Azure Monitor logs solution packs.
Microsoft.OperationalInsights/workspaces/savedSearches/*Manage Azure Monitor logs saved searches.
Microsoft.OperationalInsights/workspaces/search/actionSearch Log Analytics workspaces.
Microsoft.OperationalInsights/workspaces/sharedKeys/actionList keys for a Log Analytics workspace.
Microsoft.OperationalInsights/workspaces/storageinsightconfigs/*Manage Azure Monitor logs storage insight configurations.
Microsoft.Support/*Create and manage support tickets.
Microsoft.WorkloadMonitor/workloads/*Manage Workloads.

Monitoring Reader

A Monitoring Reader can read all monitoring data. The following table shows the permissions granted for the role:

ActionsDescription
*/readRead resources of all types, except secrets.
Microsoft.OperationalInsights/workspaces/search/actionSearch Log Analytics workspaces.
Microsoft.Support/*Create and manage support tickets

User Access Administrator

A User Access Administrator can manage user access to Azure resources. The following table shows the permissions granted for the role:

ActionsDescription
*/readRead all resources
Microsoft.Authorization/*Manage authorization
Microsoft.Support/*Create and manage support tickets

Reader role access permissions

 Important

To strengthen the overall Azure Automation security posture, the built-in RBAC Reader would not have access to Automation account keys through the API call – GET /AUTOMATIONACCOUNTS/AGENTREGISTRATIONINFORMATION.

The Built-in Reader role for the Automation Account can’t use the API – GET /AUTOMATIONACCOUNTS/AGENTREGISTRATIONINFORMATION to fetch the Automation Account keys. This is a high privilege operation providing sensitive information that could pose a security risk of an unwanted malicious actor with low privileges who can get access to automation account keys and can perform actions with elevated privilege level.

To access the API – GET /AUTOMATIONACCOUNTS/AGENTREGISTRATIONINFORMATION, we recommend that you switch to the built-in roles like Owner, Contributor or Automation Contributor to access the Automation account keys. These roles, by default, will have the listKeys permission. As a best practice, we recommend that you create a custom role with limited permissions to access the Automation account keys. For a custom role, you need to add Microsoft.Automation/automationAccounts/listKeys/action permission to the role definition. Learn more about how to create custom role from the Azure portal.

Feature setup permissions

The following sections describe the minimum required permissions needed for enabling the Update Management and Change Tracking and Inventory features.

Permissions for enabling Update Management and Change Tracking and Inventory from a VM

ActionPermissionMinimum scope
Write new deploymentMicrosoft.Resources/deployments/*Subscription
Write new resource groupMicrosoft.Resources/subscriptions/resourceGroups/writeSubscription
Create new default WorkspaceMicrosoft.OperationalInsights/workspaces/writeResource group
Create new AccountMicrosoft.Automation/automationAccounts/writeResource group
Link workspace and accountMicrosoft.OperationalInsights/workspaces/write
Microsoft.Automation/automationAccounts/read
Workspace
Automation account
Create MMA extensionMicrosoft.Compute/virtualMachines/writeVirtual Machine
Create saved searchMicrosoft.OperationalInsights/workspaces/writeWorkspace
Create scope configMicrosoft.OperationalInsights/workspaces/writeWorkspace
Onboarding state check – Read workspaceMicrosoft.OperationalInsights/workspaces/readWorkspace
Onboarding state check – Read linked workspace property of accountMicrosoft.Automation/automationAccounts/readAutomation account
Onboarding state check – Read solutionMicrosoft.OperationalInsights/workspaces/intelligencepacks/readSolution
Onboarding state check – Read VMMicrosoft.Compute/virtualMachines/readVirtual Machine
Onboarding state check – Read accountMicrosoft.Automation/automationAccounts/readAutomation account
Onboarding workspace check for VM1Microsoft.OperationalInsights/workspaces/readSubscription
Register the Log Analytics providerMicrosoft.Insights/register/actionSubscription

1 This permission is needed to enable features through the VM portal experience.

Permissions for enabling Update Management and Change Tracking and Inventory from an Automation account

ActionPermissionMinimum Scope
Create new deploymentMicrosoft.Resources/deployments/*Subscription
Create new resource groupMicrosoft.Resources/subscriptions/resourceGroups/writeSubscription
AutomationOnboarding blade – Create new workspaceMicrosoft.OperationalInsights/workspaces/writeResource group
AutomationOnboarding blade – read linked workspaceMicrosoft.Automation/automationAccounts/readAutomation account
AutomationOnboarding blade – read solutionMicrosoft.OperationalInsights/workspaces/intelligencepacks/readSolution
AutomationOnboarding blade – read workspaceMicrosoft.OperationalInsights/workspaces/intelligencepacks/readWorkspace
Create link for workspace and AccountMicrosoft.OperationalInsights/workspaces/writeWorkspace
Write account for shoeboxMicrosoft.Automation/automationAccounts/writeAccount
Create/edit saved searchMicrosoft.OperationalInsights/workspaces/writeWorkspace
Create/edit scope configMicrosoft.OperationalInsights/workspaces/writeWorkspace
Register the Log Analytics providerMicrosoft.Insights/register/actionSubscription
Step 2 – Enable Multiple VMs
VMOnboarding blade – Create MMA extensionMicrosoft.Compute/virtualMachines/writeVirtual Machine
Create / edit saved searchMicrosoft.OperationalInsights/workspaces/writeWorkspace
Create / edit scope configMicrosoft.OperationalInsights/workspaces/writeWorkspace

Manage Role permissions for Hybrid Worker Groups and Hybrid Workers

You can create Azure custom roles in Automation and grant the following permissions to Hybrid Worker Groups and Hybrid Workers:

Update Management permissions

Update Management can be used to assess and schedule update deployments to machines in multiple subscriptions in the same Azure Active Directory (Azure AD) tenant, or across tenants using Azure Lighthouse. The following table lists the permissions needed to manage update deployments.

ResourceRoleScope
Automation accountVirtual Machine ContributorResource Group for the account
Log Analytics workspaceLog Analytics ContributorLog Analytics workspace
Log Analytics workspaceLog Analytics ReaderSubscription
SolutionLog Analytics ContributorSolution
Virtual MachineVirtual Machine ContributorVirtual Machine
Actions on Virtual Machine
View history of update schedule execution (Software Update Configuration Machine Runs)ReaderAutomation account
Actions on virtual machinePermission
Create update schedule (Software Update Configurations)Microsoft.Compute/virtualMachines/writeFor static VM list and resource groups
Create update schedule (Software Update Configurations)Microsoft.OperationalInsights/workspaces/analytics/query/actionFor workspace resource ID when using non-Azure dynamic list.

 Note

When you use Update management, ensure that the execution policy for scripts is RemoteSigned.

Configure Azure RBAC for your Automation account

The following section shows you how to configure Azure RBAC on your Automation account through the Azure portal and PowerShell.

Configure Azure RBAC using the Azure portal

  1. Sign in to the Azure portal and open your Automation account from the Automation Accounts page.
  2. Select Access control (IAM) and select a role from the list of available roles. You can choose any of the available built-in roles that an Automation account supports or any custom role you might have defined. Assign the role to a user to which you want to give permissions.For detailed steps, see Assign Azure roles using the Azure portal. NoteYou can only set role-based access control at the Automation account scope and not at any resource below the Automation account.

Remove role assignments from a user

You can remove the access permission for a user who isn’t managing the Automation account, or who no longer works for the organization. The following steps show how to remove the role assignments from a user. For detailed steps, see Remove Azure role assignments:

  1. Open Access control (IAM) at a scope, such as management group, subscription, resource group, or resource, where you want to remove access.
  2. Select the Role assignments tab to view all the role assignments at this scope.
  3. In the list of role assignments, add a checkmark next to the user with the role assignment you want to remove.
  4. Select Remove.Remove users

Configure Azure RBAC using PowerShell

You can also configure role-based access to an Automation account using the following Azure PowerShell cmdlets:

Get-AzRoleDefinition lists all Azure roles that are available in Azure Active Directory. You can use this cmdlet with the Name parameter to list all the actions that a specific role can perform.

Azure PowerShellCopyOpen Cloudshell

Get-AzRoleDefinition -Name 'Automation Operator'

The following is the example output:

Azure PowerShellCopy

Name             : Automation Operator
Id               : d3881f73-407a-4167-8283-e981cbba0404
IsCustom         : False
Description      : Automation Operators are able to start, stop, suspend, and resume jobs
Actions          : {Microsoft.Authorization/*/read, Microsoft.Automation/automationAccounts/jobs/read, Microsoft.Automation/automationAccounts/jobs/resume/action,
                   Microsoft.Automation/automationAccounts/jobs/stop/action...}
NotActions       : {}
AssignableScopes : {/}

Get-AzRoleAssignment lists Azure role assignments at the specified scope. Without any parameters, this cmdlet returns all the role assignments made under the subscription. Use the ExpandPrincipalGroups parameter to list access assignments for the specified user, as well as the groups that the user belongs to.

Example: Use the following cmdlet to list all the users and their roles within an Automation account.

Azure PowerShellCopyOpen Cloudshell

Get-AzRoleAssignment -Scope '/subscriptions/<SubscriptionID>/resourcegroups/<Resource Group Name>/Providers/Microsoft.Automation/automationAccounts/<Automation account name>'

The following is the example output:

PowerShellCopy

RoleAssignmentId   : /subscriptions/00000000-0000-0000-0000-000000000000/resourceGroups/myResourceGroup/providers/Microsoft.Automation/automationAccounts/myAutomationAccount/provid
                     ers/Microsoft.Authorization/roleAssignments/cc594d39-ac10-46c4-9505-f182a355c41f
Scope              : /subscriptions/00000000-0000-0000-0000-000000000000/resourceGroups/myResourceGroup/providers/Microsoft.Automation/automationAccounts/myAutomationAccount
DisplayName        : admin@contoso.com
SignInName         : admin@contoso.com
RoleDefinitionName : Automation Operator
RoleDefinitionId   : d3881f73-407a-4167-8283-e981cbba0404
ObjectId           : 15f26a47-812d-489a-8197-3d4853558347
ObjectType         : User

Use New-AzRoleAssignment to assign access to users, groups, and applications to a particular scope.

Example: Use the following command to assign the “Automation Operator” role for a user in the Automation account scope.

Azure PowerShellCopyOpen Cloudshell

New-AzRoleAssignment -SignInName <sign-in Id of a user you wish to grant access> -RoleDefinitionName 'Automation operator' -Scope '/subscriptions/<SubscriptionID>/resourcegroups/<Resource Group Name>/Providers/Microsoft.Automation/automationAccounts/<Automation account name>'

The following is the example output:

Azure PowerShellCopy

RoleAssignmentId   : /subscriptions/00000000-0000-0000-0000-000000000000/resourcegroups/myResourceGroup/Providers/Microsoft.Automation/automationAccounts/myAutomationAccount/provid
                     ers/Microsoft.Authorization/roleAssignments/25377770-561e-4496-8b4f-7cba1d6fa346
Scope              : /subscriptions/00000000-0000-0000-0000-000000000000/resourcegroups/myResourceGroup/Providers/Microsoft.Automation/automationAccounts/myAutomationAccount
DisplayName        : admin@contoso.com
SignInName         : admin@contoso.com
RoleDefinitionName : Automation Operator
RoleDefinitionId   : d3881f73-407a-4167-8283-e981cbba0404
ObjectId           : f5ecbe87-1181-43d2-88d5-a8f5e9d8014e
ObjectType         : User

Use Remove-AzRoleAssignment to remove access of a specified user, group, or application from a particular scope.

Example: Use the following command to remove the user from the Automation Operator role in the Automation account scope.

Azure PowerShellCopyOpen Cloudshell

Remove-AzRoleAssignment -SignInName <sign-in Id of a user you wish to remove> -RoleDefinitionName 'Automation Operator' -Scope '/subscriptions/<SubscriptionID>/resourcegroups/<Resource Group Name>/Providers/Microsoft.Automation/automationAccounts/<Automation account name>'

In the preceding example, replace sign-in ID of a user you wish to removeSubscriptionIDResource Group Name, and Automation account name with your account details. Choose yes when prompted to confirm before continuing to remove user role assignments.

User experience for Automation Operator role – Automation account

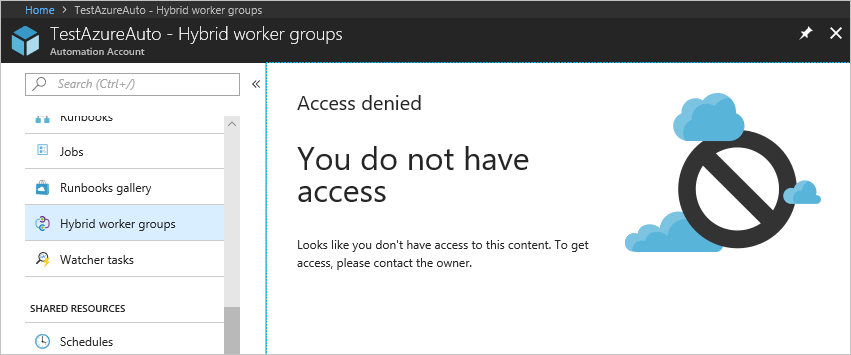
When a user assigned to the Automation Operator role on the Automation account scope views the Automation account to which he/she is assigned, the user can only view the list of runbooks, runbook jobs, and schedules created in the Automation account. This user can’t view the definitions of these items. The user can start, stop, suspend, resume, or schedule the runbook job. However, the user doesn’t have access to other Automation resources, such as configurations, Hybrid Runbook Worker groups, or DSC nodes.

No access to resources

Configure Azure RBAC for runbooks

Azure Automation allows you to assign Azure roles to specific runbooks. To do this, run the following script to add a user to a specific runbook. An Automation Account Administrator or a Tenant Administrator can run this script.

Azure PowerShellCopyOpen Cloudshell

$rgName = "<Resource Group Name>" # Resource Group name for the Automation account
$automationAccountName ="<Automation account name>" # Name of the Automation account
$rbName = "<Name of Runbook>" # Name of the runbook
$userId = "<User ObjectId>" # Azure Active Directory (AAD) user's ObjectId from the directory

# Gets the Automation account resource
$aa = Get-AzResource -ResourceGroupName $rgName -ResourceType "Microsoft.Automation/automationAccounts" -ResourceName $automationAccountName

# Get the Runbook resource
$rb = Get-AzResource -ResourceGroupName $rgName -ResourceType "Microsoft.Automation/automationAccounts/runbooks" -ResourceName "$rbName"

# The Automation Job Operator role only needs to be run once per user.
New-AzRoleAssignment -ObjectId $userId -RoleDefinitionName "Automation Job Operator" -Scope $aa.ResourceId

# Adds the user to the Automation Runbook Operator role to the Runbook scope
New-AzRoleAssignment -ObjectId $userId -RoleDefinitionName "Automation Runbook Operator" -Scope $rb.ResourceId

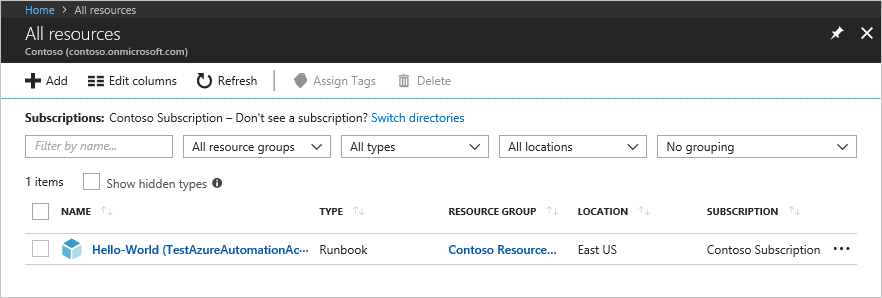
Once the script has run, have the user sign in to the Azure portal and select All Resources. In the list, the user can see the runbook for which he/she has been added as an Automation Runbook Operator.

Runbook Azure RBAC in the portal

User experience for Automation operator role – Runbook

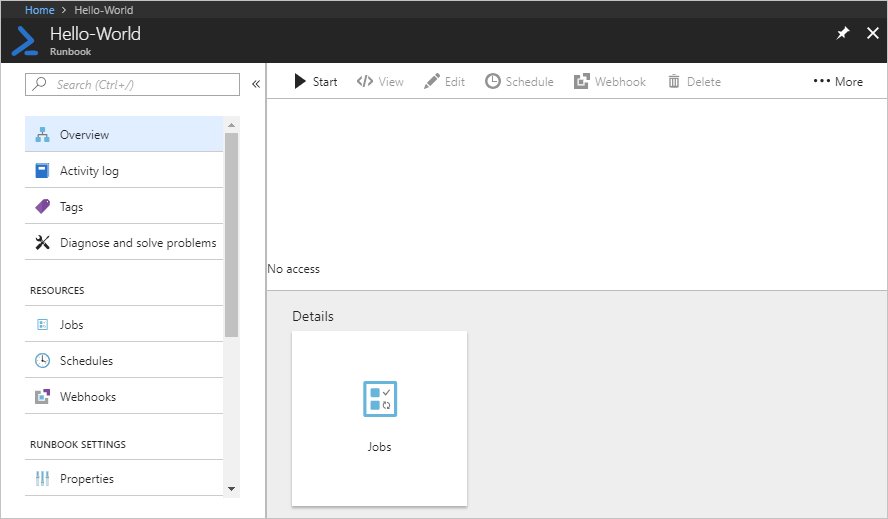
When a user assigned to the Automation Operator role on the Runbook scope views an assigned runbook, the user can only start the runbook and view the runbook jobs.

Only has access to start

Next steps

Identity and access management (IAM)

Secure access to your resources with Azure identity and access management solutions.

Protect your applications and data at the front gate with Azure identity and access management solutions. Defend against malicious login attempts and safeguard credentials with risk-based access controls, identity protection tools, and strong authentication options—without disrupting productivity.

Find the identity product you need

If you want toUse this
Provide identity and access management for cloud and hybrid environmentsAzure Active Directory (Azure AD)
Consumer identity and access management in the cloudAzure Active Directory External Identities
Join virtual machines in Azure to a domain without deploying domain controllersAzure Active Directory Domain Services

What is Azure AD Privileged Identity Management?

Privileged Identity Management (PIM) is a service in Azure Active Directory (Azure AD) that enables you to manage, control, and monitor access to important resources in your organization. These resources include resources in Azure AD, Azure, and other Microsoft Online Services such as Microsoft 365 or Microsoft Intune. The following video explains important PIM concepts and features.

Reasons to use

Organizations want to minimize the number of people who have access to secure information or resources, because that reduces the chance of

  • a malicious actor getting access
  • an authorized user inadvertently impacting a sensitive resource

However, users still need to carry out privileged operations in Azure AD, Azure, Microsoft 365, or SaaS apps. Organizations can give users just-in-time privileged access to Azure and Azure AD resources and can oversee what those users are doing with their privileged access.

License requirements

Using this feature requires either Microsoft Entra ID Governance or Microsoft Azure AD Premium P2 subscriptions. To find the right license for your requirements, see Compare generally available features of Microsoft Azure AD.

For information about licenses for users, see License requirements to use Privileged Identity Management.

What does it do?

Privileged Identity Management provides time-based and approval-based role activation to mitigate the risks of excessive, unnecessary, or misused access permissions on resources that you care about. Here are some of the key features of Privileged Identity Management:

  • Provide just-in-time privileged access to Azure AD and Azure resources
  • Assign time-bound access to resources using start and end dates
  • Require approval to activate privileged roles
  • Enforce multi-factor authentication to activate any role
  • Use justification to understand why users activate
  • Get notifications when privileged roles are activated
  • Conduct access reviews to ensure users still need roles
  • Download audit history for internal or external audit
  • Prevents removal of the last active Global Administrator and Privileged Role Administrator role assignments

What can I do with it?

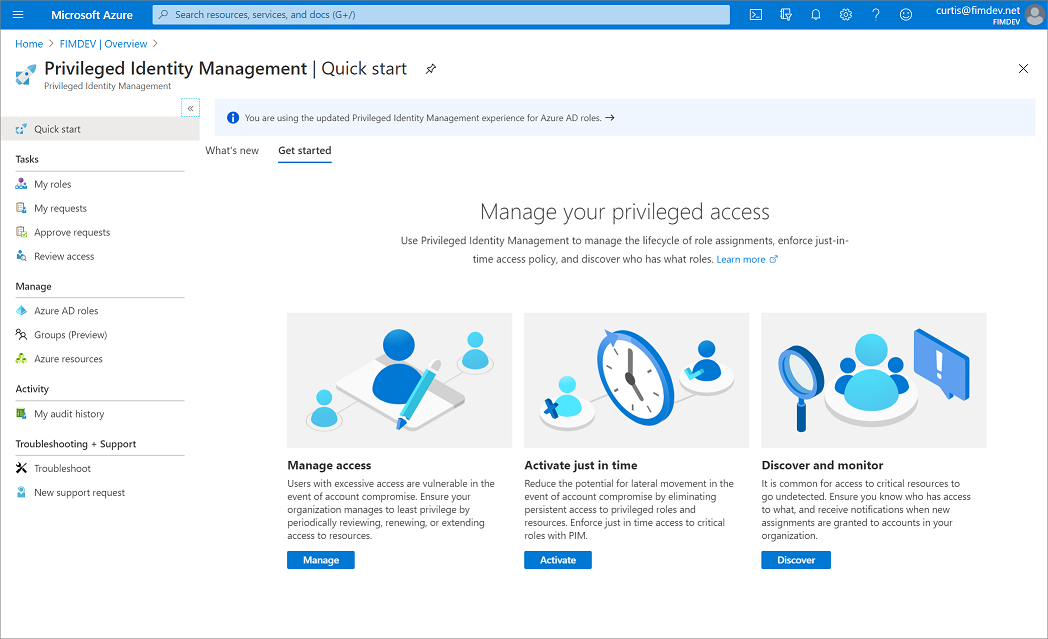
Once you set up Privileged Identity Management, you’ll see TasksManage, and Activity options in the left navigation menu. As an administrator, you’ll choose between options such as managing Azure AD roles, managing Azure resource roles, or PIM for Groups. When you choose what you want to manage, you see the appropriate set of options for that option.

Screenshot of Privileged Identity Management in the Azure portal.

Who can do what?

For Azure AD roles in Privileged Identity Management, only a user who is in the Privileged Role Administrator or Global Administrator role can manage assignments for other administrators. Global Administrators, Security Administrators, Global Readers, and Security Readers can also view assignments to Azure AD roles in Privileged Identity Management.

For Azure resource roles in Privileged Identity Management, only a subscription administrator, a resource Owner, or a resource User Access administrator can manage assignments for other administrators. Users who are Privileged Role Administrators, Security Administrators, or Security Readers don’t by default have access to view assignments to Azure resource roles in Privileged Identity Management.

Terminology

To better understand Privileged Identity Management and its documentation, you should review the following terms.

Term or conceptRole assignment categoryDescription
eligibleTypeA role assignment that requires a user to perform one or more actions to use the role. If a user has been made eligible for a role, that means they can activate the role when they need to perform privileged tasks. There’s no difference in the access given to someone with a permanent versus an eligible role assignment. The only difference is that some people don’t need that access all the time.
activeTypeA role assignment that doesn’t require a user to perform any action to use the role. Users assigned as active have the privileges assigned to the role.
activateThe process of performing one or more actions to use a role that a user is eligible for. Actions might include performing a multi-factor authentication (MFA) check, providing a business justification, or requesting approval from designated approvers.
assignedStateA user that has an active role assignment.
activatedStateA user that has an eligible role assignment, performed the actions to activate the role, and is now active. Once activated, the user can use the role for a pre-configured period of time before they need to activate again.
permanent eligibleDurationA role assignment where a user is always eligible to activate the role.
permanent activeDurationA role assignment where a user can always use the role without performing any actions.
time-bound eligibleDurationA role assignment where a user is eligible to activate the role only within start and end dates.
time-bound activeDurationA role assignment where a user can use the role only within start and end dates.
just-in-time (JIT) accessA model in which users receive temporary permissions to perform privileged tasks, which prevents malicious or unauthorized users from gaining access after the permissions have expired. Access is granted only when users need it.
principle of least privilege accessA recommended security practice in which every user is provided with only the minimum privileges needed to accomplish the tasks they’re authorized to perform. This practice minimizes the number of Global Administrators and instead uses specific administrator roles for certain scenarios.

Role assignment overview

The PIM role assignments give you a secure way to grant access to resources in your organization. This section describes the assignment process. It includes assign roles to members, activate assignments, approve or deny requests, extend and renew assignments.

PIM keeps you informed by sending you and other participants email notifications. These emails might also include links to relevant tasks, such activating, approve or deny a request.

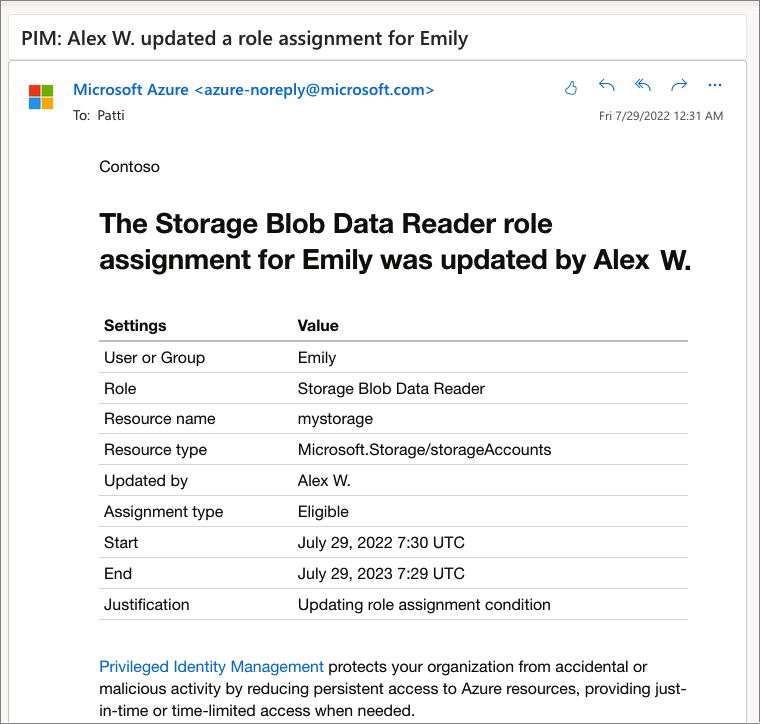
The following screenshot shows an email message sent by PIM. The email informs Patti that Alex updated a role assignment for Emily.

Screenshot shows an email message sent by Privileged Identity Management.

Assign

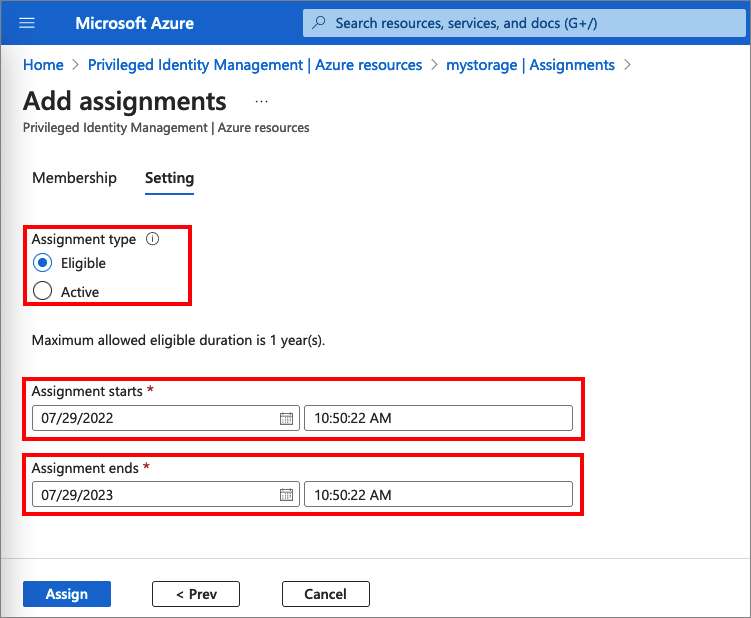
The assignment process starts by assigning roles to members. To grant access to a resource, the administrator assigns roles to users, groups, service principals, or managed identities. The assignment includes the following data:

  • The members or owners to assign the role.
  • The scope of the assignment. The scope limits the assigned role to a particular set of resources.
  • The type of the assignment
    • Eligible assignments require the member of the role to perform an action to use the role. Actions might include activation, or requesting approval from designated approvers.
    • Active assignments don’t require the member to perform any action to use the role. Members assigned as active have the privileges assigned to the role.
  • The duration of the assignment, using start and end dates or permanent. For eligible assignments, the members can activate or requesting approval during the start and end dates. For active assignments, the members can use the assign role during this period of time.

The following screenshot shows how administrator assigns a role to members.

Screenshot of Privileged Identity Management role assignment.

For more information, check out the following articles: Assign Azure AD rolesAssign Azure resource roles, and Assign eligibility for a PIM for Groups

Activate

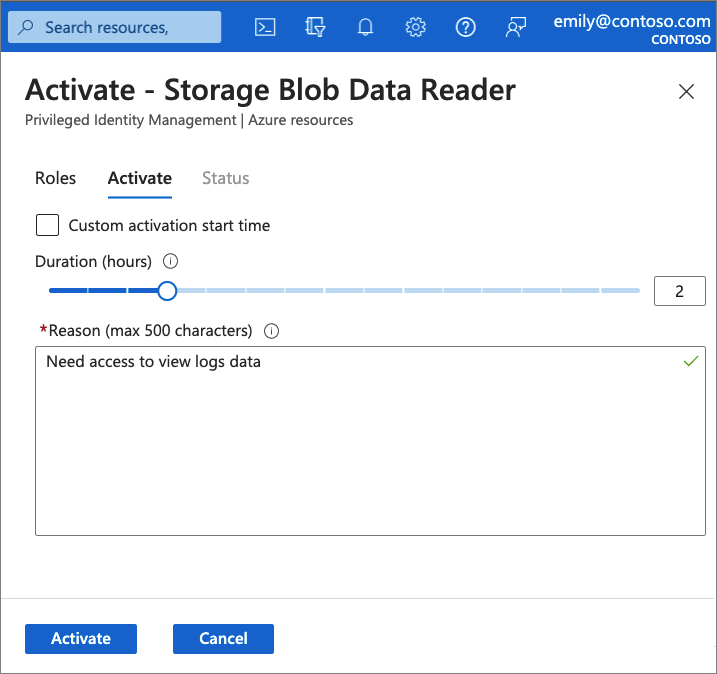
If users have been made eligible for a role, then they must activate the role assignment before using the role. To activate the role, users select specific activation duration within the maximum (configured by administrators), and the reason for the activation request.

The following screenshot shows how members activate their role to a limited time.

Screenshot of Privileged Identity Management role activation.

If the role requires approval to activate, a notification will appear in the upper right corner of the user’s browser informing them the request is pending approval. If an approval isn’t required, the member can start using the role.

For more information, check out the following articles: Activate Azure AD rolesActivate my Azure resource roles, and Activate my PIM for Groups roles

Approve or deny

Delegated approvers receive email notifications when a role request is pending their approval. Approvers can view, approve or deny these pending requests in PIM. After the request has been approved, the member can start using the role. For example, if a user or a group was assigned with Contribution role to a resource group, they’ll be able to manage that particular resource group.

For more information, check out the following articles: Approve or deny requests for Azure AD rolesApprove or deny requests for Azure resource roles, and Approve activation requests for PIM for Groups

Extend and renew assignments

After administrators set up time-bound owner or member assignments, the first question you might ask is what happens if an assignment expires? In this new version, we provide two options for this scenario:

  • Extend – When a role assignment nears expiration, the user can use Privileged Identity Management to request an extension for the role assignment
  • Renew – When a role assignment has already expired, the user can use Privileged Identity Management to request a renewal for the role assignment

Both user-initiated actions require an approval from a Global Administrator or Privileged Role Administrator. Admins don’t need to be in the business of managing assignment expirations. You can just wait for the extension or renewal requests to arrive for simple approval or denial.

For more information, check out the following articles: Extend or renew Azure AD role assignmentsExtend or renew Azure resource role assignments, and Extend or renew PIM for Groups assignments

Scenarios

Privileged Identity Management supports the following scenarios:

Privileged Role Administrator permissions

  • Enable approval for specific roles
  • Specify approver users or groups to approve requests
  • View request and approval history for all privileged roles

Approver permissions

  • View pending approvals (requests)
  • Approve or reject requests for role elevation (single and bulk)
  • Provide justification for my approval or rejection

Eligible role user permissions

  • Request activation of a role that requires approval
  • View the status of your request to activate
  • Complete your task in Azure AD if activation was approved

Managing privileged access Azure AD groups (preview)

In Privileged Identity Management (PIM), you can now assign eligibility for membership or ownership of PIM for Groups. Starting with this preview, you can assign Azure Active Directory (Azure AD) built-in roles to cloud groups and use PIM to manage group member and owner eligibility and activation. For more information about role-assignable groups in Azure AD, see Use Azure AD groups to manage role assignments.

 Important

To assign a PIM for Groups to a role for administrative access to Exchange, Security & Compliance Center, or SharePoint, use the Azure portal Roles and Administrators experience and not in the PIM for Groups experience to make the user or group eligible for activation into the group.

Different just-in-time policies for each group

Some organizations use tools like Azure AD business-to-business (B2B) collaboration to invite their partners as guests to their Azure AD organization. Instead of a single just-in-time policy for all assignments to a privileged role, you can create two different PIM for Groups with their own policies. You can enforce less strict requirements for your trusted employees, and stricter requirements like approval workflow for your partners when they request activation into their assigned group.

Activate multiple role assignments in one request

With the PIM for Groups preview, you can give workload-specific administrators quick access to multiple roles with a single just-in-time request. For example, your Tier 3 Office Admins might need just-in-time access to the Exchange Admin, Office Apps Admin, Teams Admin, and Search Admin roles to thoroughly investigate incidents daily. Before today it would require four consecutive requests, which are a process that takes some time. Instead, you can create a role assignable group called “Tier 3 Office Admins”, assign it to each of the four roles previously mentioned (or any Azure AD built-in roles) and enable it for Privileged Access in the group’s Activity section. Once enabled for privileged access, you can configure the just-in-time settings for members of the group and assign your admins and owners as eligible. When the admins elevate into the group, they’ll become members of all four Azure AD roles.

Invite guest users and assign Azure resource roles in Privileged Identity Management

Azure Active Directory (Azure AD) guest users are part of the business-to-business (B2B) collaboration capabilities within Azure AD so that you can manage external guest users and vendors as guests in Azure AD. For example, you can use these Privileged Identity Management features for Azure identity tasks with guests such as assigning access to specific Azure resources, specifying assignment duration and end date, or requiring two-step verification on active assignment or activation. For more information on how to invite a guest to your organization and manage their access, see Add B2B collaboration users in the Azure portal.

When would you invite guests?

Here are a couple examples of when you might invite guests to your organization:

  • Allow an external self-employed vendor that only has an email account to access your Azure resources for a project.
  • Allow an external partner in a large organization that uses on-premises Active Directory Federation Services to access your expense application.
  • Allow support engineers not in your organization (such as Microsoft support) to temporarily access your Azure resource to troubleshoot issues.

How does collaboration using B2B guests work?

When you use B2B collaboration, you can invite an external user to your organization as a guest. The guest can be managed as a user in your organization, but a guest has to be authenticated in their home organization and not in your Azure AD organization. This means that if the guest no longer has access to their home organization, they also lose access to your organization. For example, if the guest leaves their organization, they automatically lose access to any resources you shared with them in Azure AD without you having to do anything. For more information about B2B collaboration, see What is guest user access in Azure Active Directory B2B?.

Diagram showing how a guest user is authenticated in their home directory

Next steps