Advanced-level JavaScript concepts and examples

advanced-level JavaScript concepts and examples

  1. Prototypes and Prototypal Inheritance:
    JavaScript uses prototypal inheritance to share properties and methods between objects.
// Constructor Function
function Person(name, age) {
  this.name = name;
  this.age = age;
}

// Prototype Method
Person.prototype.greet = function () {
  console.log("Hello, " + this.name + "!");
};

let person = new Person("John", 25);
person.greet();
  1. Closures:
    Closures allow functions to access variables from an outer function, even after the outer function has returned.
function outer() {
  let count = 0;

  function inner() {
    count++;
    console.log(count);
  }

  return inner;
}

let counter = outer();
counter();
counter();
  1. Event Handling:
    JavaScript enables you to handle and respond to various events, such as clicks and keypresses, in web applications.
let button = document.querySelector("#myButton");

button.addEventListener("click", function () {
  console.log("Button clicked!");
});
  1. Asynchronous Programming:
    JavaScript provides mechanisms to handle asynchronous operations, such as callbacks, promises, and async/await.
// Callbacks
function fetchData(callback) {
  setTimeout(() => {
    callback("Data fetched successfully!");
  }, 2000);
}

fetchData(function (data) {
  console.log(data);
});

// Promises
function fetchData() {
  return new Promise((resolve, reject) => {
    setTimeout(() => {
      resolve("Data fetched successfully!");
    }, 2000);
  });
}

fetchData().then(function (data) {
  console.log(data);
});

// Async/Await
async function processData() {
  try {
    const data = await fetchData();
    console.log(data);
  } catch (error) {
    console.log("Error:", error);
  }
}

processData();
  1. Modules:
    ES6 modules provide a standardized way to organize and share code between JavaScript files.
// Module: math.js
export function add(a, b) {
  return a + b;
}

// Module: main.js
import { add } from "./math.js";

console.log(add(5, 3));
  1. Regular Expressions:
    Regular expressions allow for advanced pattern matching and manipulation of strings.
let pattern = /hello/i;
let str = "Hello, World!";

console.log(pattern.test(str)); // true
console.log(pattern.exec(str)); // ["Hello"]
console.log(str.replace(pattern, "Hi")); // "Hi, World!"
  1. Error Handling and Debugging:
    JavaScript provides error handling mechanisms like try/catch blocks, as well as debugging tools and techniques.
try {
  // Code that might throw an error
  throw new Error("Something went wrong");
} catch (error) {
  console.log("Error:", error);
}

// Debugging with console
console.log("Debugging message");

// Using breakpoints in browser developer tools
  1. Web APIs:
    JavaScript provides access to various Web APIs, enabling interaction with browser features and external services.
// Fetch API
fetch("https://api.example.com/data")
  .then(function (response) {
    return response.json();
  })
  .then(function (data) {
    console.log(data);
  })
  .catch(function (error) {
    console.log("Error:", error);
  });

// Geolocation API
navigator.geolocation.getCurrentPosition(function (position) {
  console.log(position.coords.latitude, position.coords.longitude);
});

These advanced-level JavaScript concepts and examples will help you tackle complex programming challenges

Intermediate-level JavaScript tutorial with examples

intermediate-level JavaScript tutorial with examples:

  1. Arrow Functions:
    Arrow functions provide a shorter syntax for writing function expressions.
// Regular Function
function square(num) {
  return num * num;
}

// Arrow Function
const square = (num) => num * num;
  1. Higher-Order Functions:
    Higher-order functions are functions that take other functions as arguments or return functions.
// Higher-Order Function
function doMath(operation, num1, num2) {
  return operation(num1, num2);
}

// Callback Functions
function add(a, b) {
  return a + b;
}

function subtract(a, b) {
  return a - b;
}

console.log(doMath(add, 5, 3));
console.log(doMath(subtract, 5, 3));
  1. Destructuring Assignment:
    Destructuring assignment allows you to extract values from arrays or objects into separate variables.
// Array Destructuring
let numbers = [1, 2, 3];
let [a, b, c] = numbers;
console.log(a, b, c);

// Object Destructuring
let person = { name: "John", age: 25 };
let { name, age } = person;
console.log(name, age);
  1. Spread Operator:
    The spread operator allows you to spread elements of an iterable (like an array) into individual elements.
let numbers = [1, 2, 3];
let newNumbers = [...numbers, 4, 5];
console.log(newNumbers);
  1. Classes and Objects:
    JavaScript supports object-oriented programming with classes and objects.
class Person {
  constructor(name, age) {
    this.name = name;
    this.age = age;
  }

  greet() {
    console.log("Hello, " + this.name + "!");
  }
}

let person = new Person("John", 25);
person.greet();
  1. Promises and Async/Await:
    Promises and async/await are used for handling asynchronous operations in a more readable and sequential manner.
function fetchData() {
  return new Promise((resolve, reject) => {
    setTimeout(() => {
      resolve("Data fetched successfully!");
    }, 2000);
  });
}

async function processData() {
  try {
    const data = await fetchData();
    console.log(data);
  } catch (error) {
    console.log("Error:", error);
  }
}

processData();
  1. Modules:
    Modules help organize and split code into separate files, allowing for better code organization and reusability.
// Module: math.js
export function add(a, b) {
  return a + b;
}

// Module: main.js
import { add } from "./math.js";

console.log(add(5, 3));
  1. Error Handling:
    JavaScript provides error handling mechanisms like try/catch blocks to handle and manage exceptions.
try {
  // Code that might throw an error
  throw new Error("Something went wrong");
} catch (error) {
  console.log("Error:", error);
}

Basic JavaScript concepts

This tutorial covers some basic JavaScript concepts and provides examples to help you understand and practice.

  1. Variables and Data Types:
    Variables are used to store and manipulate data in JavaScript. There are different data types in JavaScript, including numbers, strings, booleans, arrays, and objects.
// Number
let age = 25;

// String
let name = "John";

// Boolean
let isStudent = true;

// Array
let numbers = [1, 2, 3, 4, 5];

// Object
let person = {
  name: "John",
  age: 25,
  isStudent: true
};
  1. Functions:
    Functions are blocks of reusable code that perform specific tasks. They can take parameters and return values.
function greet(name) {
  console.log("Hello, " + name + "!");
}

greet("John");
  1. Conditional Statements:
    Conditional statements allow you to make decisions based on certain conditions. The most common ones are if statements and switch statements.
let num = 10;

if (num > 0) {
  console.log("Positive");
} else if (num < 0) {
  console.log("Negative");
} else {
  console.log("Zero");
}
  1. Loops:
    Loops are used to repeatedly execute a block of code. The most commonly used loops are for loops and while loops.
for (let i = 0; i < 5; i++) {
  console.log(i);
}

let count = 0;
while (count < 5) {
  console.log(count);
  count++;
}
  1. Arrays:
    Arrays are used to store multiple values in a single variable. They can hold values of different data types and can be accessed using indices.
let numbers = [1, 2, 3, 4, 5];
console.log(numbers.length);
console.log(numbers[2]);
numbers.push(6);
console.log(numbers);
  1. Objects:
    Objects are used to store multiple values as key-value pairs. They allow you to represent complex data structures.
let person = {
  name: "John",
  age: 25,
  isStudent: true
};

console.log(person.name);
console.log(person["age"]);
person.location = "New York";
console.log(person);
  1. String Manipulation:
    Strings are used to represent text in JavaScript. You can perform various operations on strings, such as concatenation, slicing, and converting case.
let str = "Hello, World!";
console.log(str.length);
console.log(str.toUpperCase());
console.log(str.slice(0, 5));
console.log(str.indexOf("World"));
  1. Math Operations:
    JavaScript provides built-in Math object and various methods for mathematical operations.
let num1 = 5;
let num2 = 3;

console.log(num1 + num2); // Addition
console.log(num1 - num2); // Subtraction
console.log(num1 * num2); // Multiplication
console.log(num1 / num2); // Division
console.log(num1 % num2); // Modulus
console.log(Math.pow(num1, num2)); // Exponentiation
console.log(Math.sqrt(num1)); // Square root
console.log(Math.round(3.7)); // Rounding
console.log(Math.random()); // Random number between 0 and 1

50 JavaScript exercises along with their solutions

50 JavaScript exercises along with their solutions:

Exercise 1:
Write a program to display “Hello, World!” in the console.

console.log("Hello, World!");

Exercise 2:
Write a program to add two numbers and display the result.

let num1 = 5;
let num2 = 10;
let sum = num1 + num2;
console.log(sum);

Exercise 3:
Write a program to check if a number is positive, negative, or zero.

let number = 0;

if (number > 0) {
  console.log("Positive");
} else if (number < 0) {
  console.log("Negative");
} else {
  console.log("Zero");
}

Exercise 4:
Write a program to check if a number is even or odd.

let number = 7;

if (number % 2 === 0) {
  console.log("Even");
} else {
  console.log("Odd");
}

Exercise 5:
Write a program to find the maximum of two numbers.

let num1 = 10;
let num2 = 5;

let max = num1 > num2 ? num1 : num2;
console.log(max);

Exercise 6:
Write a program to find the minimum of two numbers.

let num1 = 10;
let num2 = 5;

let min = num1 < num2 ? num1 : num2;
console.log(min);

Exercise 7:
Write a program to check if a year is a leap year.

let year = 2020;

if ((year % 4 === 0 && year % 100 !== 0) || year % 400 === 0) {
  console.log("Leap year");
} else {
  console.log("Not a leap year");
}

Exercise 8:
Write a program to check if a string is empty or not.

let str = "";

if (str === "") {
  console.log("String is empty");
} else {
  console.log("String is not empty");
}

Exercise 9:
Write a program to check if a string is a palindrome.

let str = "madam";
let reversedStr = str.split("").reverse().join("");

if (str === reversedStr) {
  console.log("Palindrome");
} else {
  console.log("Not a palindrome");
}

Exercise 10:
Write a program to reverse a string.

let str = "Hello, World!";
let reversedStr = str.split("").reverse().join("");
console.log(reversedStr);

Exercise 11:
Write a program to find the factorial of a number.

let num = 5;
let factorial = 1;

for (let i = 1; i <= num; i++) {
  factorial *= i;
}

console.log(factorial);

Exercise 12:
Write a program to generate Fibonacci series up to a given number of terms.

let numTerms = 10;
let fibonacciSeries = [0, 1];

for (let i = 2; i < numTerms; i++) {
  let nextTerm = fibonacciSeries[i - 1] + fibonacciSeries[i - 2];
  fibonacciSeries.push(nextTerm);
}

console.log(fibonacciSeries);

Exercise 13:
Write a program to check if a number is a prime number.

let num = 17;
let isPrime = true;

for (let i = 2; i <= Math.sqrt(num); i++) {
  if (num % i === 

0) {
    isPrime = false;
    break;
  }
}

if (isPrime) {
  console.log("Prime number");
} else {
  console.log("Not a prime number");
}

Exercise 14:
Write a program to find the sum of all elements in an array.

let numbers = [1, 2, 3, 4, 5];
let sum = 0;

for (let i = 0; i < numbers.length; i++) {
  sum += numbers[i];
}

console.log(sum);

Exercise 15:
Write a program to find the maximum element in an array.

let numbers = [1, 5, 3, 9, 2];
let max = numbers[0];

for (let i = 1; i < numbers.length; i++) {
  if (numbers[i] > max) {
    max = numbers[i];
  }
}

console.log(max);

Exercise 16:
Write a program to remove duplicate elements from an array.

let numbers = [1, 2, 3, 2, 4, 1, 5, 4];
let uniqueNumbers = [];

for (let i = 0; i < numbers.length; i++) {
  if (!uniqueNumbers.includes(numbers[i])) {
    uniqueNumbers.push(numbers[i]);
  }
}

console.log(uniqueNumbers);

Exercise 17:
Write a program to count the number of vowels in a string.

let str = "Hello, World!";
let vowels = ["a", "e", "i", "o", "u"];
let count = 0;

for (let i = 0; i < str.length; i++) {
  if (vowels.includes(str[i].toLowerCase())) {
    count++;
  }
}

console.log(count);

Exercise 18:
Write a program to count the number of words in a string.

let str = "Hello, World!";
let words = str.split(" ");
let count = words.length;

console.log(count);

Exercise 19:
Write a program to check if a string is a valid email address.

let email = "test@example.com";
let regex = /^[^\s@]+@[^\s@]+\.[^\s@]+$/;

if (regex.test(email)) {
  console.log("Valid email address");
} else {
  console.log("Invalid email address");
}

Exercise 20:
Write a program to reverse the order of words in a string.

let str = "Hello, World!";
let reversedWords = str.split(" ").reverse().join(" ");

console.log(reversedWords);

Exercise 21:
Write a program to find the length of the longest word in a string.

let str = "Hello, World!";
let words = str.split(" ");
let maxLength = 0;

for (let i = 0; i < words.length; i++) {
  if (words[i].length > maxLength) {
    maxLength = words[i].length;
  }
}

console.log(maxLength);

Exercise 22:
Write a program to sort an array of numbers in ascending order.

let numbers = [5, 2, 9, 1, 7];
numbers.sort((a, b) => a - b);

console.log(numbers);

Exercise 23:
Write a program to sort an array of strings in alphabetical order.

let fruits = ["Apple", "Orange", "Banana", "Mango"];
fruits.sort();

console.log(fruits);

Exercise 24:
Write a program to check if two strings are an

agrams.

let str1 = "listen";
let str2 = "silent";

let sortedStr1 = str1.toLowerCase().split("").sort().join("");
let sortedStr2 = str2.toLowerCase().split("").sort().join("");

if (sortedStr1 === sortedStr2) {
  console.log("Anagrams");
} else {
  console.log("Not anagrams");
}

Exercise 25:
Write a program to find the sum of natural numbers up to a given number.

let num = 10;
let sum = 0;

for (let i = 1; i <= num; i++) {
  sum += i;
}

console.log(sum);

Exercise 26:
Write a program to find the factorial of a number using recursion.

function factorial(num) {
  if (num === 0) {
    return 1;
  } else {
    return num * factorial(num - 1);
  }
}

console.log(factorial(5));

Exercise 27:
Write a program to check if a string is a valid palindrome ignoring spaces and punctuation.

function isPalindrome(str) {
  let regex = /[^\w]|_/g;
  let cleanedStr = str.toLowerCase().replace(regex, "");
  let reversedStr = cleanedStr.split("").reverse().join("");

  return cleanedStr === reversedStr;
}

console.log(isPalindrome("A man, a plan, a canal, Panama!"));

Exercise 28:
Write a program to convert a string to title case.

function toTitleCase(str) {
  let words = str.split(" ");
  let titleCaseWords = [];

  for (let i = 0; i < words.length; i++) {
    let word = words[i];
    let titleCaseWord = word.charAt(0).toUpperCase() + word.slice(1).toLowerCase();
    titleCaseWords.push(titleCaseWord);
  }

  return titleCaseWords.join(" ");
}

console.log(toTitleCase("hello, world!"));

Exercise 29:
Write a program to find the second largest element in an array.

let numbers = [5, 2, 9, 1, 7];
numbers.sort((a, b) => b - a);

console.log(numbers[1]);

Exercise 30:
Write a program to remove all falsy values from an array.

let array = [0, 1, false, true, "", "hello", null, undefined, NaN];
let filteredArray = array.filter(Boolean);

console.log(filteredArray);

Exercise 31:
Write a program to find the median of an array of numbers.

let numbers = [5, 2, 9, 1, 7];
numbers.sort((a, b) => a - b);

let median;

if (numbers.length % 2 === 0) {
  let midIndex = numbers.length / 2;
  median = (numbers[midIndex - 1] + numbers[midIndex]) / 2;
} else {
  let midIndex = Math.floor(numbers.length / 2);
  median = numbers[midIndex];
}

console.log(median);

Exercise 32:
Write a program to find the sum of all even numbers in an array.

let numbers = [1, 2, 3, 4, 5];
let sum = 0;

for (let i = 0; i < numbers.length; i++) {
  if (numbers[i] % 2 === 0) {
    sum += numbers[i];
  }
}

console.log(sum);

Exercise 33:
Write a program to find the intersection of two arrays

.

let array1 = [1, 2, 3, 4, 5];
let array2 = [4, 5, 6, 7, 8];
let intersection = [];

for (let i = 0; i < array1.length; i++) {
  if (array2.includes(array1[i])) {
    intersection.push(array1[i]);
  }
}

console.log(intersection);

Exercise 34:
Write a program to convert a number to binary.

let num = 10;
let binary = num.toString(2);

console.log(binary);

Exercise 35:
Write a program to convert a binary number to decimal.

let binary = "1010";
let decimal = parseInt(binary, 2);

console.log(decimal);

Exercise 36:
Write a program to find the sum of digits of a number.

let num = 12345;
let sum = 0;

while (num > 0) {
  sum += num % 10;
  num = Math.floor(num / 10);
}

console.log(sum);

Exercise 37:
Write a program to find the largest element in an array using reduce() method.

let numbers = [5, 2, 9, 1, 7];
let max = numbers.reduce((a, b) => Math.max(a, b));

console.log(max);

Exercise 38:
Write a program to find the smallest element in an array using reduce() method.

let numbers = [5, 2, 9, 1, 7];
let min = numbers.reduce((a, b) => Math.min(a, b));

console.log(min);

Exercise 39:
Write a program to remove duplicate elements from an array using the filter() method.

let numbers = [1, 2, 3, 2, 4, 1, 5, 4];
let uniqueNumbers = numbers.filter((value, index, array) => array.indexOf(value) === index);

console.log(uniqueNumbers);

Exercise 40:
Write a program to find the average of numbers in an array.

let numbers = [1, 2, 3, 4, 5];
let sum = numbers.reduce((a, b) => a + b);
let average = sum / numbers.length;

console.log(average);

Exercise 41:
Write a program to shuffle an array.

let array = [1, 2, 3, 4, 5];

for (let i = array.length - 1; i > 0; i--) {
  let j = Math.floor(Math.random() * (i + 1));
  [array[i], array[j]] = [array[j], array[i]];
}

console.log(array);

Exercise 42:
Write a program to find the number of occurrences of a specific element in an array.

let array = [1, 2, 3, 2, 4, 1, 5, 4];
let element = 2;
let count = array.reduce((acc, value) => (value === element ? acc + 1 : acc), 0);

console.log(count);

Exercise 43:
Write a program to check if a number is a perfect number.

function isPerfectNumber(num) {
  let sum = 0;

  for (let i = 1; i < num; i++) {
    if (num % i === 0) {
      sum += i;
    }
  }

  return sum === num;
}

console.log(is

PerfectNumber(28));

Exercise 44:
Write a program to find the power of a number.

function power(base, exponent) {
  let result = 1;

  for (let i = 0; i < exponent; i++) {
    result *= base;
  }

  return result;
}

console.log(power(2, 3));

Exercise 45:
Write a program to find the number of words in a sentence.

let sentence = "Hello, World!";
let words = sentence.split(" ");
let count = words.length;

console.log(count);

Exercise 46:
Write a program to find the sum of digits of a number using recursion.

function sumOfDigits(num) {
  if (num === 0) {
    return 0;
  } else {
    return (num % 10) + sumOfDigits(Math.floor(num / 10));
  }
}

console.log(sumOfDigits(12345));

Exercise 47:
Write a program to find the GCD (Greatest Common Divisor) of two numbers.

function gcd(a, b) {
  if (b === 0) {
    return a;
  } else {
    return gcd(b, a % b);
  }
}

console.log(gcd(12, 18));

Exercise 48:
Write a program to convert a decimal number to binary using recursion.

function decimalToBinary(num) {
  if (num === 0) {
    return "";
  } else {
    return decimalToBinary(Math.floor(num / 2)) + (num % 2);
  }
}

console.log(decimalToBinary(10));

Exercise 49:
Write a program to find the LCM (Least Common Multiple) of two numbers.

function lcm(a, b) {
  let max = Math.max(a, b);
  let min = Math.min(a, b);

  for (let i = max; ; i += max) {
    if (i % min === 0) {
      return i;
    }
  }
}

console.log(lcm(12, 18));

Exercise 50:
Write a program to find the number of digits in a number.

let num = 12345;
let count = num.toString().length;

console.log(count);

How to Create EC2 Instance in AWS

What is Amazon EC2 Instance?

An on-demand EC2 instance is an offering from AWS where the subscriber/user can rent the virtual server per hour and use it to deploy his/her own applications.

An EC2 instance is nothing but a virtual server in Amazon Web services terminology.

It stands for Elastic Compute Cloud. It is a web service where an AWS subscriber can request and provision a compute server in AWS cloud.

The instance will be charged per hour with different rates based on the type of the instance chosen. AWS provides multiple instance types for the respective business needs of the user.

Thus, you can rent an instance based on your own CPU and memory requirements and use it as long as you want. You can terminate the instance when it’s no more used and save on costs. This is the most striking advantage of an on-demand instance- you can drastically save on your CAPEX.

Let us see in detail how to launch an on-demand EC2 instance in AWS Cloud.

Login and access to AWS services

Step 1) In this step,

  • Login to your AWS account and go to the AWS Services tab at the top left corner.
  • Here, you will see all of the AWS Services categorized as per their area viz. Compute, Storage, Database, etc. For creating an EC2 instance, we have to choose Computeà EC2 as in the next step.
Creating an Amazon EC2 instance
  • Open all the services and click on EC2 under Compute services. This will launch the dashboard of EC2.

Here is the EC2 dashboard. Here you will get all the information in gist about the AWS EC2 resources running.

Creating an Amazon EC2 instance

Step 2) On the top right corner of the EC2 dashboard, choose the AWS Region in which you want to provision the EC2 server.

Here we are selecting N. Virginia. AWS provides 10 Regions all over the globe.

Creating an Amazon EC2 instance

Step 3) In this step

  • Once your desired Region is selected, come back to the EC2 Dashboard.
  • Click on ‘Launch Instance’ button in the section of Create Instance (as shown below).
Creating an Amazon EC2 instance
  • Instance creation wizard page will open as soon as you click ‘Launch Instance’.

Choose AMI

Step 1) In this step we will do,

  1. You will be asked to choose an AMI of your choice. (An AMI is an Amazon Machine Image. It is a template basically of an Operating System platform which you can use as a base to create your instance). Once you launch an EC2 instance from your preferred AMI, the instance will automatically be booted with the desired OS. (We will see more about AMIs in the coming part of the tutorial).
  2. Here we are choosing the default Amazon Linux (64 bit) AMI.
Creating an Amazon EC2 instance

Choose EC2 Instance Types

Step 1) In the next step, you have to choose the type of instance you require based on your business needs.

  1. We will choose t2.micro instance type, which is a 1vCPU and 1GB memory server offered by AWS.
  2. Click on “Configure Instance Details” for further configurations
Creating an Amazon EC2 instance
  • In the next step of the wizard, enter details like no. of instances you want to launch at a time.
  • Here we are launching one instance.

Configure Instance

Step 1) No. of instances- you can provision up to 20 instances at a time. Here we are launching one instance.

Creating an Amazon EC2 instance

Step 2) Under Purchasing Options, keep the option of ‘Request Spot Instances’ unchecked as of now. (This is done when we wish to launch Spot instances instead of on-demand ones. We will come back to Spot instances in the later part of the tutorial).

Creating an Amazon EC2 instance

Step 3) Next, we have to configure some basic networking details for our EC2 server.

  • You have to decide here, in which VPC (Virtual Private Cloud) you want to launch your instance and under which subnets inside your VPC. It is better to determine and plan this prior to launching the instance. Your AWS architecture set-up should include IP ranges for your subnets etc. pre-planned for better management. (We will see how to create a new VPC in Networking section of the tutorial.
  • Subnetting should also be pre-planned. E.g.: If it’s a web server you should place it in the public subnet and if it’s a DB server, you should place it in a private subnet all inside your VPC.

Below,

  1. Network section will give a list of VPCs available in our platform.
  2. Select an already existing VPC
  3. You can also create a new VPC

Here I have selected an already existing VPC where I want to launch my instance.

Creating an Amazon EC2 instance

Step 4) In this step,

  • A VPC consists of subnets, which are IP ranges that are separated for restricting access.
  • Below,
  1. Under Subnets, you can choose the subnet where you want to place your instance.
  2. I have chosen an already existing public subnet.
  3. You can also create a new subnet in this step.
Creating an Amazon EC2 instance
  • Once your instance is launched in a public subnet, AWS will assign a dynamic public IP to it from their pool of IPs.

Step 5) In this step,

  • You can choose if you want AWS to assign it an IP automatically, or you want to do it manually later. You can enable/ disable ‘Auto assign Public IP’ feature here likewise.
  • Here we are going to assign this instance a static IP called as EIP (Elastic IP) later. So we keep this feature disabled as of now.
Creating an Amazon EC2 instance

Step 6) In this step,

  • In the following step, keep the option of IAM role ‘None’ as of now. We will visit the topic of IAM role in detail in IAM services.
Creating an Amazon EC2 instance

Step 7) In this step, you have to do following things

  • Shutdown Behavior – when you accidently shut down your instance, you surely don’t want it to be deleted but stopped.
  • Here we are defining my shutdown behavior as Stop.
Creating an Amazon EC2 instance

Step 8) In this step,

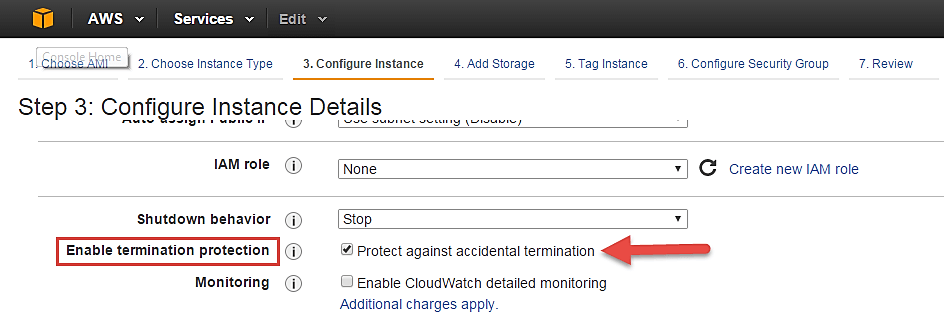
  • In case, you have accidently terminated your instance, AWS has a layer of security mechanism. It will not delete your instance if you have enabled accidental termination protection.
  • Here we are checking the option for further protecting our instance from accidental termination.
Creating an Amazon EC2 instance

Step 9) In this step,

  • Under Monitoring- you can enable Detailed Monitoring if your instance is a business critical instance. Here we have kept the option unchecked. AWS will always provide Basic monitoring on your instance free of cost. We will visit the topic of monitoring in AWS Cloud Watch part of the tutorial.
  • Under Tenancy- select the option if shared tenancy. If your application is a highly secure application, then you should go for dedicated capacity. AWS provides both options.
Creating an Amazon EC2 instance

Step 10) In this step,

  • Click on ‘Add Storage’ to add data volumes to your instance in next step.
Creating an Amazon EC2 instance

Add Storage

Step 1) In this step we do following things,

  • In the Add Storage step, you’ll see that the instance has been automatically provisioned a General Purpose SSD root volume of 8GB. ( Maximum volume size we can give to a General Purpose volume is 16GB)
  • You can change your volume size, add new volumes, change the volume type, etc.
  • AWS provides 3 types of EBS volumes- Magnetic, General Purpose SSD, Provisioned IOPs. You can choose a volume type based on your application’s IOPs needs.
Creating an Amazon EC2 instance

Tag Instance

Step 1) In this step

  • you can tag your instance with a key-value pair. This gives visibility to the AWS account administrator when there are lot number of instances.
  • The instances should be tagged based on their department, environment like Dev/SIT/Prod. Etc. this gives a clear view of the costing on the instances under one common tag.
  1. Here we have tagged the instance as a Dev_Web server 01
  2. Go to configure Security Groups later
Creating an Amazon EC2 instance

Configure Security Groups

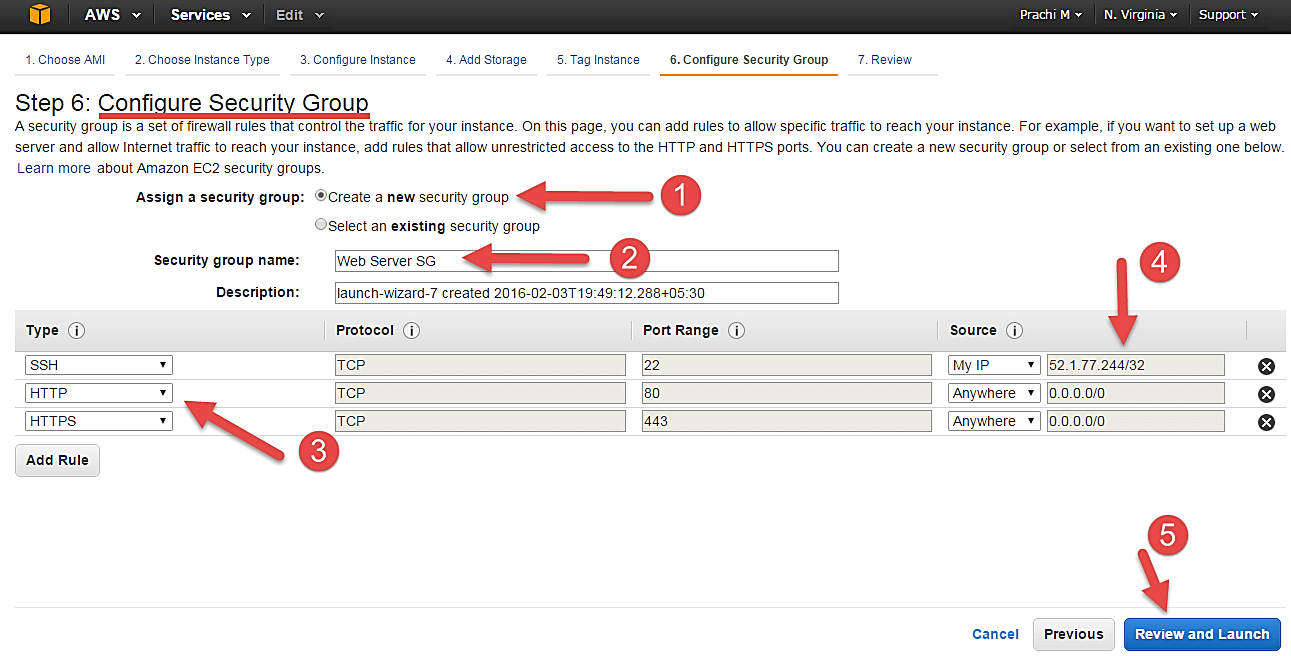
Step 1) In this next step of configuring Security Groups, you can restrict traffic on your instance ports. This is an added firewall mechanism provided by AWS apart from your instance’s OS firewall.

You can define open ports and IPs.

  • Since our server is a webserver=, we will do following things
  1. Creating a new Security Group
  2. Naming our SG for easier reference
  3. Defining protocols which we want enabled on my instance
  4. Assigning IPs which are allowed to access our instance on the said protocols
  5. Once, the firewall rules are set- Review and launch
Creating an Amazon EC2 instance

Review Instances

Step 1) In this step, we will review all our choices and parameters and go ahead to launch our instance.

Creating an Amazon EC2 instance

Step 2) In the next step you will be asked to create a key pair to login to you an instance. A key pair is a set of public-private keys.

AWS stores the private key in the instance, and you are asked to download the private key. Make sure you download the key and keep it safe and secured; if it is lost you cannot download it again.

  1. Create a new key pair
  2. Give a name to your key
  3. Download and save it in your secured folder
Creating an Amazon EC2 instance
  • When you download your key, you can open and have a look at your RSA private key.
Creating an Amazon EC2 instance

Step 3) Once you are done downloading and saving your key, launch your instance.

Creating an Amazon EC2 instance
  • You can see the launch status meanwhile.
Creating an Amazon EC2 instance
  • You can also see the launch log.
Creating an Amazon EC2 instance
  • Click on the ‘Instances’ option on the left pane where you can see the status of the instance as ‘Pending’ for a brief while.
Creating an Amazon EC2 instance
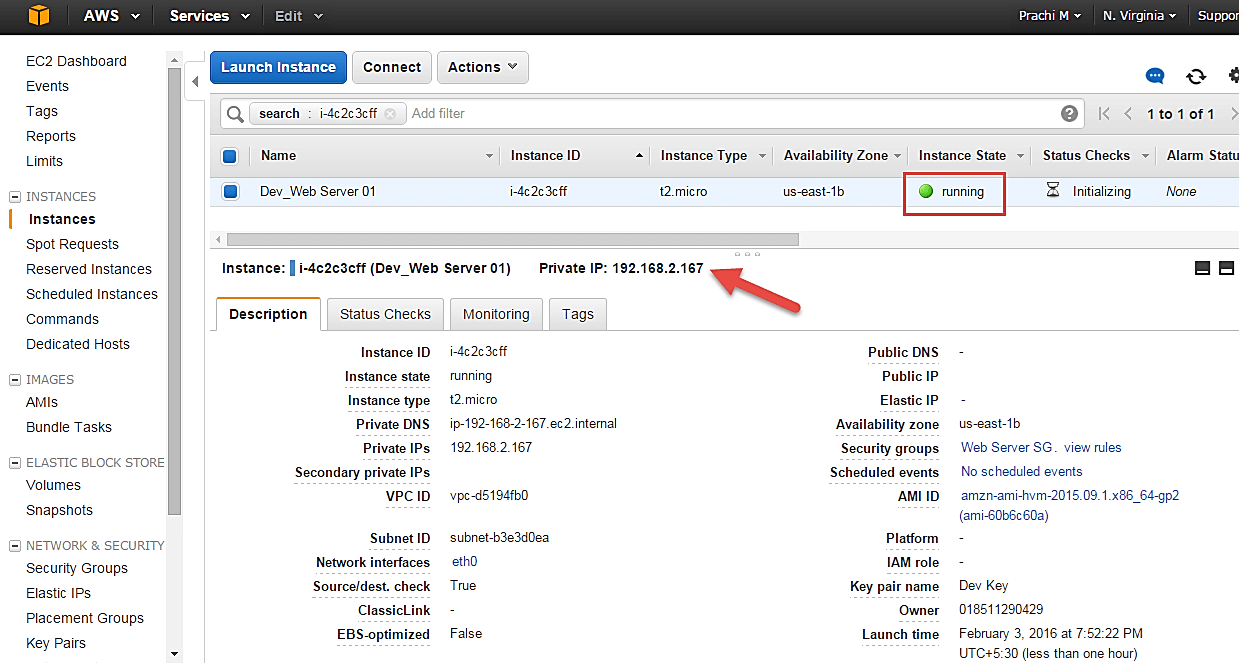
  • Once your instance is up and running, you can see its status as ‘Running’ now.
  • Note that the instance has received a Private IP from the pool of AWS.
Creating an Amazon EC2 instance

Create a EIP and connect to your instance

An EIP is a static public IP provided by AWS. It stands for Elastic IP. Normally when you create an instance, it will receive a public IP from the AWS’s pool automatically. If you stop/reboot your instance, this public IP will change- it’dynamic. In order for your application to have a static IP from where you can connect via public networks, you can use an EIP.

Step 1) On the left pane of EC2 Dashboard, you can go to ‘Elastic IPs’ as shown below.

Creating an Amazon EC2 instance

Step 2) Allocate a new Elastic IP Address.

Creating an Amazon EC2 instance

Step 3) Allocate this IP to be used in a VPC scope.

Creating an Amazon EC2 instance
  • Your request will succeed if you don’t have 5 or more than 5 EIPs already in your account.
Creating an Amazon EC2 instance

Step 4) Now assign this IP to your instance.

  1. Select the said IP
  2. Click on Actions -> Associate Address
Creating an Amazon EC2 instance

Step 5) In the next page,

  1. Search for your instance and
  2. Associate the IP to it.
Creating an Amazon EC2 instance

Step 6) Come back to your instances screen, you’ll see that your instance has received your EIP.

Creating an Amazon EC2 instance

Step 7) Now open putty from your programs list and add your same EIP in there as below.

Creating an Amazon EC2 instance

Step 8) In this step,

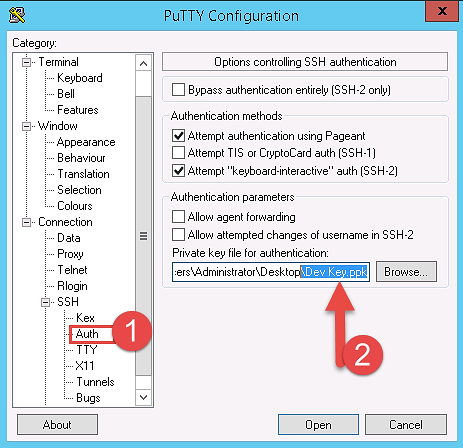
Add your private key in putty for secure connection

  1. Go to Auth
  2. Add your private key in .ppk (putty private key) format. You will need to convert pem file from AWS to ppk using puttygen

Once done click on “Open” button

Creating an Amazon EC2 instance
  • Once you connect, you will successfully see the Linux prompt.
  • Please note that the machine you are connecting from should be enabled on the instance Security Group for SSH (like in the steps above).
Creating an Amazon EC2 instance

Once you become familiar with the above steps for launching the instance, it becomes a matter of 2 minutes to launch the same!

You can now use your on-demand EC2 server for your applications.

What is Spot Instance?

A spot Instance is an offering from AWS; it allows an AWS business subscriber to bid on unused AWS compute capacity. The hourly price for a Spot instance is decided by AWS, and it fluctuates depending on the supply and demand for Spot instances.

Your Spot instance runs whenever your bid exceeds the current market price. The price of a spot instance varies based on the instance type and the Availability Zone in which the instance can be provisioned.

When your bid price exceeds the market spot price of the instance called as the ‘spot price,’ your instance stays running. When the spot price overshoots the bid price, AWS will terminate your instance automatically. Therefore, it is necessary to plan the spot instances in your application architecture carefully.

Create a Spot Request

In order to launch a spot instance, you have to first create a Spot Request.

Follow the steps below to create a Spot Request.

  1. On the EC2 Dashboard select ‘Spot Requests’ from the left pane under Instances.
  2. Click on the button ‘Request Spot Instances” as shown below.
Creating a Spot Amazon EC2 instance

Spot instance launch wizard will open up. You can now go ahead with selecting the parameters and the instance configuration.

Find Instance Types

The first step for spot instance is to “Find instance types.”

Creating a Spot Amazon EC2 instance

Step 1) Select an AMI- an AMI is a template consisting of the OS platform and software to be installed in the instance. Select your desired AMI from the existing list. We are selecting Amazon Linux AMI for this tutorial.

Creating a Spot Amazon EC2 instance

Step 2) Capacity Unit- a Capacity Unit is your application requirement. You may decide to launch an instance based on the instance type, vCPU or custom configuration like your choice of vCPU/memory/storage requirements. Here we are selecting an Instance.

Creating a Spot Amazon EC2 instance

If you wish to customize the capacity, you can add your choice of

  1. vCPU,
  2. Memory and
  3. Instance storage as below.
Creating a Spot Amazon EC2 instance

Step 3) Target Capacity depicts how many spot instances you wish to maintain in your request. Here we are selecting one.

Creating a Spot Amazon EC2 instance

Step 4) Bid Price – this is the maximum price we are ready to pay for the instance. We are going to set a particular price per instance/hour. This is the simplest to calculate based on our business requirement. We will see ahead how we should determine the bid price so that our bid price always remains high and doesn’t exceed the spot price so that our instance keeps running.

Creating a Spot Amazon EC2 instance

just below the bid price you can see a button of Pricing History. Click on that as shown below.

Creating a Spot Amazon EC2 instance

Here in Pricing History, we can see a graph depicting instance pricing trends with historical data. You can select the parameters and get an idea of the pricing of our desired instance over a period of time.

  1. Select the product. We have selected our Linux AMI.
  2. Select the instance type. We have selected m3.medium.
  3. Note the average prices for over a day here.

Thus, from the chart below, we can see that the instance type that we are planning to provision lies in the pricing range of $0.01xx, and it seems that Availability Zone ‘us-east 1a’ has the lowest price.

Creating a Spot Amazon EC2 instance

cont. to step 4.

So let’s come back to our step of quoting a bid price.

For the sake of maintaining our instance always available and if it falls within our budget, we can quote a higher bid price. Here we have quoted a slightly higher price of $0.05.

Creating a Spot Amazon EC2 instance

You can see some trends in the wizard itself.

  1. Note the instance types section
  2. Select the instance type that we are planning to provision
  3. Note the price that we are planning to bid. % of on-demand shows us that our quoted price is 75% of the on-demand price for the same instance type. This means we are saving 25% per hour as compared to an on-demand instance. You can further lower the price and save costs drastically.
Creating a Spot Amazon EC2 instance

Step 5) Once we are done looking at the trends and quoting our bid price, click on next.

Creating a Spot Amazon EC2 instance

Configure the Spot instance

Our next step is to configure the instance, in this step of the wizard, we’ll configure instance parameters like VPC, subnets, etc.

Let’s take a look.

Step 1) Allocation Strategy – it determines how your spot request is fulfilled from the AWS’s spot pools. There are two types of strategies:

  • Diversified – here, spot instances are balanced across all the spot pools
  • Lowest price – here, spot instances are launched from the pool which has lowest price offers

For this tutorial, we’ll select Lowest Price as our allocation strategy.

Creating a Spot Amazon EC2 instance

Step 2) Select the VPC- we’ll select from the list of available VPCs that we have created earlier. We can also create a new VPC in this step.

Creating a Spot Amazon EC2 instance

Step 3) Next we’ll select the security group for the instance. We can select an already existing SG or create a new one.

Creating a Spot Amazon EC2 instance

Step 4) Availability Zone- we’ll select the AZ where we want to place our instance based on our application architecture. We are selecting AZ- us-east-1a.

Creating a Spot Amazon EC2 instance

Step 5) Subnets- we are going to select the subnet from our list of already available list.

Creating a Spot Amazon EC2 instance

Step 6) Public IP- we’ll choose to assign the instance a public IP as soon as it launches. In this step, you can choose if you want AWS to assign it an IP automatically, or you want to do it manually later. You can enable/ disable ‘Auto assign Public IP’ feature here likewise.

Creating a Spot Amazon EC2 instance

Step 7) Key pair- A key pair is a set of public-private keys.

AWS stores the private key in the instance, and you are asked to download the private key. Make sure you download the key and keep it safe and secured; if it is lost you cannot download it again.

After selecting public IP, here we are selecting a key which we already have created in our last tutorial.

Creating a Spot Amazon EC2 instance

Review your Spot instance

Once we are done configuring our spot instance request in the 2 steps earlier in our wizard, we’ll take a look at the overall configuration.

Creating a Spot Amazon EC2 instance
  1. We can also download a JSON file with all the configurations. Below is our JSON file.
Creating a Spot Amazon EC2 instance

After we are done reviewing, we can proceed with the launching by clicking the Launch button as shown below.

Creating a Spot Amazon EC2 instance

Once we select Launch, we can see a notification about the request getting created.

Creating a Spot Amazon EC2 instance

The spot request creation wizard will close, and the page will automatically direct back to the EC2 Dashboard.

You can see as shown below that the State of our request is ‘open’ which means that it is getting evaluated from the AWS’s side. AWS EC2 will check if the required instance is available in its spot pool.

Creating a Spot Amazon EC2 instance

After a couple of minutes, you can see that the state is changed to ‘active’, and now our spot request is successfully fulfilled. You can note the configuration parameters below.

Creating a Spot Amazon EC2 instance

Summary:

Because it is an on-demand server, we can keep it running when in use and ‘Stop’ it when it’s unused to save on your costs.

You can provision a Linux or Windows EC2 instance or from any of the available AMIs in AWS Marketplace based on your choice of OS platform.

We saw how to create a Spot Instance request successfully by determining our bid price.

Spot instances are a great way to save on costs for instances which are not application critical.

AWS EC2

AWS EC2 (Elastic Compute Cloud), which is a cloud computing service offered by Amazon Web Services. EC2 allows you to rent virtual servers in the cloud and run applications on them.

Here are the basic steps to get started with AWS EC2:

  1. Create an AWS Account: If you don’t have an AWS account, go to the AWS website (https://aws.amazon.com/) and sign up for an account. You’ll need to provide your personal and payment information.
  2. Sign in to the AWS Management Console: Once you have your AWS account, sign in to the AWS Management Console using your account credentials.
  3. Launch an EC2 Instance: In the AWS Management Console, navigate to the EC2 service. Click on “Launch Instance” to start the process of creating a virtual server.
  4. Choose an Amazon Machine Image (AMI): An AMI is a template for the root file system of the EC2 instance. Select an AMI that suits your requirements. AWS provides various pre-configured AMIs for different operating systems and applications.
  5. Choose an Instance Type: Instance types determine the hardware of the host computer used for your EC2 instance. Each instance type has different CPU, memory, storage, and networking capacities. Choose an instance type based on your workload requirements.
  6. Configure Instance Details: Configure additional details such as the number of instances you want to launch, network settings, security groups (firewall rules), and other options specific to your use case.
  7. Add Storage: Specify the storage requirements for your EC2 instance. You can choose between different storage options like Amazon EBS (Elastic Block Store) volumes or instance store volumes.
  8. Configure Security Groups: Security groups control inbound and outbound traffic for your EC2 instances. Define rules to allow specific traffic based on protocols, ports, and source/destination IP addresses.
  9. Review and Launch: Review the configuration details you have provided for your EC2 instance. Make any necessary changes, if required, and then launch the instance.
  10. Create a Key Pair: A key pair consists of a public key that is stored on the EC2 instance and a private key that you download. This key pair is used for secure login to your EC2 instance.
  11. Connect to Your EC2 Instance: Once your EC2 instance is launched, you can connect to it using various methods such as SSH (for Linux instances) or Remote Desktop (for Windows instances). Use the private key from the key pair to securely access your instance.
  12. Manage and Monitor Your EC2 Instances: You can perform various actions on your EC2 instances, such as stopping, starting, terminating, or resizing them. You can also monitor the performance of your instances using Amazon CloudWatch and set up alerts for specific metrics.

This tutorial provides a high-level overview of getting started with AWS EC2. There are many additional features and capabilities available, such as load balancing, auto scaling, and integrating with other AWS services, which you can explore based on your specific requirements.

I recommend referring to the official AWS documentation for more in-depth information: https://aws.amazon.com/documentation/ec2/

CSS media queries

CSS media queries are used to apply different styles based on various characteristics of the device or viewport. Media queries allow you to create responsive designs that adapt to different screen sizes, orientations, resolutions, and more.

Here are a few examples of commonly used CSS media queries:

  1. Targeting specific screen widths:
/* Styles applied when the viewport width is 600 pixels or less */
@media (max-width: 600px) {
  /* CSS rules here */
}

/* Styles applied when the viewport width is 768 pixels or more */
@media (min-width: 768px) {
  /* CSS rules here */
}
  1. Targeting specific device orientations:
/* Styles applied when the viewport is in landscape orientation */
@media (orientation: landscape) {
  /* CSS rules here */
}

/* Styles applied when the viewport is in portrait orientation */
@media (orientation: portrait) {
  /* CSS rules here */
}
  1. Targeting high-resolution displays (e.g., Retina displays):
/* Styles applied when the device has a high pixel density */
@media (-webkit-min-device-pixel-ratio: 2),
       (min-resolution: 192dpi) {
  /* CSS rules here */
}
  1. Combining multiple conditions:
/* Styles applied when the viewport width is between 600px and 1024px, and the orientation is landscape */
@media (min-width: 600px) and (max-width: 1024px) and (orientation: landscape) {
  /* CSS rules here */
}

These examples demonstrate different media query conditions that can be used to target specific device characteristics. Media queries allow you to adjust the layout, typography, or any other CSS properties based on the conditions specified, providing a flexible and responsive design for various devices and screen sizes.

It’s important to note that these examples are just a starting point, and you can customize the media queries based on your specific needs and design requirements.

CSS sprites

CSS sprites are a technique used in web development to reduce the number of HTTP requests made to a server when loading images on a webpage.

It involves combining multiple images into a single larger image, called a sprite sheet or sprite image, and then using CSS background positioning to display specific parts of the sprite as individual elements.

Here’s how the process works:

  1. Create a sprite sheet: Combine multiple images into a single larger image. These individual images are usually icons, buttons, or other small graphics that are used throughout the website. The sprite sheet can be created using image editing software like Photoshop or online tools.
  2. Define CSS classes: Each individual image within the sprite sheet is given a CSS class, which defines the background image and position for that specific image. The background image is set to the sprite sheet, and the background position is adjusted to display the desired part of the sprite.
  3. Apply CSS classes: Apply the CSS classes to the appropriate HTML elements on the webpage. The background image will be set to the sprite sheet, and the background position specified in the CSS class will display the correct image from the sprite.

By using CSS sprites, you can reduce the number of HTTP requests required to load multiple images, which can significantly improve the page load time and overall performance of a website. Instead of making separate requests for each image, you only need to load a single image file.

Here’s an example of CSS sprite implementation:

HTML:

htmlCopy code<button class="sprite sprite-icon"></button>

CSS:

.sprite {
  display: inline-block;
  width: 30px;
  height: 30px;
}

.sprite-icon {
  background-image: url('spritesheet.png');
  background-position: -10px -10px; /* Adjust the position to display the desired image */
}

In this example, the sprite sheet file ‘spritesheet.png’ contains multiple icons. The .sprite-icon class is applied to a button element, and it sets the background image to the sprite sheet and adjusts the background position to display the specific icon from the sprite.

Using CSS sprites can be an effective optimization technique for websites that use many small images. It reduces the server load and improves performance by minimizing the number of requests made for separate image files.

CSS Box Model

In CSS, the term “box model” is used when talking about design and layout.

The CSS box model is essentially a box that wraps around every HTML element.

It consists of: margins, borders, padding, and the actual content.

Explanation of the different parts:

  • Content – The content of the box, where text and images appear
  • Padding – Clears an area around the content. The padding is transparent
  • Border – A border that goes around the padding and content
  • Margin – Clears an area outside the border. The margin is transparent

The box model allows us to add a border around elements, and to define space between elements. 

div {
  width: 300px;
  border: 15px solid green;
  padding: 50px;
  margin: 20px;
}

Width and Height of an Element

In order to set the width and height of an element correctly in all browsers, you need to know how the box model works.

Important: When you set the width and height properties of an element with CSS, you just set the width and height of the content area. To calculate the full size of an element, you must also add padding, borders and margins.

Example

This <div> element will have a total width of 350px: 

div {
  width: 320px;
  padding: 10px;
  border: 5px solid gray;
  margin: 0;
}

Here is the calculation:

320px (width)
+ 20px (left + right padding)
+ 10px (left + right border)
+ 0px (left + right margin)
= 350px

The total width of an element should be calculated like this:

Total element width = width + left padding + right padding + left border + right border + left margin + right margin

The total height of an element should be calculated like this:

Total element height = height + top padding + bottom padding + top border + bottom border + top margin + bottom margin

The top 50 HTML questions and answers

The top 50 HTML questions and answers:

Q1. What is HTML?

A1. HTML stands for HyperText Markup Language. It is the standard markup language used for creating web pages and applications on the World Wide Web.

Q2. What are the different versions of HTML?
A2. HTML has evolved over time, and different versions have been released. Some notable versions include HTML5, HTML4, HTML3, and HTML2.

Q3. What is the doctype declaration in HTML?
A3. The doctype declaration is used to specify the version of HTML being used in the document. It is placed at the beginning of an HTML document and helps the browser to render the page correctly.

Q4. What are the basic structure and tags of an HTML document?
A4. The basic structure of an HTML document consists of the HTML opening and closing tags, head tags, and body tags. Example:


<!DOCTYPE html>
<html>
<head>
  <title>Page Title</title>
</head>
<body>
  <!-- Content goes here -->
</body>
</html>


Q5. What is the purpose of the head section in an HTML document?
A5. The head section of an HTML document contains meta-information about the document, such as the title, character encoding, CSS stylesheets, and JavaScript scripts.

Q6. How to add comments in HTML?
A6. Comments in HTML are added using the <!-- --> syntax. Anything within these comment tags will not be rendered by the browser.


<!-- This is a comment -->

Q7. What are HTML elements and tags?
A7. HTML elements are the building blocks of an HTML document, represented by tags. Tags define the structure and content of the elements. For example, the <h1> tag represents a heading element.

Q8. What are the block-level and inline elements in HTML?
A8. Block-level elements start on a new line and take up the full width available, while inline elements occupy only the necessary width and do not start on a new line. Examples of block-level elements are <div>, <p>, and <h1>, while <span> and <a> are inline elements.

Q9. What is the difference between <div> and <span> elements?
A9. The <div> element is a block-level container that is used to group and style larger sections of content, while the <span> element is an inline container used to apply styles to smaller sections of text or elements.

Q10. How to create hyperlinks in HTML?
A10. Hyperlinks, or anchor links, can be created using the <a> tag. The href attribute is used to specify the URL or destination of the link.
<a href="https://www.example.com">Visit Example</a>


Q11. What is the difference between absolute and relative URLs?
A11. Absolute URLs provide the complete address of a resource, including the protocol (http:// or https://), domain, and path. Relative URLs specify the path to a resource relative to the current page's URL.

Q12. How to add images in HTML?
A12. Images can be added using the <img> tag. The src attribute is used to specify the image URL, and the alt attribute provides alternative text for the image.

<img src="image.jpg" alt="Description of the image">


Q13. How to create an unordered list (bullet points) in HTML?
A13. Unordered lists can be created using the <ul> tag, and list items are represented by the <li> tag.


<ul>
  <li>Item 1</li>
  <li>Item 2</li>
  <li>Item 3</li>
</ul>


Q14. How to create an ordered list (numbered list) in HTML?
A14. Ordered lists can be created using the <ol> tag, and list items are represented by the <li> tag.

<ol>
  <li>Item 1</li>
  <li>Item 2</li>
  <li>Item 3</li>
</ol>


Q15. What is the purpose of the <table> tag in HTML?
A15. The <table> tag is used to create tabular data. It contains rows represented by the <tr> tag, and each row contains cells represented by the <td> or <th> tags for data and headers, respectively.


Q16. How to create a form in HTML?
A16. Forms can be created using the <form> tag. Form controls such as input fields, checkboxes, and buttons are added within the form.


<form action="/submit" method="post">
  <label for="name">Name:</label>
  <input type="text" id="name" name="name">
  <input type="submit" value="Submit">
</form>


Q17. What is the purpose of the <input> tag in HTML?
A17. The <input> tag is used to create various form controls such as text fields, checkboxes, radio buttons, and submit buttons. The specific type of control is defined by the type attribute.


Q18. How to add CSS styles to HTML elements?
A18. CSS styles can be added inline using the style attribute or in a separate CSS file linked to the HTML document using the <link> tag or the <style> tag within the <head> section.


Q19. What is the purpose of the <div> element in HTML?
A19. The <div> element is a generic container used to group and style other elements or sections of content. It is commonly used for layout purposes.


Q20. What is semantic HTML?
A20. Semantic HTML refers to using HTML elements that convey meaning and structure to the content, making it more understandable by both humans and search engines. Examples include <header>, <nav>, <section>, and <footer>.


Q21. How to add a background color to an element in HTML?
A21. The background color of an element can be set using the background-color property in CSS.
<div style="background-color: red;">Content with a red background</div>


Q22. What are the different types of heading tags in HTML?
A22. HTML provides six heading tags, <h1> to <h6>, where <h1> represents the highest level of heading and <h6> the lowest level.


Q23. What is the purpose of the <meta> tag in HTML?
A23. The <meta> tag is used to provide metadata about an HTML document, such as the character encoding, description, keywords, and viewport settings.


Q24. How to create a line break in HTML?
A24. Line breaks can be created using the <br> tag. It is a self-closing tag and does not require a closing tag.

This is a line<br>break.

Q25. How to create a hyperlink that opens in a new tab?
A25. To open a hyperlink in a new tab, add the target="_blank" attribute to the <a> tag.
<a href="https://www.example.com" target="_blank">Visit Example</a>


Q26. What is the purpose of the <iframe> tag in HTML?
A26. The <iframe> tag is used to embed another HTML document within the current document. It is commonly used for embedding videos, maps, or other external content.


Q27. How to add a video to an HTML page?
A27. Videos can be added to an HTML page using the <video> tag. The src attribute specifies the video source URL, and additional attributes can be used to control playback and appearance.

<video src="video.mp4" controls></video>


Q28. How to add a CSS class to an HTML element?
A28. The class attribute is used to add a CSS class to an HTML element. CSS classes are defined in a CSS file or within a <style> tag.

<div class="my-class">Content with a CSS class</div>


Q29. What is the purpose of the <span> element in HTML?
A29. The <span> element is an inline container used to apply styles or manipulate specific sections of text or elements within a larger context.


Q30. How to create a dropdown/select list in HTML?
A30. Dropdown/select lists can be created using the <select> tag, and individual options are defined using the <option> tag.

<select>
  <option value="option1">Option 1</option>
  <option value="option2">Option 2</option>
  <option value="option3">Option 3</option>
</select>


Q31. How to make an HTML element clickable?
A31. HTML elements can be made clickable by wrapping them in an <a> tag and adding an href attribute with a valid URL or using JavaScript event handlers.


Q32. What is the purpose of the <label> tag in HTML?
A32. The <label> tag is used to associate a label with a form control, providing a textual description or name for the control. It improves accessibility and usability.


Q33. How to set a default value for an input field in HTML?
A33. The value attribute is used to set a default value for an input field. The value is pre-filled when the page loads.

<input type="text" value="Default Value">


Q34. What is the purpose of the <nav> element in HTML?
A34. The <nav> element is used to define a section of navigation links within an HTML document. It is typically placed in the header or footer section of a web page.


Q35. How to create a responsive website in HTML?
A35. A responsive website can be created using CSS media queries, which adapt the layout and styles based on the screen size and device. Using a mobile-first approach and flexible units like percentages can also help in responsiveness.


Q36. What is the purpose of the <fieldset> and <legend> tags in HTML?
A36. The <fieldset> tag is used to group related form elements, and the <legend> tag provides a caption or description for the fieldset.


Q37. How to create a tooltip in HTML?
A37. Tooltips can be created using the title attribute, which displays a tooltip when the user hovers over the element.

<button title="This is a tooltip">Hover Me</button>
Q38. How to disable an input field in HTML?
A38. The disabled attribute can be added to an input field to disable it. The field will be grayed out and the user cannot interact with it.

<input type="text" disabled>


Q39. What is the purpose of the <strong> and <em> tags in HTML?
A39. The <strong> tag is used to indicate important or emphasized text, while the <em> tag is used to emphasize or highlight text.


Q40. How to create a responsive image in HTML?
A40. Responsive images can be created using CSS by setting the max-width property to 100%. This ensures that the image scales proportionally based on the container size.


Q41. How to add a favicon to an HTML page?
A41. A favicon, or shortcut icon, can be added to an HTML page by placing a .ico or .png image file in the root directory of the website and adding a <link> tag in the <head> section.


<link rel="icon" href="favicon.ico" type="image/x-icon">


Q42. What is the purpose of the <aside> element in HTML?
A42. The <aside> element is used to represent content that is tangentially related to the main content of the document. It is typically used for sidebars, pull quotes, or advertising.


Q43. How to create a responsive navbar/menu in HTML?
A43. A responsive navbar/menu can be created using HTML for the structure and CSS for styling. CSS techniques like flexbox or grid layout can be used to achieve responsiveness.


Q44. What is the purpose of the <audio> tag in HTML?
A44. The <audio> tag is used to embed audio content, such as music or podcasts, in an HTML document. The src attribute specifies the audio file URL, and additional attributes control playback.


Q45. How to create a progress bar in HTML?
A45. Progress bars can be created using the <progress> tag. The value and max attributes are used to define the current progress and the maximum value.

<progress value="50" max="100"></progress>


Q46. What is the purpose of the <abbr> tag in HTML?
A46. The <abbr> tag is used to mark up abbreviated or acronym text in an HTML document. The title attribute is used to provide the full description or expansion of the abbreviation.


Q47. How to create a sticky/fixed header in HTML?
A47. A sticky or fixed header can be created using CSS by setting the position property of the header to fixed and adjusting other styles as needed.


Q48. What is the purpose of the <canvas> element in HTML?
A48. The <canvas> element is used to draw graphics, animations, or other visual effects using JavaScript. It provides a drawing surface on which to render dynamic content.


Q49. How to embed a YouTube video in HTML?
A49. YouTube videos can be embedded in HTML using the <iframe> tag and the YouTube video URL as the src attribute.

<iframe width="560" height="315" src="https://www.youtube.com/embed/video_id" frameborder="0" allowfullscreen></iframe>


Q50. What is the purpose of the <datalist> tag in HTML?
A50. The <datalist> tag is used to provide a list of predefined options for an input field. It is used in conjunction with the <input> tag and the list attribute to create autocomplete or suggestion functionality.